Or should this be "Cream Cheese for Dummies"? Hmmmm... nah, then I'd be insulting a very smart lady in Squarebanks working on her PHD with classes like Ice Physics and the like.
This recipe is basically a "How to make curds without rennet and then what to do with the curds", nothing fancy. And the next day you'll be enjoying wonderful cream cheese with chives and smoked salmon on your bagel. Aren't I nice?
BTW, does it surprise you that a bloke who makes his own Worchestershire Sauce also makes his own cream cheese? No, doesn't surprise me either.
This is kinda a variation on curds for cottage cheese, but instead of using buttermilk to separate the curds, I use lemon juice. See, when you use buttermilk and milk --1 part buttermilk to 4 parts regular milk-- you have to be very careful with the temp kept at 82 C or 180 F. With lemon juice you don't have to be so careful, and you don't need nearly as much lemon juice as you would buttermilk.
Notes: when making anything cheesy, make sure you use stainless steel. No aluminium, no teflon coatings. Also, I use full cream milk powder, much cheaper that way. And keep the whey as it makes a great soup base. You can easily sterilise your cloth for the curds by tossing it in boiling water for a minute.
What you need to make 1 and 1/2 pounds of really good cream cheese:
1 gallon (about 4 litres) of whole milk
1/4 cup lemon juice (doesn't need to be exact)
1 bit of sea salt
Isn't that simple!!!! There's a few non-food items you'll also need:
Large thick-bottomed stainless steel pot
A stainless steel slotted flat spatula (you'll find good ones in the barbecue section of your local outdoors shop)
A strainer (metal mesh)
Large hankerchief (cleaned and sterilised) OR a chex cloth (cleaned and sterilised) OR cheesecloth (cleaned and sterilised)
One of them clip on cooking thermometer type thingies (if you aren't good at estimating temp of simmering milk)
Some kind of heat source (I recommend a stovetop, but if you are camping then a campfire will do)
What you do:
Put the milk in your pot. Turn the heat on LOW. As the milk heats, stir it regularly with the spatula making sure to scrap the bottom so the milk doesn't burn to the base of the pot. When the milk gets to 70 to 80 C (158 to 176 F) add the lemon juice. Amazingly enough, curds will start to form! WOW! Just like your magic kit you had as a kid!
Stir with the spatula and MAKE SURE YOU SCRAP THE BOTTOM so the curds don't stick to the bottom of the pot. After a minute of stirring, turn the heat off. The curds will continue to form, no worries.
Let it cool for 10 to 15 minutes. Scrap the bottom of the pot with the spatula so no curds stick to the pot.
Line your strainer with your chex cloth (or whatever you are using) and strain the curds over a bowl (or your soup pot if you are making soup that day and need the whey).
************************************************************************************
Hmmmm, the whey... If you aren't making soup that day or the next, then put the whey in a freezerable container. I've frozen whey before and it still makes a good soup base. Remember to let the whey cool to room temp before freezing, of course.
Or you can just drink the whey! It's very tasty, trust me.
************************************************************************************
So what to do with the curds in the cloth lined strainer? Simple, bring the corners of the cloth together and tie them up tight. Then tie two corners of the cloth over your faucet in the kitchen sink. Let it drain overnight.
Obviously, don't run the faucet while the curds are hanging there!
The next day...
Plop the drained curds into a bowl. Add a couple pinches of sea salt. Mix it all together with a spoon, and beat the mix with the spoon until it's creamy.
TA-DA!
You now have about a pound and a half of cream cheese that'll keep in your fridge for a week.
Now comes the fun part: THE TASTY ADDITIONS!
At this point I'll usually divide it into four smaller bowls, and add flavourings to each bowl. Perhaps I'll mince up some smoked salmon and add that to a bowl of the creamy goodness. Maybe minced chives in another. Minced fresh tomatoes are always good. So's fresh chopped basil leaves. Minced onion? Why not! Heck, use your imagination! Mix 'n' match!
There's quite a lot of other things to do with the curds and you don't even need a cheese hoop! BTW, it's easy to make your own cheese hoop from a can...
I know many of you from my other blog were expecting something like SHISHKABOB KANGAROO BALLS, but don't worry cus that's coming soon to a theatre near you.
Friday, November 28, 2008
Tuesday, November 18, 2008
Cheese, Cheese, Glorious Cheese!
Ah, yes. That wonderful concoction starting with the most basic food... Milk. Why do I consider Milk the most basic food? Cus that's what all mammals start eating! Can't get no more basic than that.
I'll be delving into the history of cheese; myth, legend, fact, guess, etc, in future Cheese posts. I'll also talk about some of the basic tekneeks for making different types of cheeses.
BTW, are you lactose intolerant? No worries, in about a month you can eat cheese and drink milk, not a problem. Heck, it's all about restarting your body's own natural production of lactase which swtiched off when you stopped eating/drinking/consuming lactose as an infant.
I thought that a good way to start off a cheese series would be to list the different kinds of cheeses there are. Well... that would take a long while. So what I've done is pared down the list so it doesn't include variations of the original. It also doesn't include regional knock-offs of other types of cheese.
Some quick examples of what's not on the list:
You won't see Fontal, Fontinella or Fantina on the list as they are all imitations of the original Fontina cheese.
You also won't see Wisconsin Cheddar listed, nor any other type of Cheddar produced away from the Cheddar Gorge on the outskirts of Somerset. Why? Well, it's not that I'm being a snob, but why list all the different types of Cheddar made around the world when the original will do. Why does the original listing work for all the other types? Cus they are all made from the same process. See, if somebody in Wisconsin or New Zealand makes a cheese using the identical process as Cheddar Cheese, then why add a new listing?
However, American Cheddar is listed as the process to make it is different from the original Cheddar.
I've also not listed some variations of an original cheese if the variation is made in the same place. For instance, Peneteleu Cheese is not listed as it's made in the same area and the same process as Kaskaval Cheese.
Heck, France alone claims over 500 different types of cheeses. However, many of them are variations of an original type. So why list them all?
You may notice Monterey Cheese, but not Monterey Jack, nor Jack Cheese. Why not? They are all made in the same place (Monterey Valley, California, USA) from the same process and just marketed differently.
See? Easy!
Hey, that's my logic and I'm sticking to it. Besides, this is my food blog and I can post what I want; it's up to you if you want to read it or not.
Alrighty, here's THE LIST.
Abertam
Agrafa
Aisy, cendre de
Alemtejo
Allguaer Rundkase
Alpin
Altenburger
Ambert
American Cheddar
American Cheese
Ancien Imperial
Appenzeller
Appetitost
Armavir
Asiago
Asin
Backsteiner
Bagozzo
Baker's Cheese
Banbury
Barbarey
Battlemat
Bellelay
Bel Paese
Bergkase
Bergquara
Bernarde
Bgug-Panir
Bitto
Blue Cheese
Blue Dorset
Borelli
Boudanne
Bourgain
Box Cheese
Brickbat
Broccio
Burgundy
Butterkase
Buttermilk Cheese
Buttiri
Cabecou
Cabrales
Cabriero
Cabrion
Cachat
Caciocavallo
Cacio Fiore
Caerphilly
Calcagno
Cambridge
Camembert
Camosun
Canquillote
Cardiga
Carre
Carre de l'Est
Carrowgarry
Casigiolu
Casette
Cebrero
Certosina
Chabichon
Champenois
Champoleon
Chantelle
Chaource
Charolles
Chascol
Cheddar
Cheshire
Cheshire-Stilton
Chevret
Chevrotins
Chhana
Chiavari
Christalinna
Christian IX
Cincho
Citeaux
Clonevan
Colby
Coldpack
Commission
Comte
Cooked Cheese
Coon
Cornhusker
Cotherstone
Cotronese
Cottage Cheese
Cream Cheese
Creole
Crescenza
Creuse
Damen
Danish Export
Delft
Derby
Devonshire Cream Cheese
Domiati
Dorset
Dotter
Duel
Dunlop
Edam
Egg Cheese
Emiliano
Engadine
Epoisse
Eriwani
Ervy
Farm Cheese
Feta
Filled
Fiore Sardo
Flotost
Flower Cheese
Foggiano
Fontina
Forez
Formagelle
Formaggini di Lecco
Formaggini di Montpellier
Formaggio di Pasta Filata
Fresa
Fribourg
Frisian Clove
Fromage a la Creme
Fromage Fort
Fruhstuck
Gaiskasli
Gammelost
Gasperon
Gautrias
Gavot
Geheimrath
Gerome
Gervaise
Getmesost
Gex
Gislev
Gjetost
Glumse
Goat's Milk
Gorgonzola
Gouda
Gournay
Goya
Grana
Gray Cheese
Gussing
Hand Cheese
Harzkase
Hauskase
Havarti
Hay Cheese
Herve
Holstein
Holstein Skim-Milk
Hop Cheese
Hvid Gjetost
Ilha
Isigny
Island of Orleans
Jochberg
Josephine
Kajamak
Kareish
Karut
Kaskaval
Kassir
Katschkawalj
Kefalotyri
Kjarsgaard
Klevovaca
Kloster
Kopanisti
Koppen
Kosher Cheese
Krutt
Kubacher
Kuminost
Lancashire
Langres
Lapland
Leicester
Lescin
Leyden
Liederkranz
Limburger
Liptauer
Livarot
Loaf
Lodigiano
Lombardo
Lorraine
Maconnais
Macqueline
Maile
Mainauer
Mainzer Hand
Malakoff
Manteca
Maquee
Marches
Marienhofer
Markish Hand
Marolles
Mecklenburg Skim
Melun
Mesitra
Mignot
Milano
Mintzithra
Mitsithra
Moliterno
Moncensio
Mondseer Schachtelkase
Monostorer
Montasio
Montavoner
Mont Cenis
Mont d'Or
Monterey
Monthery
Mozzarinelli
Mozzarella
Munster
Nageles
Nessel
Neufchatel
Noekkelost
Nostrale
Oka
Old Heidelberg
Olivet
Olmutzer Quagrel
Oschtjepek
Ossetin
Ovar
Ovcji Sir
Paglia
Pago
Panedda
Parencia
Parmesan
Parmigiano
Patagras
Pecorino
Pepato
Petit Suisse
Pfister
Pickled Cheese
Pineapple Cheese
Piora
Pont l'Eveque
Port du Salut
Potato Cheese
Prato
Prattigau
Pretost
Primula
Process Cheese
Provatura
Providence
Provole
Provolone
Pultost
Quacheg
Quartirolo
Quesa anejo
Queso Blanco
Queso de Bola
Queso de Cincho
Queso de Crema
Queso de Hoja
Queso de la Tierra
Queso del Pais
Queso de Prensa
Queso Fresca
Rabacal
Radener
Radolfzeller Cream Cheese
Rangiport
Raviggiolo
Rayon Cheese
Reblochon
Red Cheese
Reindeer Cheese
Requeijao
Ricotta
Rinnen
Riola
Robbiole
Rocamadur
Roll Cheese
Rollot
Romadur
Romanello
Romano
Roncal
Roquefort
Royal Brabant
Runestan
Saanen
Sage Cheese
St. Benoit
St. Claude
St. Marcellin
St. Stephano
Salamano
Salame Cheese
Samsoe
Sandwich Nut
Sapsago
Sardo
Sarrazin
Sassenage
Sbrinz
Scamorze
Scanno
Schamser
Schleische Sauermilchkase
Schlosskase
Schottenseid
Schutzenkase
Schwarzenberger
Senecterre
Septmoncel
Serra da Estrela
Silesian Cheese
Siraz
Sirene
Sir Iz Mjesine
Sir Mastny
Sir Posny
Slipcote
Spiced Cheese
Spitzkase
Steinbuscher
Steppe
Stilton
Stracchino
Styria
Surati
Sveciaost
Taleggio
Tamie
Tanzenburger
Teleme
Texel
Thenay
Tibet Cheese
Tignard
Tomme
Topfkase
Toscanello
Toureg
Touloumisio
Trappist Cheese
Travnik
Treccia
Trouville
Tschil
Twdr Sir
Tworog
Tybo
Uri
Urseren
Vacherin
Vendome
Veneto
Villiers
Vize
Washed Curd Cheese
Weisslacker
Wensleydale
Werder
West Frisian
Westpahlian Sour Milk Cheese
White Cheese
Wilstermarsch
Wiltshire
Withania
Yogurt Cheese
Ziegel
Ziger
Zomma
Saturday, November 15, 2008
Prawn-Flavoured Miso and Seaweed Soup
Ever done any cooking with prawns (shrimp)? Ever had to shell them? Did you ever wonder what you could do with the "heads" and the rest of the shells besides chucking them in the bin? Well, you are about to find out what you can do with them.
This easy and tasty soup makes a great side dish to whatever you are doing with the shrimp (prawn) meat for the main course.
Here's what you need:
Prawn (shrimp) shells and heads from about 1 pound of shrimp (prawn)
1 or 2 tbsp light miso paste
1 or 2 sheets of yaki-nori seaweed (the kind you make sushi rolls with)
8 to 10 cups of water
a large saucepan
a heat source
There's some optional stuff, like shitake shrooms, chillis, or some of the prawn meat, but the above will give you a very nice, refreshing soup. Oh, the light miso paste refers to the color and has nothing to do with reducing calories.
What you do:
Dump the prawn shells and heads into your saucepan along with the water. Crank up the heat source, cover and simmer till the liquid is reduced by around half. This'll take anywhere between 30 mins (minutes) and an hour (3,600 seconds).
Remove from heat. Take a potato masher and mash the shells (while still in the broth) to extract every last bit of prawny goodness from them. Strain to get rid of the shells. Put the strained broth back in the saucepan and add the miso paste. Put it back on the heat to bring it up to a simmer.
A couple of minutes (a few hundred seconds) before serving, shred the seaweed sheets into the soup. Let it stand for a minute.
Serve it up!
Tasty, simple, healthy!
Makes about a litre. If you want more soup, then use more water initially.
If you are using dried shitakes, try reconstituting them in half water and half dry sherry --it'll take an hour or so depending on how dry they are (if they've been in your pantry for a few years it'll take a long soak). And add the reconstipated shitakes to the soup the same time as the miso.
Tuesday, November 11, 2008
Holiday Feast 2008/2009
Before I begin typing in this years menu, let me tell you that this is to feed the brood from dec 23rd to Jan 3rd. Yes, life pretty much comes to a halt for 2 weeks down unda.
Now, I still haven't decided what's gonna be served on which day, and there'll be a couple of days of leftovers spaced throughout. I also reserve the right to add any menu item I want to. Hmmmph!
Please note, with the exception of the Christmas fruitcakes and the puddings that have been in the pantry for 6 years, pretty much everything is made from scratch. No, I don't go out and milk the cow's for the cream... you know what I mean!
At this point there is no particular order, or rhyme or reason to anything; I'm just jotting down the stuff that I plan to prepare.
Holiday Feast 2008/2009 Menu
Peanut Butter Cheesecake with hot fudge sauce (does this surprise you?)
2 Christmas fruitcakes
2 Roast chooks with all the fixin's --that includes stuffing, gravy, spuds, etc
Dave's Polynesian Pork Roast --yes, it's wrapped in banana leaves and slow roasted
Souvlaki chicken with tabouli and tzatziki
BBQ Roo burgers
Teriyaki Roo burgers
Dave's extra special chips
Homemade pizza
Grilled Basa fillets
Homemade crumpets and cream
Charlotte Rouse (you'll love it, I'll put up pics of the process)
Potato Salad
Coleslaw
Candied Sweet Potato with marshmallow and cherry topping
Waldorf salad --with mom's special dressing
Herbed, baked spuds
Pineapple glazed ham
Herbed, baked pumpkin
Roasted pumpkin seeds
Mexican buffet with all the fixin's (let your imagination run wild on this)
At least 2 sushi platters
Various chocolates
Hummus
Many salsas
Banana jam
Pineapple sherbet
Pineapple topping
Pineapple tarts
Pineapple Coconut pie
Pineapple meringue pie
Chocolate mint Chocolate chip ice cream made with fresh choc mint from the garden
2 Xmas puddings
Fresh plate of homemade dolmades
Pitcher (or 4) of margaritas
case of Cascade's
case of Boag's
Strawberries and cream
Champagne and strawberries
A few cases of vino
Apples and bleu cheese
some champagne
Devonshire Cream Tea --made from homemade scones, fresh whipped cream, and fresh picked strawberries.
I'm sure I've left something out, but you kinda get the idea... If I don't gain 15 pounds this year then I'll consider this holiday wasted!
Sunday, November 9, 2008
Quick and Easy Dinner Rolls
I have a confession to make... I make all our bread. Loaves for sandwiches and toast, pizza dough, foccacia, bruschetta, dinner rolls, cheesebread, zucchini bread, corn bread, etc. The confession is: I now use a bread machine for the dough!
I know, I know... Sacrilege! Blasphemer!
Well, does it help that the batter breads are still made in a bowl? So's the corn bread. So's the biscuit dough. Even the doughs made in the bread machine are also still rolled out and shaped by hand! Heck, even my homemade pasta (no pasta maker, just a rolling pin and really strong forearms --no carpal tunnel yet!) is completely from scratch!
OT how many guys do you know that actually make their own ravioli?
And I do toss and twirl the pizza bases to shape them! Oops, SPLAT, there's another mess on the floor to clean up...
So, can you, like, maybe, sorta forgive me for using the bread machine for the dough? Pretty please?
So, here's my standard recipe white bread and rolls. It all gets chucked into the bread maker on it's "dough" setting. If you're making it by hand I'm sure you'll figure out how to make it since you've obviously made dough before. If you've never made dough by hand and don't have bread (dough) maker, then I'll put some instructions up for ya, no worries.
BTW, I use the bread machine for dough cus I'm making at least a loaf everyday. And today I'll be making pizza dough in it along with a loaf of rye. It really just saves boatloads of time.
Dingo Dave's Quick and Easy Dinner Rolls:
What you need:
375 mls water (that's about 1 1/2 cups)
2 tbsp raw sugar (that's about 2 tbsp)
1 tsp of sea salt (or somewhere close to that)
3 tbsp olive oil (yes, it must be olive oil)
4 1/3 cups high quality flour (at least 10.9% protein)
2 tsp dried yeast
What you do:
If you have a bread machine, then chuck it all in your bread pan (don't forget the paddle!!!) and set it to your "dough" setting. Should take about 90 mins (minutes).
If you wanna make the dough by hand...
Warm the water slightly and add the sugar and the yeast. Let the yeast "proof" for ten mins (it'll "foof" on the top of the water). Sift the flour and salt into a large bowl. Add the proofed yeast mix and the olive oil. Mix well. Turn the dough out onto a lightly floured surface and knead 8 or ten times. Remember: when kneading bread dough, only use the "heels" of your hand, DON'T dig your fingers into the dough.
Put the dough into a lightly oiled bowl, cover the top of the bowl with a damp, warm towel, and let rise in a warm place for an hour (turn your oven on for a minute, then turn it off: instant warm place!).
After an hour, the dough should have doubled in size. Punch the dough down and then turn it onto a floured board.
SEE? Wasn't the bread machine way so much easier????
BTW, remember I'm not too worried about how my food pics looks, they are more to give you the general idea. Besides, I'm usually way too busy in the kitchen to get good food pics. Unlike my parrot pics, of course.
Anyways, no matter how you make the dough, here's what it'll look like after you take it out of the bread maker or take it out of the bowl:

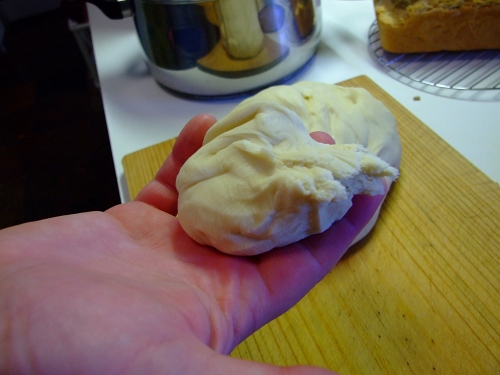
Please note this morning's loaf on the bread rack and tonight's chicken soup stock in the large pot.
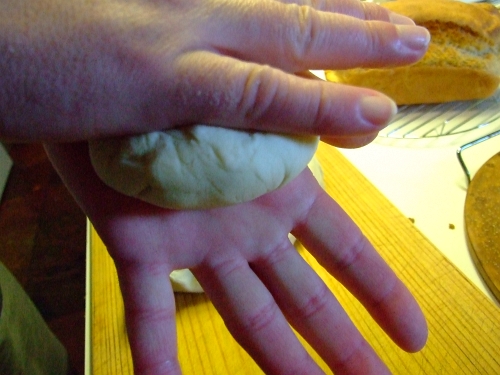
Grab a small hunk of the dough, about this size:
Please note, this size is for dinner rolls with the soup. When I make burger rolls for the kangaroo burgers I'll make em a bit larger.
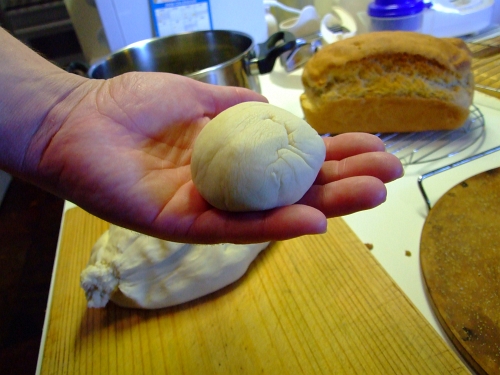
Give it a quick roll between your palms:
And it'll look like this:
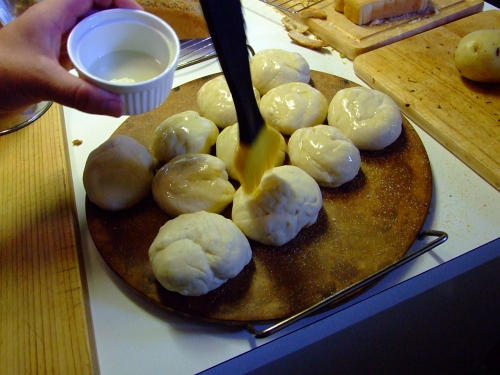
I cook mine on one of my pizza stones. Just sprinkle a bit of polenta (or corn meal if you are in North America) on the stone so the rolls don't stick. Put the first one in the centre (center):
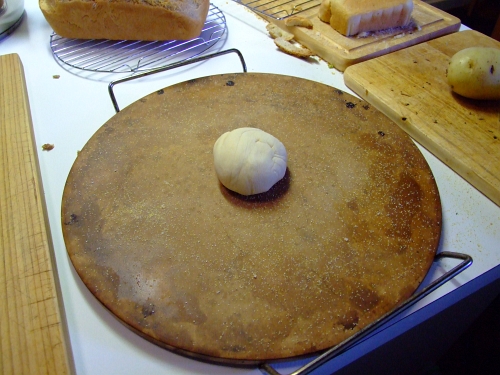
Note, that's not crumbs on the pizza stone, it's polenta. Also, the potato is to be diced up and tossed in the soup. The end of the bread is for bread crumbs.
Load up the pizza stone with the rest of the rolls:

Note the amount of space left between the rolls
Now get a brush, some olive oil and a bowl
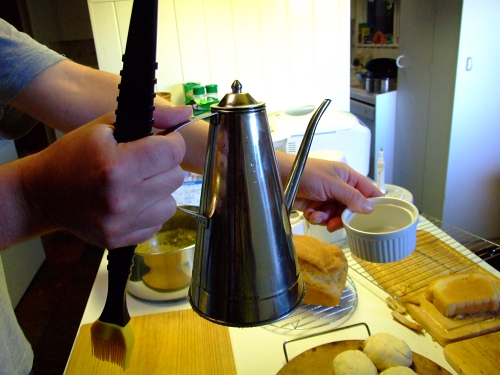
Brush, brush, brush...
Pop that sucker in an oven at 180 C (around 360 F) fan forced, or 200 C (395-400 F) if not fan forced. 20 to 25 mins.
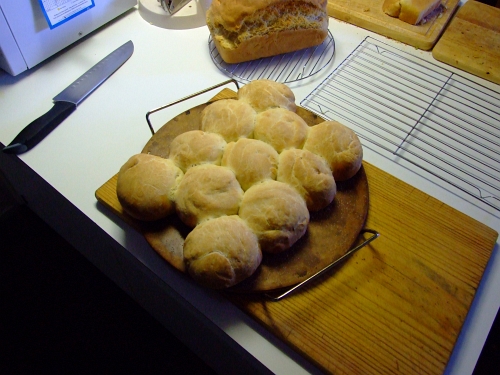
When they come out they'll look like this:
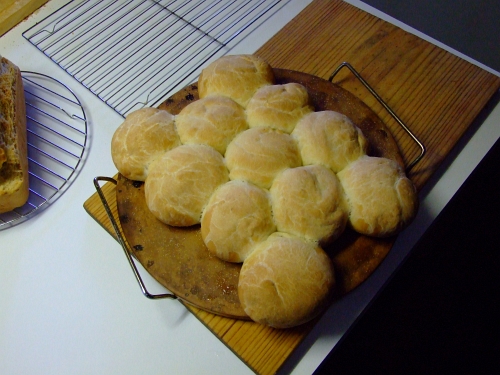
And here's another view:
Please notice that I diced up the spud, seared the pieces in a wok with some olive oil and flour, and added it to the chicken soup while the rolls were cooking.
After about five mins, pull the rolls apart and let them cool on a rack. If you've left them in the oven too long and the tops are too crispy, then after about 20 mins of cooling put them in a plastic bag. The rest of the steam will soften the tops and they'll still be perfect.
Remember, if you are gonna use them for roo burgers, instead of rolling them out to 11 or 12 rolls, you'll want 6 or 7 ro
I know, I know... Sacrilege! Blasphemer!
Well, does it help that the batter breads are still made in a bowl? So's the corn bread. So's the biscuit dough. Even the doughs made in the bread machine are also still rolled out and shaped by hand! Heck, even my homemade pasta (no pasta maker, just a rolling pin and really strong forearms --no carpal tunnel yet!) is completely from scratch!
OT how many guys do you know that actually make their own ravioli?
And I do toss and twirl the pizza bases to shape them! Oops, SPLAT, there's another mess on the floor to clean up...
So, can you, like, maybe, sorta forgive me for using the bread machine for the dough? Pretty please?
So, here's my standard recipe white bread and rolls. It all gets chucked into the bread maker on it's "dough" setting. If you're making it by hand I'm sure you'll figure out how to make it since you've obviously made dough before. If you've never made dough by hand and don't have bread (dough) maker, then I'll put some instructions up for ya, no worries.
BTW, I use the bread machine for dough cus I'm making at least a loaf everyday. And today I'll be making pizza dough in it along with a loaf of rye. It really just saves boatloads of time.
Dingo Dave's Quick and Easy Dinner Rolls:
What you need:
375 mls water (that's about 1 1/2 cups)
2 tbsp raw sugar (that's about 2 tbsp)
1 tsp of sea salt (or somewhere close to that)
3 tbsp olive oil (yes, it must be olive oil)
4 1/3 cups high quality flour (at least 10.9% protein)
2 tsp dried yeast
What you do:
If you have a bread machine, then chuck it all in your bread pan (don't forget the paddle!!!) and set it to your "dough" setting. Should take about 90 mins (minutes).
If you wanna make the dough by hand...
Warm the water slightly and add the sugar and the yeast. Let the yeast "proof" for ten mins (it'll "foof" on the top of the water). Sift the flour and salt into a large bowl. Add the proofed yeast mix and the olive oil. Mix well. Turn the dough out onto a lightly floured surface and knead 8 or ten times. Remember: when kneading bread dough, only use the "heels" of your hand, DON'T dig your fingers into the dough.
Put the dough into a lightly oiled bowl, cover the top of the bowl with a damp, warm towel, and let rise in a warm place for an hour (turn your oven on for a minute, then turn it off: instant warm place!).
After an hour, the dough should have doubled in size. Punch the dough down and then turn it onto a floured board.
SEE? Wasn't the bread machine way so much easier????
BTW, remember I'm not too worried about how my food pics looks, they are more to give you the general idea. Besides, I'm usually way too busy in the kitchen to get good food pics. Unlike my parrot pics, of course.
Anyways, no matter how you make the dough, here's what it'll look like after you take it out of the bread maker or take it out of the bowl:
Please note this morning's loaf on the bread rack and tonight's chicken soup stock in the large pot.
Grab a small hunk of the dough, about this size:
Please note, this size is for dinner rolls with the soup. When I make burger rolls for the kangaroo burgers I'll make em a bit larger.
Give it a quick roll between your palms:
And it'll look like this:
I cook mine on one of my pizza stones. Just sprinkle a bit of polenta (or corn meal if you are in North America) on the stone so the rolls don't stick. Put the first one in the centre (center):
Note, that's not crumbs on the pizza stone, it's polenta. Also, the potato is to be diced up and tossed in the soup. The end of the bread is for bread crumbs.
Load up the pizza stone with the rest of the rolls:
Note the amount of space left between the rolls
Now get a brush, some olive oil and a bowl
Brush, brush, brush...
Pop that sucker in an oven at 180 C (around 360 F) fan forced, or 200 C (395-400 F) if not fan forced. 20 to 25 mins.
When they come out they'll look like this:
And here's another view:
Please notice that I diced up the spud, seared the pieces in a wok with some olive oil and flour, and added it to the chicken soup while the rolls were cooking.
After about five mins, pull the rolls apart and let them cool on a rack. If you've left them in the oven too long and the tops are too crispy, then after about 20 mins of cooling put them in a plastic bag. The rest of the steam will soften the tops and they'll still be perfect.
Remember, if you are gonna use them for roo burgers, instead of rolling them out to 11 or 12 rolls, you'll want 6 or 7 ro
Monday, November 3, 2008
Whipped Cream Strawberry Chocolate Strawberry Biscuit Cake
Whew! With a title like that I should win some searches, I tells ya! *wink*
Before I begin, I have a question I'd like to ask: Is anyone on a diet? If you answered "yes, jerk, I am on a diet" then this just may not be quite the thing for you at this point in time. Unless you're way up in the cold arctic, and then it's ok. We all know you need loads of calories just to stay warm, let alone jogging, skijoring and mushing with the huskies in an Interior winter.
DISCLAIMER:I do not profess to take good food pictures. The food looks way better than is depicted from my lame, indoor photo skills. I do, however, take really really good outdoor parrot pics so have a look at my other blog if you wanna see good pics... cus you won't see 'em 'ere!
First, you need to make the biscuit dough (and cook it). You don't want it to be too flaky, so for this I use softened butter instead of cold butter or even *gasp* shortening.
Biscuit dough
2 cups flour
1 tbsp raw sugar
4 tsp baking powder
1 tsp sea salt
1/2 cup SOFTENED butter
2/3 cups of milk with one egg beaten into the milk
To make the biscuit
This is easy. Add the first 4 ingredients to a bowl. Mix it together. Plop in the softened butter (it's easy to soften butter in Aus; just leave it on the counter for a bit) and mash it all together with the tines of a fork. Pour in the milk/egg mixture and stir together with a wooden spoon.
The dough will seem a bit sticky, that's ok. Turn it out onto a well floured surface and knead it a few times till it's not a soft and not sticky anymore. Take half the dough and form it into a round about 6 inches in diameter. Do the same with the other half. Stack one on top of the other and toss it in an oven. 375 for 25 to 30 mins should do the trick.
The two halves will separate easily when you take them out of the oven. Note: if it's not done when you pull the halves apart, just put them back together and back in the oven for a few more mins, no worries.
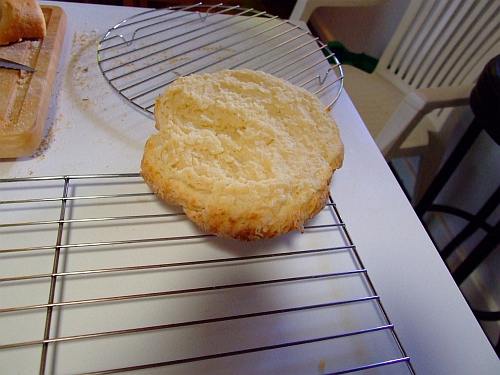
Once it's done, take it out of the oven, pop the top and bottom apart and let them cool. Why, look! Here's the top half cooling:
While the top and bottom are cooling, you get to make your whipped cream.
What you need:
450 mls whipping cream (1 2/3 cups)
2 to 3 tbsp raw sugar
What you do:
Combine the two ingredients in a bowl. Get out your electric mixer and beat the heck out of it till it's whipped. Takes about 5 mins. If you cheat and get a can of that spray cream not only will you be missing out on some great flavors, but you'll also be putting an obscene amount of gunk into you.
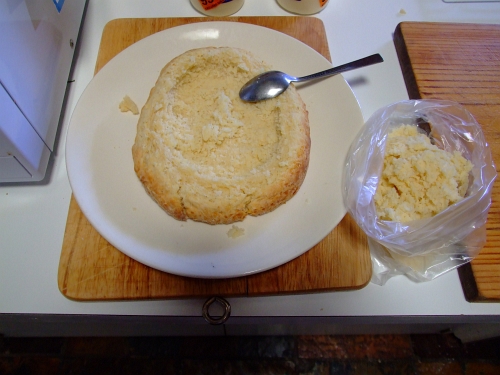
Once your cream in whipped, you get to hollow out the top and bottom. Just use a small spoon and start scrapping. Little bit at a time now... what's done can't be undone, ya know!
Here's the bottom scrapped:
Notice the bag with the scrapped stuff in it? Yeah, KEEP IT! It freezes nicely, no worries. The next time you are making stuffing you'll be thankfull you kept it...
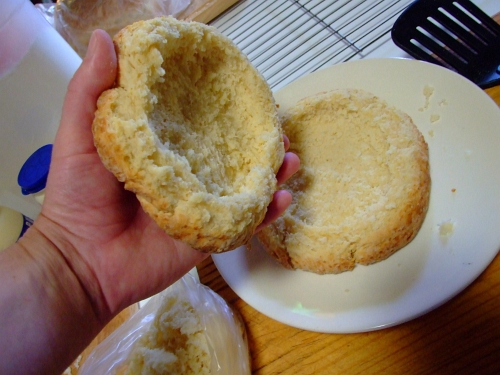
Here's both bottom and top hollowed out:
Spoon the cream in both halves:
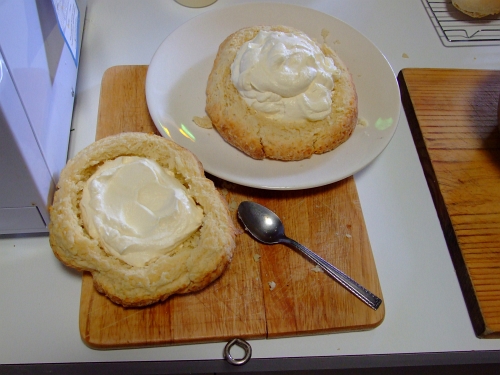
Slice up four or five fresh strawberries. Layer them in the cream of the bottom half:
Top now goes on TOP of the bottom:
Got 3 mins? Good, time to make the chocolate sauce.
What you need
200 grams dark cooking chocolate
2 or 3 tbsp butter
100 mls (1/3 cup) cream
What you do
Put it all in a saucepan. Low heat. Whisking consantly. A couple of mins later you've got chocolate sauce!
Now let it cool for 15 or 20 mins. Go read a book... I'll be here when you get back.
.
.
.
.
.
.
Ok, sauce is cool but still pourable? Right? Right! It should look something like this:

So pour the sauce on! Here's what it'll look like now:
Get some more fresh strawberries. 5 or 6 should be fine. Slice em up. Put the strawberries on the top and around the sides of the cake.
But wait! Oh no! I didn't let the chocolate sauce cool enough before I put the strawberries on! Gaaaaackkkk! Sliding strawberries:
I did put everything in the fridge to set after I put the strawberry slices on, should had it in the fridge for about five mins and THEN put the slices on...
I'm a failure...
But hey, it'll still taste good!
Almost forgot; you'll have a bit of whipped cream left over. So when you slice this sucker, just put a dollup of the leftover whipped cream on, no worries.
Before I begin, I have a question I'd like to ask: Is anyone on a diet? If you answered "yes, jerk, I am on a diet" then this just may not be quite the thing for you at this point in time. Unless you're way up in the cold arctic, and then it's ok. We all know you need loads of calories just to stay warm, let alone jogging, skijoring and mushing with the huskies in an Interior winter.
DISCLAIMER:I do not profess to take good food pictures. The food looks way better than is depicted from my lame, indoor photo skills. I do, however, take really really good outdoor parrot pics so have a look at my other blog if you wanna see good pics... cus you won't see 'em 'ere!
First, you need to make the biscuit dough (and cook it). You don't want it to be too flaky, so for this I use softened butter instead of cold butter or even *gasp* shortening.
Biscuit dough
2 cups flour
1 tbsp raw sugar
4 tsp baking powder
1 tsp sea salt
1/2 cup SOFTENED butter
2/3 cups of milk with one egg beaten into the milk
To make the biscuit
This is easy. Add the first 4 ingredients to a bowl. Mix it together. Plop in the softened butter (it's easy to soften butter in Aus; just leave it on the counter for a bit) and mash it all together with the tines of a fork. Pour in the milk/egg mixture and stir together with a wooden spoon.
The dough will seem a bit sticky, that's ok. Turn it out onto a well floured surface and knead it a few times till it's not a soft and not sticky anymore. Take half the dough and form it into a round about 6 inches in diameter. Do the same with the other half. Stack one on top of the other and toss it in an oven. 375 for 25 to 30 mins should do the trick.
The two halves will separate easily when you take them out of the oven. Note: if it's not done when you pull the halves apart, just put them back together and back in the oven for a few more mins, no worries.
Once it's done, take it out of the oven, pop the top and bottom apart and let them cool. Why, look! Here's the top half cooling:
While the top and bottom are cooling, you get to make your whipped cream.
What you need:
450 mls whipping cream (1 2/3 cups)
2 to 3 tbsp raw sugar
What you do:
Combine the two ingredients in a bowl. Get out your electric mixer and beat the heck out of it till it's whipped. Takes about 5 mins. If you cheat and get a can of that spray cream not only will you be missing out on some great flavors, but you'll also be putting an obscene amount of gunk into you.
Once your cream in whipped, you get to hollow out the top and bottom. Just use a small spoon and start scrapping. Little bit at a time now... what's done can't be undone, ya know!
Here's the bottom scrapped:
Notice the bag with the scrapped stuff in it? Yeah, KEEP IT! It freezes nicely, no worries. The next time you are making stuffing you'll be thankfull you kept it...
Here's both bottom and top hollowed out:
Spoon the cream in both halves:
Slice up four or five fresh strawberries. Layer them in the cream of the bottom half:
Top now goes on TOP of the bottom:
Got 3 mins? Good, time to make the chocolate sauce.
What you need
200 grams dark cooking chocolate
2 or 3 tbsp butter
100 mls (1/3 cup) cream
What you do
Put it all in a saucepan. Low heat. Whisking consantly. A couple of mins later you've got chocolate sauce!
Now let it cool for 15 or 20 mins. Go read a book... I'll be here when you get back.
.
.
.
.
.
.
Ok, sauce is cool but still pourable? Right? Right! It should look something like this:
So pour the sauce on! Here's what it'll look like now:
Get some more fresh strawberries. 5 or 6 should be fine. Slice em up. Put the strawberries on the top and around the sides of the cake.
But wait! Oh no! I didn't let the chocolate sauce cool enough before I put the strawberries on! Gaaaaackkkk! Sliding strawberries:
I did put everything in the fridge to set after I put the strawberry slices on, should had it in the fridge for about five mins and THEN put the slices on...
I'm a failure...
But hey, it'll still taste good!
Almost forgot; you'll have a bit of whipped cream left over. So when you slice this sucker, just put a dollup of the leftover whipped cream on, no worries.
Subscribe to:
Posts (Atom)