Saturday, July 31, 2010

How To Shuck Fresh Scallops

With pictures! With video! With words!

Can't beat that.

And when I say "fresh scallops", I mean FRESH! These babies were pulled out of the ocean the morning that I bought them at the Willunga Farmers Market. The wife and I really like the market. Every Saturday morning no matter what the weather: rain, hail, sleet, 120 F temps, no matter cus it's always there!

I especially like the stall from Nangkita that has the venison sausages from their own deer farm, but that's a different story.

Back to the scallops!

These juicy shellfish were taken from Kangaroo Island, which is just a hop off the tip of Cape Jervis. I've never been there, but it is on my list of many places to visit.

Anyways...

Let's say you've got a fresh load of scallops and you have NO IDEA how to get them out of their shells, nor do you have any idea what to do with them once you have "shucked" them.

That's why you are reading this. To Learn. From Me.

Fresh scallops are actually very easy to "shuck" from their shells. Oh, the part of the scallop you in the US eat is the adductor muscle that holds the two shells together and propels the little bugger all over, quickly. When you are outside of the US, you'll find that not only is the adductor muscle eaten, but so is the roe.

Roe is the bright pink part of the scallop. It's the reproductive part. And it is oh so tasty, smooth, and creamy! Seriously, I think the fresh roe is better than the adductor muscle!

Now, if you have been interested in learning how to shuck scallops you've probably seen that youtube video with the guy on the fishing boat shucking scallops at the rate of one every five seconds. Yeah, that's fast. That's also his job. But it's not your job and you also want to keep the roe.

That's why you are reading this post.

First, you need some fresh scallops:
scallops01

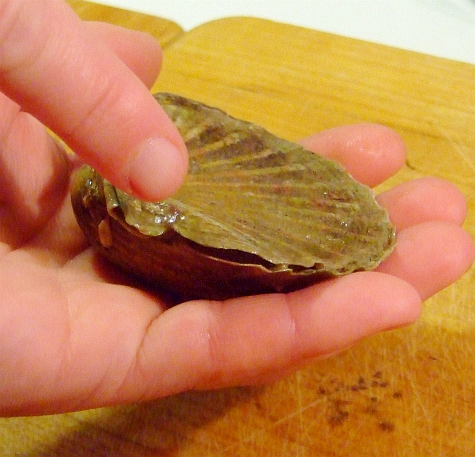
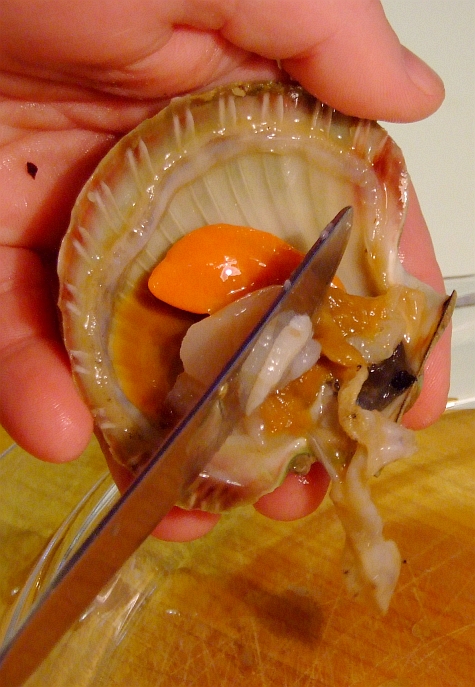
Please note that is a butter knife. You do not need NOR want a sharp knife for shucking scallops. Also notice that one shell of a scallop is deep and concave, and the other is flat --in fact slightly convex.

Put the scallop in your palm with the concave shell down and the hinge towards your thumb. You'll notice a gap between the shell halves close to the hinge. Here I am pointing that out to you:
scallops02


Just gently slide your butter knife into that gap. You want to work it all the way to the other side whilst keep the knife as close to the flat shell as possible.
scallops03


Once you slice through the large, tasty, succulent adductor muscle the scallop will basically pop open:
scallops04


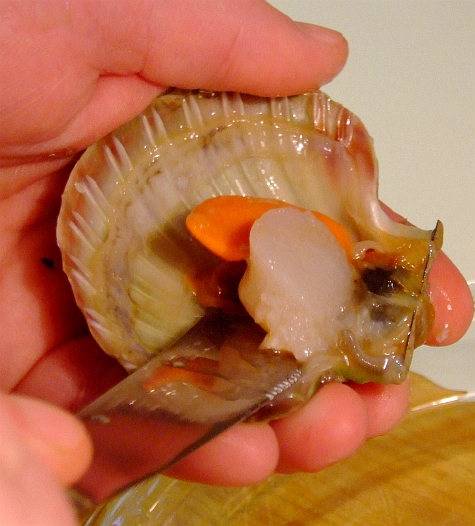
Open that baby up and scrap out everything except the large muscle AND the roe! That pink stuff is the roe --gourmet food!
scallops05


Then just slide your knife under the muscle and the roe still attached to the concave shell:
scallops06


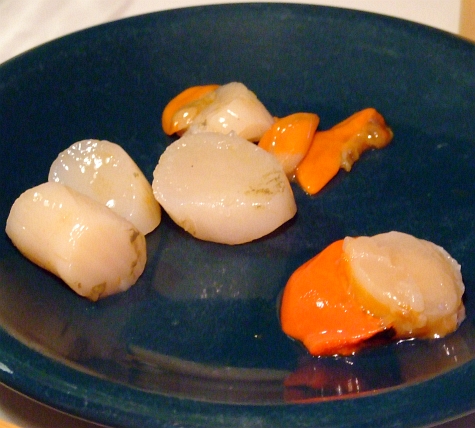
Don't worry if you can't keep the roe attached to the muscle of the scallop, but keep the roe anyways. Your plate should soon start to look like this:
scallops07


Here's a short vid demonstrating the process. Please note, if you don't keep the roe (you idiot, you) then this can be done in about ten seconds. 30 of the 43 seconds is me saving the roe.


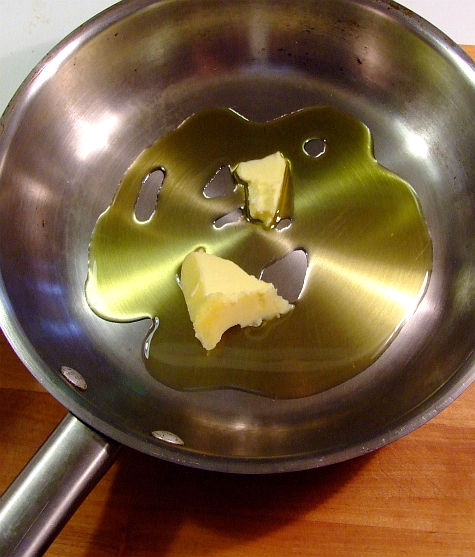
To cook these fresh, succulent, ultra-creamy, delicious scallops, all you need is a small saucepan and a bit of olive oil along with some butter. Or you can eat them raw --you'll be transorted to heaven! But don't eat them raw if they aren't ultra fresh. Anyways, half olive oil and half butter:
scallops08


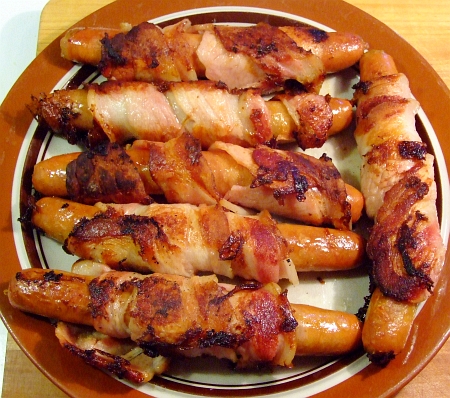
Do NOT over cook them! 45 seconds to a mins on each side in the sizzling oil/butter is perfect. Your plate of cooked scallops should now look like this:
scallops09


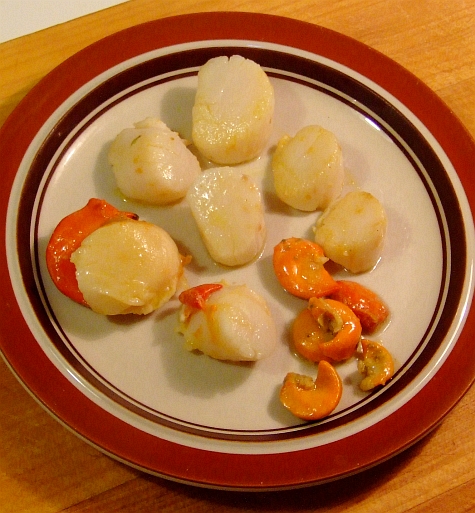
Just eat them. Savor every tender, juicy morsel as you drool all over yourself and make very pleasant purring sounds.

Monday, July 26, 2010

Cheese & Bacon Mini Muffins

And they are oh so tasty! A quick snack, they do make. Bake up a mess of 'em on Sunday and toss a few in your lunch box throughout the week. If they last that long... which I doubt.

I got the idea for these from an Aussie cookbook circa 1972 titled Cooking With Wine & Cheese. 50 cents at a garage sale. And with a title like that I certainly wasn't going to pass it by. No sirree!

The recipe from the book, with it's frail, aged pages, did not call for bacon and some of the amounts were not what I'd use. Especially since they didn't use nearly enough cheese. Also, mine are made in mini muffin tins so they are bite-sized. Very handy. I also use different techniques and different ingredients. But I did get the idea from the book.

But you gotta like any recipe book that says to not only to preheat the oven but to also preheat the "irons". Irons? Yes, "irons" is what any type of metal (always cast iron) baking implement used to be called. These days you'll rarely hear the term outside of grey-haired camping aficionados as some still refer to campfire cooking implements as "irons".

Anyways, just use a muffin tin, no worries. Make sure you use the smallest you can find. These aren't called mini muffins just cuz, you know?

On with the recipe!

Cheese & Bacon Mini Muffins this makes 36 mini muffins

What you need:

1 1/2 cups self raising flour
1 tsp salt
3 tbsp full cream milk powder

1 tbsp butter

3 slices of Aussie sized bacon slices; diced, cooked and drained. 6 if you are using US sized bacon slices.
125 grams diced cheddar (equal to 5.33 ounces or 1/3 of a pound)

1 egg
2/3 cup water (H2O)


What you do:

Put the first 3 ingredients in a mixing bowl. Stir em up so they are combined. Add the butter and cut it in with a fork --if your butter is really cold you can use your fingers if you do it quickly.

Toss in the cooked & drained bacon pieces:
muff01


Mix it up so the bacon is coated. Then add the cheese:
muff02


and mix it around so the cheese chunks are coated. Make a small well in the center of the mix and crack an egg into it.muff03


Add the water and beat the egg and water together.
muff04


Grab a wooden spoon and mix the whole mess together!muff05


Grab your muffin tray and the spoons. I put a couple of table spoons on the tray so you'd get an idea just how small each muffin hole is.
muff06


Fill the tray with a decent sized spoonful of the mix in each muffin hole:
muff07
As I said earlier, you'll get 36 mini muffins or 3 tray fulls from this recipe.

You should have preheated your oven to 220 C (428 F) a while back. I'd recommend doing that first thing as the preparation doesn't take very long.

Bake them for 12 to 15 mins till they look something like this:
muff08


Pop em out and put em on a cooling rack. Load the tray up for the next round. After a while your cooling rack will look something like this:
muff09


That picture was taken after 2 of the 3 rounds were done. You'll notice there is not 24 of the buggas on the rack. They are, ummmmmm, very tasty and very easy to eat as you make them, well at least that's what I've heard. Great hot and great cold.

Make these and you'll be happy. So will your taste buds. So will your tummy. Just try not to eat them all at once.

Wednesday, July 21, 2010

Australian Sausage Rolls --With BACON!

Cus, like, seriously folks: Doesn't bacon just make any food that much better? I can picture it now... bacon flavoured ice cream... Mmmmmmmmmmm.

Ok, enough of that.

Sausage rolls are very Australian. Like SERIOUSLY Australian! If you are in the US then think of things like this:

mom & apple pie

baseball & hot dogs

nachos & beer

hot dogs & beer

football & beer

burgers, fries & beer

beer & beer

TV & beer gut

Ok, you all sorta get the message! Sausage rolls & Aussies just go together like any perfect combination you can think of.

What is an Aussie sausage roll? Did you know there's this thingy called "google"? They even have an image search function! I suggest you try it!

My homemade sausage rolls are a bit different from the norm (just like me) in the fact that mine include BACON! Bacon, sausage, and puff pastry! Can't beat that!

Here's what you need:

6 thin Aussie sausages (snags or bangers)
6 slices of Aussie bacon (12 if you use tiny US bacon slices)
3 sheets of puff pastry

Nice, short list of ingredients, eh?

What you do:

You first need to half-cook your sausages. If you are using hot dogs (BAD!!!!) then you can omit this step. Here's what a plate of half-cooked aussie sausages look like:

bacon and sausage roll 01


If you are curious, I use Slape n Sons sausages. Tasty, local, fresh.

Let the half-cooked sausages cool, and then wrap each one with a slice of bacon. If you use Aussie bacon, then you'll only need one slice per snag. If you use US bacon, then you'll need 2 bacon slices per snag. Here's why:
bacon and sausage roll 02
Just make sure you trim the rind (skin) off.

Don't forget to make fried worms with the bacon rinds!

Here's what your plate should now be looking like:
bacon and sausage roll 03
Don't worry if the bacon isn't tightly wrapped around the snags. Why? Cus bacon shrinks whilst cookin', doncha know.

Cook the bacon-wrapped, semi-cooked snags on 2 sides till they look something like this:
bacon and sausage roll 04


Let them cool and drain them of cooked bacon/snag fat. Just make sure you keep the drained fat for future use, of course. Once they are cool you get to break out the puff pastry sheets! Wee-Hoo!


bacon and sausage roll 05a


Just peel off 3 sheets and put the rest back in the freezer, no worries.
bacon and sausage roll 05


Obviously, let the puff pastry sheets thaw. {insert serious DUH factor here} It shouldn't take long for them to thaw, 30 mins maybe. by the time they are thawed, the 3/4 cooked, bacon-wrapped, Aussie sausages should be cool enough to handle with no worries.

Cut a pastry sheet in half. I use a pizza cutter, BTW. Wrap the half sheet around one of the snags. You'll find there's around about 2 inches you'll need to trim after wrapping the sausage.
bacon and sausage roll 06


Continue till they are all wrapped. Place them some sort of baking sheet or tray.
bacon and sausage roll 07


Do you remember the trimmed off-cuts of the puff pastry that you trimmed after wrapping the 3/4 cooked, bacon-wrapped, Aussie sausages? You should have a nice pile looking something like this:
bacon and sausage roll 07a


DO NOT THROW THEM AWAY!!!!!!!!!!!! Heat some oil up and toss them in the hot oil. 30 to 40 seconds a side. You'll find the puff up HUGELY! A very tasty side snack, they do make.

Put the rolls in a hot oven (220 C or 440 F) until they look like this:
bacon and sausage roll 08


At this point you can just pick one up and eat it --let it cool a bit as they really hold their heat-- or you can put em in the fridge or freezer for later, no worries.

And they taste ohhhhhhh so good!

Saturday, July 17, 2010

Hong Kong Steamed Sponge Cake

I collect recipe books. The more obscure, the better. This recipe is from a cookbook that I found for 50 cents at a local thrift shop (down here they call them op shops) a few years back.

Hong Kong's 'Chinese Flavours' is the title and it was published in 1975 in Hong Kong. No author, just an editor named Kenneth Mitchell. He had the help of several major Hong Kong restaurants and hotels along with the Hong Kong Tourist Association. Any recipe that had pictures was prepared by the restaurant or hotel that volunteered the recipe for inclusion.

To say that this is book contains authentic Hong Kong restaurant fare from the mid 1970's would be a serious understatement.

It's also old enough that many ingredients (like flour, corn starch, etc) are listed by weight. The only thing I did to this recipe was find out that 100 grams of flour is 3/4 cup, and that 75 grams of sugar is 1/2 cup. You are welcome.

This recipe also specifies for the cake to be served hot. And they ain't kidding! I left a bit of one out to cool to find out what it tastes like cold... Like chewing on a wet, cold, clammy, tasteless sponge. Don't ask me how I know what a sponge like that tastes like!

Hong Kong Steamed Sponge Cake

What you need:
2 eggs --I used free range, of course
75 gr (1/2 cup!) castor sugar --I used raw sugar
100 gr (3/4 cup!) flour --I used unbleached baker's flour
1/4 tsp baking powder --I used baking powder

Now who can argue with that for a simple ingredient list! And it was ohhhh so good.


What you do:
Separate the eggs and beat the whites till they just start to stiffen. Mix in the sugar and beat till sugar is dissolved. Add the egg yolks and beat them in too. No, you won't have stiff peaks anymore, but you aren't supposed to.

Add the flour and the baking powder and mix till you have a smooth batter.

At this point the recipe called for pouring the batter into a small, greased, cake tin and steaming for 20 mins or until done. I don't know about you, but none of my steamers are large enough to fit a cake pan in, that's for sure.

However, I found that a 4.33" diameter ramikin dish fits nicely into home-sized steamers!

I buttered up 2 of them, see?
readying ramikin


The batter was evenly divided betwixt the two ramikins. Each one filled up halfway, perfect!
ramikins loaded


I checked the steamer after 15 minutes, and them cakes had risen to over double the original size!
steaming cake
At this point the cake didn't "test" done (bamboo skewer test), but it did after another five minutes.

A wonderfully light, fluffy texture!
steamed cake finished


And it was sooooooo good when ate HOT! Mmmmmmmm, delicious.

As it cooled, the flavour and texture really changed into the cold, clammy, bland, sponge. So make sure you serve it (and eat it) piping hot, right out of the steamer!

Next time I make it I'll add a bit of vanilla and grated orange peel to the batter, and sprinkle ground cinnamon, powdered sugar, and cocoa powder over the top just before steaming. Should be tasty.