Monday, December 12, 2011

Deep Fried Zucchini Fingers

DSCF7787


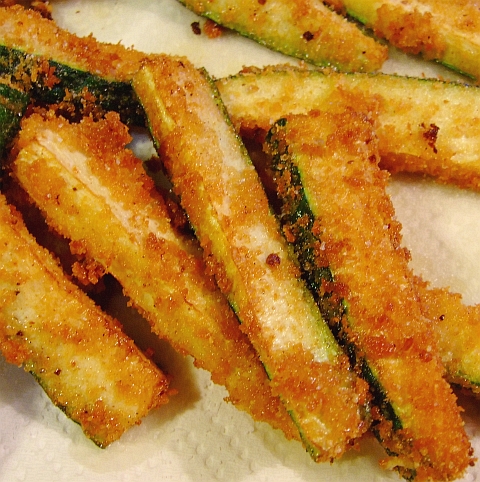
These are so easy to make and oh so tasty! Don't worry if you don't normally like zucchini, you'll LOVE these!

AND you don't have to worry about salting n "sweating" the zucchini fingers. Why? Since they are deep fried any bitterness that may be in the zucchini (if it's not fresh) is gone during the cooking, woo-hoo!

These are breaded, not battered. The battered ones come out a bit on the soggy side I've found. However if you do have soggy battered deep fried treats, you can chuck 'em in a hot oven for a few minutes to crispy them up, no worries mates.

Alrighty then, let's get to the breaded zucc's.

What you need:

one zucchini
bread crumbs (around a cup should do)
1 tsp cumin powder (cuz I LOVE cumin)
1 tbsp (or so) of freshly grated Parmesan (cuz I LOVE Parmesan)
sprinkle of sea salt
one beaten egg

The oil you want to use for deep frying is something that'll take a good hot temp of around 400 to 425F. The two best for deep frying, in my opinion, are peanut oil and rice bran oil. Both are very healthy, have a very high smoke point, and aren't GMO.

What you do:

Add the bread crumbs, cumin powder, Parmesan, and a pinch of sea salt to a bowl
DSCF7788
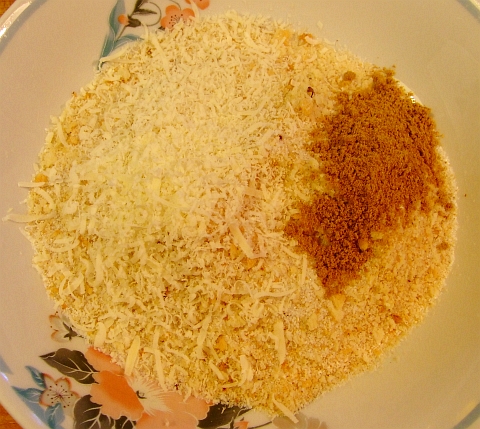
and mix it all together!

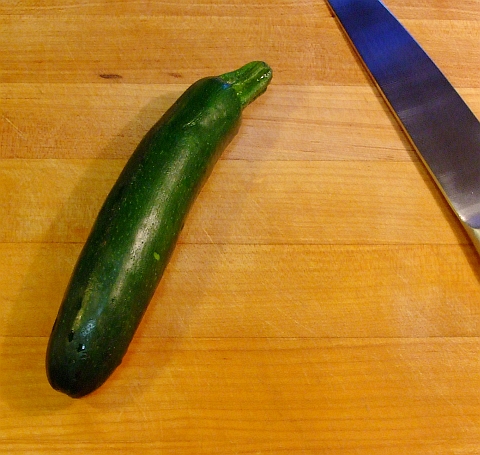
Next, prepare your zucchini. Just cut each end off and rinse it, no need to peel it. Cut it in half, then halve each half lengthwise. Slice each halved half into finger sized pieces.

You should now have a bowl of seasoned bread crumbs, a bowl with a beaten egg (do I really need to tell you how to beat an egg? Thought naught) in it, and a small plate of zucchini fingers.
DSCF7790


Hopefully you remembered to light a fire under your oil before you started all this so you should have a wok with an inch of hot oil in it.

Put one fourth of the zucchini fingers into the egg, move around to thoroughly coat, put them in the bread crumbs and make sure they are well coated in the seasoned crumbs.

Carefully plop the breaded zucchini fingers into the oil without splashing any oil on you. Cuz, well, like, you know, that kinda like HURTS!

After around 45 seconds or so, give em a stir and turn. I suggest using tongs instead of your fingers BTW.

Once they are nicely browned, take them out of the oil and drain on paper towels. Continue deep frying in batches till they are all cooked.

A little sprinkle of sea salt and they'll be perfect! No dips are needed for these, trust me.

And don't they look delicious?
DSCF7794

Friday, December 2, 2011

Perfect Hard Boiled Eggs with pics and humor!

hb12


Hard boiled eggs. Yes, I wrote "hard boiled" instead of "hard cooked". Why? Cuz I can, that's why. And I'd never heard the term "hard cooked" until just recently.

Apparently there's a recent(?) move afoot to call them hard cooked instead of hard boiled. The method involves putting the eggs into cold water, bring the temp up to just boiling, cover, then turn heat off and let sit for a certain length of time.

Harumph, says I!

As long as the yolks are solid and there's no green tinge around the outside of the yolk then they're fine without doing some new-fangled cooking technique. So there.

BTW, that thar greenish tinge is not harmful and doesn't stink and doesn't taste like crud... it just looks like it!

But what is it? It's just iron sulfide formed when the iron in the yolk reacts with the hydrogen sulfide in the white. Oh, the hydrogen sulfide is what makes rotten eggs stink. It does the same thing to crude oil too!

Anyways, it's quite easy to make perfect hard boiled eggs that peel easily, never crack whilst cooking and have no iron sulfide formed around the yolk.

How is this done? Quite easily as it turns out. And since eggs are the original Meal Ready to Eat, you want to know how to cook them in their shells properly.

Here's how:

Dave's Perfectly Cooked Hard Boiled Eggs

What you need:
3 medium eggs
some water
salt
vinegar
some sort of slotted spoon/ladle type thingy
ice cubes

What you do:

Take the eggs out of the fridge for an hour before you'll be BOILING them. The shells are much less likely to crack if they aren't cold to start out.

hb01
Above is the eggs coming up to room temp. Eggsciting, eh?


Once the eggs have warmed up, get the water boiling (I'd suggest using a saucepan to contain the water), give it a sprinkle of sea salt and a splash of vinegar.

Why salt? It makes the eggs much easier to peel, that's why.
Why vinegar? If the eggs do crack, the vinegar will seal them up so none of your egg whites leak out.

Once the salted, vinegary water is boiling (here's a handy reference pic in case you don't know what boiling water looks like)
hb02
you want to very carefully load your room temp eggs into your slotted/holey spoon/ladle
hb03
and slowly walk across the kitchen to your boiling water without dropping any eggs!
hb04


Lower the eggs over the boiling water, but DO NOT IMMERSE!

hb05

Hold the eggs over the boiling water till condensation forms (20 to 30 seconds)

hb06

and then carefully lower the eggs into the boiling water

hb07
then cover the saucepan and set your oven timer for TWELVE (12, XII) minutes.

hb08


Whilst you are waiting for your eggs to finish cooking, you can prepare the ice water that you'll plunge them into to stop the cooking process.

hb09


Once your 12 minute oven timer beeps, turn off the heat and rinse the eggs under cold tap water for a moment, then plunge them into the ice water! Ker-sploosh!
hb10
If you omit this step, you will not halt the cooking process and the outer surface of your yolks Will. Be. Green.

After they've been in the ice water for 30 minutes then go ahead and chuck em in the fridge, use whenever you want them!

And you'll find that the shells practically fall off!
hb11


And of course the yolks will be perfect when you slice them:
hb12