Showing posts with label bacon. Show all posts

Sunday, September 5, 2010

Easy Vegetable Stock AND Easy Cheese Sauce

You get 2 recipes today! Mainly cus I've been negligent in my posting lately, my bad.

These really aren't "recipes" as I think they are just too simple for ingredient lists and the like. Besides, I make each one different each time. Don't worry, I'll write all about various substitutions and methods.

We'll start with the veggie stock. Why make your own? Have you ever looked at the list of ingredients on powdered or liquid stock you buy at the shops? GAAACK! The rule is if you either can't pronounce it or don't know what it is then DON'T buy it. I happen to be able to do both and it scares me just what people put into their bodies.

*dave climbs off soapbox now*

Simple to make you own veggie stock. And you don't even need a bunch of high priced perfect-looking veggies. Cheap ratty-tatty ones on quick sale work great. So do scraps from your meal prep!

Potato peelings? Toss em in the pot. Corn husks? Ditto! Same goes for that corn cobb you just ate. Shriveled garlic or dried out onion? Wee-hoo! Skanky looking outer cabbage leaves? The more the merrier! Shriveled carrot? No worries!

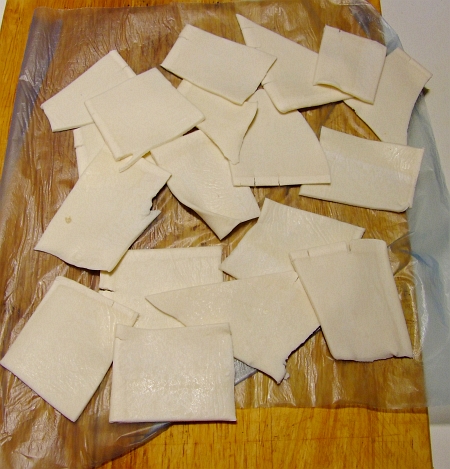
Here's what mine looked like:
veggie stock raw

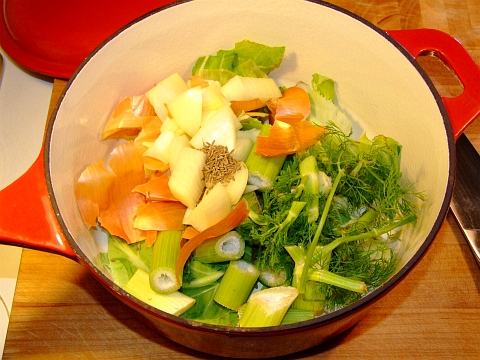
The pot contains half a dried onion plus it's brown skin and roots, a mashed up garlic clove, fennel stalks and fronds, outer leaves from a cauliflower, and a small handful of cumin seeds.

Added just enough water to cover things as I didn't need too much stock. I was going to use this stock to start the cheese sauce so I didn't need much. If you are making enough for soup then use a larger pot and more water.

After simmering, covered, on the stovetop for an hour, this is what it looked like:
veggie stock cooked


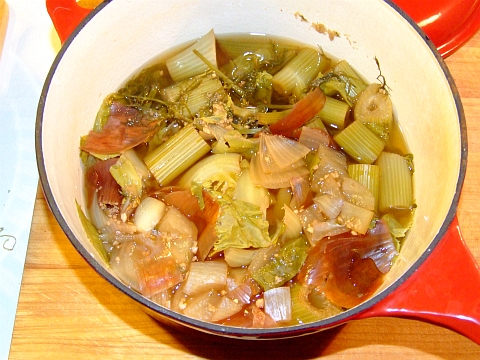
Just strain it and put it into a small saucepan to make the cheese sauce.

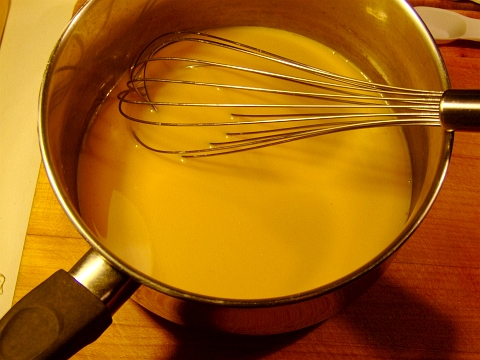
Sometimes I use beer to start the cheese sauce, other times white wine. This time I wanted to use the stock I just made. Which, after all, was the whole reason for making the stock in the first place.

I had around 3 cups of stock and to that I added 1/2 cup cream and a pinch of turmeric (just enough to turn it yellow about 1/8 tsp). Heated it up and whisked till it was all combined.

The saucepan should now look something like this:
cheese sauce01


At this point you can also grate in some chedder; you won't get as creamy a texture though.

Next I removed it from the heat (thick bottomed saucepan so it held the heat nicely) and whisked in cornflour (cornstarch in the US) 1/4 tsp at a time. It's important to REALLY whisk the sauce at this point as you actually want to aerate the sauce. Once the sauce is just less than your desired consistency (while constantly whisking) then return the pan to the heat for about a minute. Now add 4 or 5 tbsp cream cheese and stir/whisk till cream cheese in incorporated into the nice, fluffy sauce.

Here I am whisking away after the 6th 1/4 tsp of cornflour was added.
cheese sauce02
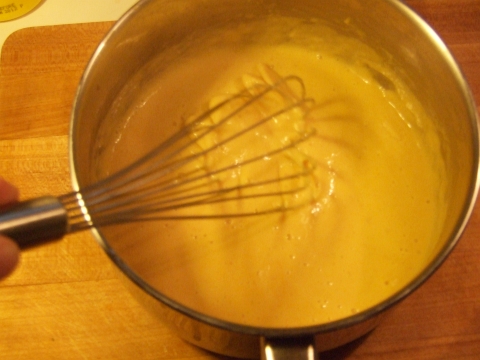
Notice the aeration already? That'll keep it from "gellifying" when it cools.

Whisk CONSTANTLY. This whole process will take 5 to 8 minutes to get the sauce thickened but airy.

Those cramps in your hand are worth it, trust me. Or you could just use an electric mixer the whole time if you so desire.

Once you've heated it back up for a minute or two (while whisking constantly) and added the cream cheese, then remove the saucepan from the heat and pour it into a bowl.

Now's when you get to add goodies! Chilli flakes? No worries. Cumin powder? Oh yeah! Fresh coriander (cilantro in North America) leaves? You betcha! You are only limited by your imagination.

For this sauce I chose bacon. Seriously, doesn't EVERYTHING taste better with bacon?
cheese sauce03


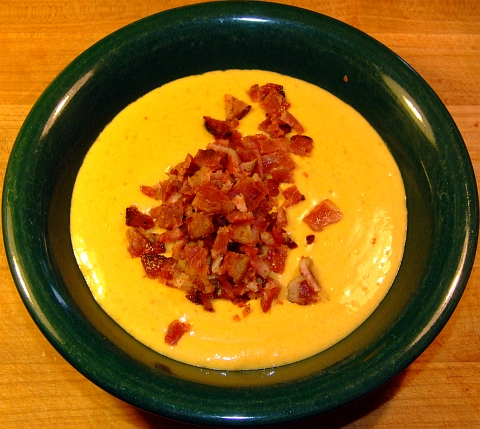
Then just gently stir it in!
cheese sauce04


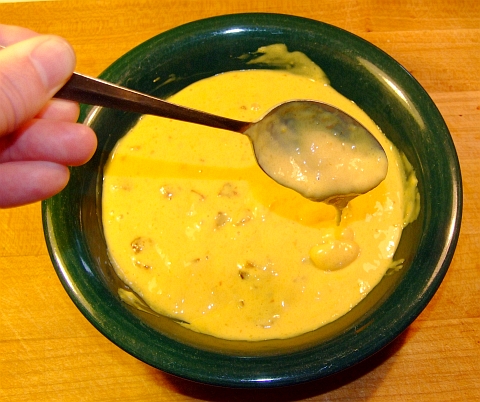
Notice the creaminess of the sauce? This last photo was taken AFTER the sauce had cooled. Neat huh? So you can make a creamy cheese sauce using cornflour --cornstarch-- provided you whisk or mix well for a bit of time to really aerate the mix so it doesn't congeal as it cools.

Enjoy!

Sunday, August 15, 2010

Bacon Wrapped Bananas with Chocolate Sauce

And doesn't that just sound AWESOMELY delicious? I know it does "it" for me! Seriously, what dish can't be improved by adding bacon?

I got the idea for this from a yoga teacher in New Zealand who has a cool food blog called Couscous & Consciousness. In one of her posts she asked folks about what trio or trios of food combination go well together. One of the ones I mentioned was bacon wrapped chocolate that gets battered and deep-fried. She thought it sounded ok but suggested some with bananas to go along with the bacon and chocolate.

Hence, this beauty of a recipe was born!

I made it last night, we all loved it. And that includes BIL who has a very fussy palate. In fact, he licked the plate clean!

Dingo Dave's Original Bacon Wrapped Bananas with Chocolate sauce with thanks to Couscous & Consciousness for inspiration.

What you need:

For the bananas and bacon:
One banana per person
1 to 3 slices of bacon per banana depending on size of slice

For the chocolate sauce:
175 grams of dark chocolate --that's 6.141592654 or pi+3 ounces
2 heaping tbsp butter
1/3 cup cream
1/4 cup cream port (or regular port, or a sherry variety)
1/4 tsp cinnamon powder
1/8 tsp cayenne powder (I usually double or triple this, but that's for when it's just me)

What you do:

Put everything for the chocolate sauce in a small, thick-bottomed saucepan. Your saucepan should now look like this:
stuff for chocolate sauce


Put the saucepan on the lowest heat possible and stir or whisk it while it heats. Make sure nothing sticks to the bottom and that it's well mixed. This should only take a couple of minutes.

Turn the heat off and cover it.

Now to assemble the bacon and bananas. Ummmmmm, this is pretty simple, just wrap the bacon around the bananas. If you need to secure the bacon with toothpicks the go for it.
bacon wrapped bananas raw


Then cook them till the bacon is done to your liking. Be gentle when turning them as you don't want to bananas to break apart.
bacon wrapped bananas cooked


Remove the toothpicks if you used them and liberally ladle the sauce on top!
bacon wrapped bananas with chocolate sauce
Notice how I used one dark plate and one light plate so that the color balance in the photo is way off? Yeah, I did that on purpose. Maybe.

And the obligatory closeup:
bacon wrapped bananas with chocolate sauce closeup


Use a sharp knife and a fork for eating. Why a sharp knife? So that you don't mush down the banana as you cut a piece.

You'll have lots of leftover sauce, I'm sure you'll think of some use for it.

Oh, next time I'm going to roll the bananas in brown sugar before wrapping the bacon around them!

Monday, July 26, 2010

Cheese & Bacon Mini Muffins

And they are oh so tasty! A quick snack, they do make. Bake up a mess of 'em on Sunday and toss a few in your lunch box throughout the week. If they last that long... which I doubt.

I got the idea for these from an Aussie cookbook circa 1972 titled Cooking With Wine & Cheese. 50 cents at a garage sale. And with a title like that I certainly wasn't going to pass it by. No sirree!

The recipe from the book, with it's frail, aged pages, did not call for bacon and some of the amounts were not what I'd use. Especially since they didn't use nearly enough cheese. Also, mine are made in mini muffin tins so they are bite-sized. Very handy. I also use different techniques and different ingredients. But I did get the idea from the book.

But you gotta like any recipe book that says to not only to preheat the oven but to also preheat the "irons". Irons? Yes, "irons" is what any type of metal (always cast iron) baking implement used to be called. These days you'll rarely hear the term outside of grey-haired camping aficionados as some still refer to campfire cooking implements as "irons".

Anyways, just use a muffin tin, no worries. Make sure you use the smallest you can find. These aren't called mini muffins just cuz, you know?

On with the recipe!

Cheese & Bacon Mini Muffins this makes 36 mini muffins

What you need:

1 1/2 cups self raising flour
1 tsp salt
3 tbsp full cream milk powder

1 tbsp butter

3 slices of Aussie sized bacon slices; diced, cooked and drained. 6 if you are using US sized bacon slices.
125 grams diced cheddar (equal to 5.33 ounces or 1/3 of a pound)

1 egg
2/3 cup water (H2O)


What you do:

Put the first 3 ingredients in a mixing bowl. Stir em up so they are combined. Add the butter and cut it in with a fork --if your butter is really cold you can use your fingers if you do it quickly.

Toss in the cooked & drained bacon pieces:
muff01


Mix it up so the bacon is coated. Then add the cheese:
muff02


and mix it around so the cheese chunks are coated. Make a small well in the center of the mix and crack an egg into it.muff03


Add the water and beat the egg and water together.
muff04


Grab a wooden spoon and mix the whole mess together!muff05


Grab your muffin tray and the spoons. I put a couple of table spoons on the tray so you'd get an idea just how small each muffin hole is.
muff06


Fill the tray with a decent sized spoonful of the mix in each muffin hole:
muff07
As I said earlier, you'll get 36 mini muffins or 3 tray fulls from this recipe.

You should have preheated your oven to 220 C (428 F) a while back. I'd recommend doing that first thing as the preparation doesn't take very long.

Bake them for 12 to 15 mins till they look something like this:
muff08


Pop em out and put em on a cooling rack. Load the tray up for the next round. After a while your cooling rack will look something like this:
muff09


That picture was taken after 2 of the 3 rounds were done. You'll notice there is not 24 of the buggas on the rack. They are, ummmmmm, very tasty and very easy to eat as you make them, well at least that's what I've heard. Great hot and great cold.

Make these and you'll be happy. So will your taste buds. So will your tummy. Just try not to eat them all at once.

Wednesday, July 21, 2010

Australian Sausage Rolls --With BACON!

Cus, like, seriously folks: Doesn't bacon just make any food that much better? I can picture it now... bacon flavoured ice cream... Mmmmmmmmmmm.

Ok, enough of that.

Sausage rolls are very Australian. Like SERIOUSLY Australian! If you are in the US then think of things like this:

mom & apple pie

baseball & hot dogs

nachos & beer

hot dogs & beer

football & beer

burgers, fries & beer

beer & beer

TV & beer gut

Ok, you all sorta get the message! Sausage rolls & Aussies just go together like any perfect combination you can think of.

What is an Aussie sausage roll? Did you know there's this thingy called "google"? They even have an image search function! I suggest you try it!

My homemade sausage rolls are a bit different from the norm (just like me) in the fact that mine include BACON! Bacon, sausage, and puff pastry! Can't beat that!

Here's what you need:

6 thin Aussie sausages (snags or bangers)
6 slices of Aussie bacon (12 if you use tiny US bacon slices)
3 sheets of puff pastry

Nice, short list of ingredients, eh?

What you do:

You first need to half-cook your sausages. If you are using hot dogs (BAD!!!!) then you can omit this step. Here's what a plate of half-cooked aussie sausages look like:

bacon and sausage roll 01


If you are curious, I use Slape n Sons sausages. Tasty, local, fresh.

Let the half-cooked sausages cool, and then wrap each one with a slice of bacon. If you use Aussie bacon, then you'll only need one slice per snag. If you use US bacon, then you'll need 2 bacon slices per snag. Here's why:
bacon and sausage roll 02
Just make sure you trim the rind (skin) off.

Don't forget to make fried worms with the bacon rinds!

Here's what your plate should now be looking like:
bacon and sausage roll 03
Don't worry if the bacon isn't tightly wrapped around the snags. Why? Cus bacon shrinks whilst cookin', doncha know.

Cook the bacon-wrapped, semi-cooked snags on 2 sides till they look something like this:
bacon and sausage roll 04


Let them cool and drain them of cooked bacon/snag fat. Just make sure you keep the drained fat for future use, of course. Once they are cool you get to break out the puff pastry sheets! Wee-Hoo!


bacon and sausage roll 05a


Just peel off 3 sheets and put the rest back in the freezer, no worries.
bacon and sausage roll 05


Obviously, let the puff pastry sheets thaw. {insert serious DUH factor here} It shouldn't take long for them to thaw, 30 mins maybe. by the time they are thawed, the 3/4 cooked, bacon-wrapped, Aussie sausages should be cool enough to handle with no worries.

Cut a pastry sheet in half. I use a pizza cutter, BTW. Wrap the half sheet around one of the snags. You'll find there's around about 2 inches you'll need to trim after wrapping the sausage.
bacon and sausage roll 06


Continue till they are all wrapped. Place them some sort of baking sheet or tray.
bacon and sausage roll 07


Do you remember the trimmed off-cuts of the puff pastry that you trimmed after wrapping the 3/4 cooked, bacon-wrapped, Aussie sausages? You should have a nice pile looking something like this:
bacon and sausage roll 07a


DO NOT THROW THEM AWAY!!!!!!!!!!!! Heat some oil up and toss them in the hot oil. 30 to 40 seconds a side. You'll find the puff up HUGELY! A very tasty side snack, they do make.

Put the rolls in a hot oven (220 C or 440 F) until they look like this:
bacon and sausage roll 08


At this point you can just pick one up and eat it --let it cool a bit as they really hold their heat-- or you can put em in the fridge or freezer for later, no worries.

And they taste ohhhhhhh so good!

Sunday, October 18, 2009

Fried Worms

Did you know that the humble earthworm has (by far) the highest protein content of any critter? 72% protein the are! And virtually fat free!

We are talking some seriously high quality meat here, folks.

And earthworm broth is a very traditional Chinese soup too. Very healthy.

To prepare my fried worms, you'll need to get yourself some bacon rashers with the rind on. What's that you say? Didn't I mention that fried bacon rinds LOOK like fried worms? I didn't? Oh, sorry.

Mmmmmmmm, bacon rinds... Everyone does know that when you buy a bag of "pork rinds" (loaded with so many chemicals it's amazing you're still alive) that you are buying --and then eating-- processed pork leather. You did know that, right?

Back to the recipe...

Down here in Oz virtually all the sliced bacon you buy has the rind still on. And the pieces (called rashers) are HUGE compared to wee little wussy US slices. Imagine a piece of bacon 16 to 18 inches long... drool...

But you do have to slice the rind off. Here's what that looks like:
raw worms


You have to be very carefull when frying the rinds. Why? Cus they jump, spit, and sizzle. It's often referred to as "pork cracklin'" for that reason.

I find it best to fry them on the hotplate of the barby outside.

I also cut the rinds in half so they are easier to spread out. You have to make sure you spread them out otherwise they stick to each other when they cook.

To cook them, crank up your barby's hotplate burners to HIGH for a minute or two and then turn it to LOW. Arrange the pieces of rind on the hotplate so they aren't touching. Sprinkle with salt.

And then, CLOSE THE LID. It's very important otherwise when the jump around while frying they could end up everywhere except the hotplate.

Here's a pic of them about 3/4 the way done:
worms frying


You can turn them if you think they need it. Most of them won't as they tend to turn themselves when popping and crackling.

Here's the finished product, sprinkled with more salt:
fried worms
Mmmmmmmmmmm, tasty treat!

You can season them with whatever you'd like while frying them and afterwards. I find a nice sprinkle of hot madras curry powder after frying works nicely.

Enjoy!

Monday, May 25, 2009

Prawn and Bacon Curry

I mean really, just what DOESN'T go well with bacon? You can do loads of different dishes with bacon. Ahhhhh, the humble pig; Mother Nature's gift to the culinary world.

Don't worry about me abandoning the cheesy goodness, I'll be back with a How To Make Awesomely Good Feta Cheese soon --complete with pictures. But I've been told by the clan that I'd better write this one down cus they are going to want it again.

See, when I make curries I usually make them with whatever I can find in the pantry. They always come out great, but every once in a while one stands out. Two nights ago was a "once in a while" curry.

Note about the prawns (shrimp): I used already peeled and cooked prawns cus that's all I had at the time. Feel free to use fresh ones, no worries. Just make sure you keep the shells, tails, and heads as they make a very flavourful seafood stock when boiled and strained.

Feel free to use lemon grass or kaffir lime leaves if you'd like, they should go in at the same time you add the garlic. Speaking of the garlic, I used jarred, prepared, minced garlic as I was out of fresh garlic heads.

Alright, I've blathered enough! Let's get cookin'!

Prawn and Bacon Curry


What you need:

Prep wok-ing:
5 or 6 large rashers of bacon, diced (for you US'ns that'd be about half a pound of bacon strips chopped up)

For the initial wok-ing:
bacon fat (see above)
1 small onion, minced
1 tbsp minced garlic
1 tbsp tamarind paste
2 tbsp Tom Yum paste
1 small red capsicum (bell pepper), minced
1 small can (225 grams around 8 oz) whole water chestnuts

For the prawn part:
350 grams (3/4 of a pound) of shelled, deveined, de-tailed, small prawns (think cocktail shrimp size)
1/4 cup cornflour (called cornstarch in the US)
2 tsp curry powder --I used Clive of India, but any good one will do
1 tsp ginger powder
1 tsp cumin powder
1 tsp turmeric powder
1 tsp cinnamon powder
2 tbsp olive oil

For the cookin' part:
1 can (400 mls or 13 oz) coconut milk or coconut cream (whichever is in your pantry)
1/2 cup cream
semi-cooked bacon pieces from prep wok-ing

For the serving part:
Bed of cooked, white, long-grained rice (I used jasmine)
1 cup of greek yoghurt


Yeah I know, seems like a long list. You'll be happy that I broke it up into sections though, makes the instructions very easy to follow.


What you do:

Start with the bacon in the prep wok-ing section. Toss the cut up bacon into a large wok and cook on low heat till the bacon is about halfway cooked --you don't want it to be crispy. Take the semi-cooked bacon pieces out of the wok, but leave the bacon fat in the wok.

Next add the minced onion to the wok and cook in the bacon fat for a minute or 2 on medium-low heat. Then add the next four ingredients in the "initial wok-ing" section. Give it a good stir. Once it starts to really sizzle (and smell OH SO GOOD!), add the water chestnuts plus the water from the can they were in. Give it a good stir.

While the can water is cooking down (it'll only take a minute) you get to do the prawn part! Put the prawns in a large bowl and then add everything from the "prawn part" section. Toss to coat everything evenly.

By the time you take the bowl with the coated prawns over to the sizzling wok the water should have cooked down. Add the olive oil and then add the prawns to the wok (which is smelling really good by now). Stir and toss and then turn the heat up for a minute.

Add the coconut cream, the cream, and the semi-cooked bacon pieces. Give it a good stir to combine, turn the heat to low and simmer for 5 or 10 mins. Stir it every now and then.

Serve it over a bed of the cooked long grain white rice, and each plate gets a dollop of greek yoghurt on the top of the curry.

Why? Well, this could be a bit hot for some folks and the yoghurt takes care of the heat but you still get the flavours.

Some people will think this isn't hot enough! If you're one of those folks who likes your curries really hot, then double the amount of Tom Yum paste and add a few chopped up thai chilli peppers at the time you add the garlic. That'll be guaranteed to clear the sinuses!

Saturday, September 20, 2008

Seafood Chowder

This may seem to be a fairly simple menu item, but no matter how you make your chowder and whatever you put into it (clams, prawns (shrimp), crab, fish chunks, mussels, etc) there are a couple of very important techniques to getting it right.

For those of you in the US who make your own New England Clam Chowder, you'll feel right at home with this.

There are also many many different ingredients you can use. I'm going to give you the recipe as I made it two nights ago, and then give you a bunch of different things you can use/substitute. That way no matter where in the world you are and no matter what local ingredients you can lay your hands on, you'll always be able to make Dingo Dave's Seafood Chowder!

Oh, I tend to make it slightly different each time, depending on what I have in the pantry and the freezer that day or what was fresh at the fish shop that morning. So there's no real hard and fast rule, except for a couple of techniques.

On with the show!

Dingo Dave's Seafood Chowder

What you need:
2 or 3 rashers of bacon cut into small pieces
bacon fat from the above bacon (this is IMPORTANT)
1 can (400 mls or about 14 oz) coconut cream
200 gms small whole prawns (1/2 pound small shrimp) with the shells on
1 litre seafood stock (made from the above prawn shells)
1 whitefish fillet cut into small chunks (I used hoki)
small can of crab meat (or fresh if you've got it)
1/2 to 1 litre milk (2 to 4 cups)
a small minced (or diced) onion
2 cloves crushed garlic
2 tsp minced ginger
2 tbsp olive oil
1 tsp sesame oil
3 or 4 small diced potatoes
sea salt
ground black pepper
ground white pepper
1 tbsp dried basil
1/4 cup flour
a couple of litres of H-TWO-OH(water)

What you due:

Firstly, make the seafood stock (start this a few hours before you want to make the chowder). To make it you'll need to peel and devein the prawns. Toss the veins (alimentary tract, ahem...) but keep the heads, shells, legs etc and throw them in a big ole saucepan. Add a litre (4 cups) of water and boil the heck out of it. Once it's almost boiled down, add another litre of water and boil for a short time. Let cool. Take a potato masher and mash down the shells --this is to extract every bit of flavourful prawny goodness from the shells. Strain the stock (this is IMPORTANT). Save the stock, dump the shells.

Ok, your seafood stock is made, no worries.

Now for the nuts and bolts.

Cook the bacon pieces in the pot you plan to make the chowder in (use a low flame). Once the bacon is done to your liking (crispy or not, your call), remove the bacon but LEAVE THE BACON FAT IN THE POT. Add the diced potatoes to the pot, and cook in the bacon fat for a few mins; stir regularly. After a couple of mins, add the minced onion, some salt, some ground black (or white) pepper and a bit of dried basil. Stir it around. You should have some very nice aromas by now; just keep the heat low so nothing burns. Add the flour and mix well.

Yes, you'll have some browned on gunky looking stuff in the pot along with the spuds and onions. Don't worry, you're about to take care of that.

Now add the seafood stock you made earlier in the day. Give everything a good stir and use your wooden spoon to scrap the bottom and sides of the pot. Ain't deglazing pots great? Very flavourful. Oh, and, ummmmm, it's a FRENCH cooking technique!

Now add the coconut cream and about 1/2 litre of milk (2 cups). Let it simmer for a few mins.

While that's simmering, you get to sear the spices and seafood.

I use a wok, but feel free to use a saucepan if you'd like.

To the wok add the olive oil, sesame oil, garlic, ginger, fish chunks, crab meat, prawn (shrimp) meat. Crank the heat to HIGH and sear that stuff while tossing/stirring regularly. It'll only take 2 to 3 mins.

Dump the entire contents of the wok into the chowder pot. Also add the bacon pieces. This is the point where you can add more milk if you think the chowder is too thick. I, however, feel that chowder can never be too thick --but that's just me.

Let it simmer for a couple of mins, then serve it up! Have a fresh made loaf of bread or a fresh cobb or a fresh baguette around for dunkers.

This is seriously good!

And now for the substitutions and garnishes!

Well, most of you may not want to make your own fish stock. I can respect that, really! So get a bottle of clam juice instead. Oi! Can't find clam juice, use white wine! Don't drink? Don't worry, the alcohol will cook off.

Fake crab can be subbed for crab meat, no worries.

If you sub clams for the prawns, then DON'T sear them and only add them to the chowder in the last couple of minutes --otherwise they'll be really tough and chewy.

Don't like coconut (heathen scum)? No worries, just use milk cream instead.

Allergic to lactose? Well... this really isn't the recipe for you, sorry.

Garnish with any herbs you want, just make sure they are fresh; chives, basil, parsley, coriander (cilantro if you are in N.A.) etc.

Want it spicy? Add a tbsp or two of vindaloo paste to the wok when you sear the seafood and spices. Oh YEAH! That'll get them capillaries dilated!

Wednesday, September 3, 2008

Bacon Wrapped Fish Fillets with Pineapple, Peanut, and Coconut Curry

Oi, don't that sound like a mouthful? That's cus it is, and a darned tasty one at that! If you like fish and pork, then this is the dish for YOU. Mmmmmmmmmm... I drool on the keyboard as I type this and remember the flavours... ahhhhhhh...

Ok dave, take a deep breath and calm down; your stuffed pumpkin will be out of the oven soon so you can eat. Mmmmmmm...

Oops, back to the topic. So, like, what kinda fish? I used basa. Basa is a freshwater white fleshy fish found in the Mekong Delta (that'd be Vietnam). I do believe it's a type of catfish. I wouldn't want to use US catfish for this as they are darned flavourful on their own (deep fried with a cajun chili dipping sauce). Basically, any small whitefish fillets will do. Hake, Whiting, Hoki, Basa, Cod, Halibut, whatever.

One of the nice things about this is that it only takes 20 mins and it'll feed four hungry adults (provided they like bacon and fish, of course).

A note about Bacon... American bacon is from pork bellies, whereas Canadian bacon, UK, Aus, Kiwi, etc is from the pork back. The difference: The belly pork is fattier than the back pork. Thin-sliced American bacon probably won't work too well for this as it would crispy up before the fish was done; I'd suggest for you US'ns to use either Canadian bacon, or thick sliced US bacon.

Alrighy, here we go with Dingo Dave's Bacon Wrapped Fish Fillets with Pineapple, Peanut, and Coconut Curry.

What you need:

4 whitefish fillets (I used basa, but hoki, hake, cod, or halibut would be fine)
8 LONG slices of THICK bacon

rice

For the curry sauce:
one can (400 ml or 16 oz) coconut cream
1/3 to 1/2 cup finely chopped pineapple
one good sized handful of coarsely chopped roasted peanuts
2 to 3 tbsp of minced onion
a couple of tbsp olive oil and a 1/2 tsp sesame oil
2 tbsp tamarind paste
1 tsp prepared lemon grass
1 or 2 cloves crushed garlic
1 tbsp minced ginger
pinch or two of chilli powder
1 or 2 tsp turmeric powder

Optional garnish stuff:
thin sliced red capsicum (red bell pepper)
fresh coriander leaves (cilantro)
parsley sprigs
fresh basil leaves
etc (use your imagination)

What to do:

First, put your rice on to cook. 1 cup of uncooked should be enough, but don't short yourself as leftover rice is a very good thing to have in the kitchen. Short, long, medium, jasmine, basmati, whatever you prefer. You should have some rice cooking technique where you can go away and leave it for 20 mins, and then POOF perfect rice. A microwave oven makes a great rice cooker.

Once the rice is on, wrap each fish fillet with two slices of bacon. You don't need to pin the bacon on with toothpicks. Start cooking the bacony-fish either on your big grill hotplate, or a large frypan. Low heat. You can also bake it in a hot oven, but if you do that you'll want to get them in the oven before the rice as they'll take 20 or so mins to cook in the oven. I prefer the hotplate on the outdoor grill thankyouverymuch.

Once the bacony-fish starts cooking, you'll start the curry. Put the olive oil and sesame oil in a wok, add the pineapple, onion, and peanut. Crank the heat medium-high. Just when the wok starts to sizzle, add the rest of the curry stuff. Toss it every ten or 15 secs so it doesn't burn, then after 2 mins (you'll smell WONDERFUL spicy aromas) add the coconut cream, stir, and turn the heat down low.

By now, it should be time to turn the bacony-fish. They really only need 7 or 8 mins a side. It should smell really really really good by now.

While the fish finishes cooking, give the curry a stir every minute or so. Give it a taste, adjust seasonings: if it's not spicy enough for you then add some more chili powder, if it's too hot then add some cream, if it's too tart, then add a bit of sugar.

It should all come together 20 mins after you started the rice. Each plate gets a bed of rice, then the bacon wrapped fish, and the curry sauce poured over the top. It'll look something like this:

bacon wrapped fish fillets

I know, my parrot pics are a heckuva lot better than my food pics, but I was rushed a bit.

Oh, I didn't have any fresh red bell peppers, so I added some dried ones to the curry --as I'm sure you can tell from the pic, eh? Garnish with whatever herb you'd like. Or not, your choice.