Showing posts with label simple. Show all posts

Friday, December 2, 2011

Perfect Hard Boiled Eggs with pics and humor!

hb12


Hard boiled eggs. Yes, I wrote "hard boiled" instead of "hard cooked". Why? Cuz I can, that's why. And I'd never heard the term "hard cooked" until just recently.

Apparently there's a recent(?) move afoot to call them hard cooked instead of hard boiled. The method involves putting the eggs into cold water, bring the temp up to just boiling, cover, then turn heat off and let sit for a certain length of time.

Harumph, says I!

As long as the yolks are solid and there's no green tinge around the outside of the yolk then they're fine without doing some new-fangled cooking technique. So there.

BTW, that thar greenish tinge is not harmful and doesn't stink and doesn't taste like crud... it just looks like it!

But what is it? It's just iron sulfide formed when the iron in the yolk reacts with the hydrogen sulfide in the white. Oh, the hydrogen sulfide is what makes rotten eggs stink. It does the same thing to crude oil too!

Anyways, it's quite easy to make perfect hard boiled eggs that peel easily, never crack whilst cooking and have no iron sulfide formed around the yolk.

How is this done? Quite easily as it turns out. And since eggs are the original Meal Ready to Eat, you want to know how to cook them in their shells properly.

Here's how:

Dave's Perfectly Cooked Hard Boiled Eggs

What you need:
3 medium eggs
some water
salt
vinegar
some sort of slotted spoon/ladle type thingy
ice cubes

What you do:

Take the eggs out of the fridge for an hour before you'll be BOILING them. The shells are much less likely to crack if they aren't cold to start out.

hb01
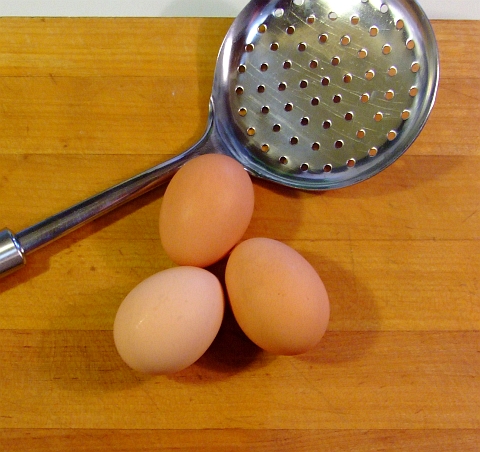
Above is the eggs coming up to room temp. Eggsciting, eh?


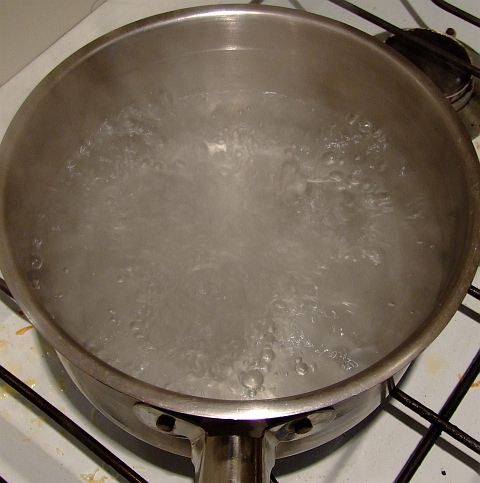
Once the eggs have warmed up, get the water boiling (I'd suggest using a saucepan to contain the water), give it a sprinkle of sea salt and a splash of vinegar.

Why salt? It makes the eggs much easier to peel, that's why.
Why vinegar? If the eggs do crack, the vinegar will seal them up so none of your egg whites leak out.

Once the salted, vinegary water is boiling (here's a handy reference pic in case you don't know what boiling water looks like)
hb02
you want to very carefully load your room temp eggs into your slotted/holey spoon/ladle
hb03
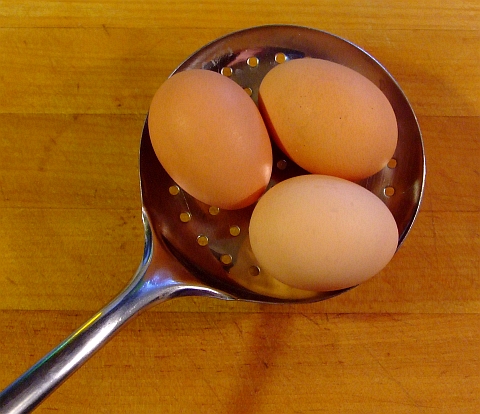
and slowly walk across the kitchen to your boiling water without dropping any eggs!
hb04


Lower the eggs over the boiling water, but DO NOT IMMERSE!

hb05

Hold the eggs over the boiling water till condensation forms (20 to 30 seconds)

hb06

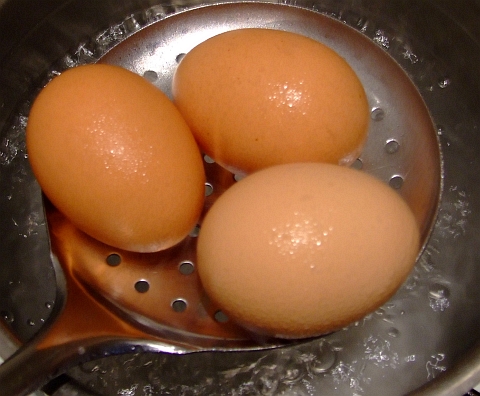
and then carefully lower the eggs into the boiling water

hb07
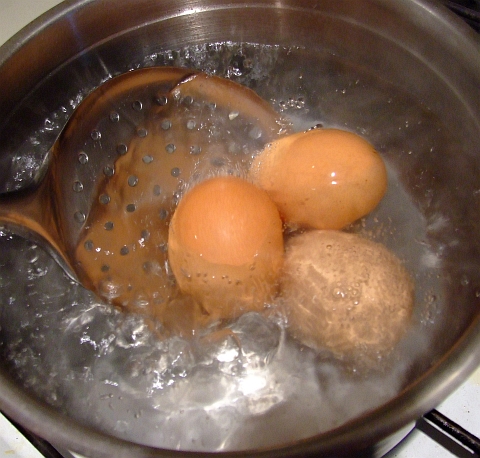
then cover the saucepan and set your oven timer for TWELVE (12, XII) minutes.

hb08


Whilst you are waiting for your eggs to finish cooking, you can prepare the ice water that you'll plunge them into to stop the cooking process.

hb09


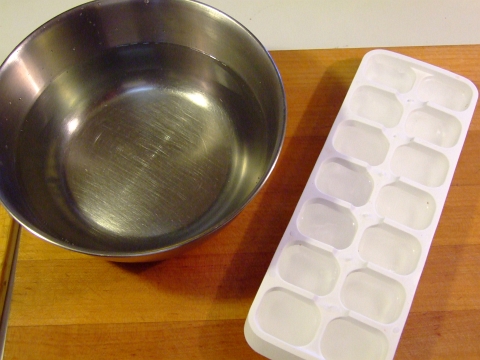
Once your 12 minute oven timer beeps, turn off the heat and rinse the eggs under cold tap water for a moment, then plunge them into the ice water! Ker-sploosh!
hb10
If you omit this step, you will not halt the cooking process and the outer surface of your yolks Will. Be. Green.

After they've been in the ice water for 30 minutes then go ahead and chuck em in the fridge, use whenever you want them!

And you'll find that the shells practically fall off!
hb11


And of course the yolks will be perfect when you slice them:
hb12

Sunday, May 16, 2010

Creamy Potato and Pea Soup

And it is best served with a crusty, fresh, loaf of french bread for dunkers.

No pics of this as the batteries died when I turned the camera on (ooh baby, what big lenses you have!) and I didn't have time to charge another set --of batteries.

But trust me, it is delicious! If you'd like I can take a pic of an empty bowl and you can sorta imagine the soup in it... maybe not.

I shall now try to remember what went into the soup and the procedure I used...

What you need:

8 to 10 medium potatoes, peeled and diced
1 onion, chopped
2 cloves garlic, crushed
1 litre of water (4 cups)

1 cup cream
2 glasses chardonnay (and a 3rd one for the cook)
1 can garden peas (should only have 3 ingredients: peas, water, salt)
3 or 4 wild onion greens, minced (or garlic greens)
1 tsp dillweed

sea salt
white pepper

2 thai chili peppers, minced (optional)
1/2 small onion, finely minced (optional)
1 wild onion green, minced (optional)
1/2 tsp mint (optional)
1/4 tsp turmeric (optional)

What you do:

Take the first 4 ingredients and chuck em into a big ole dutch oven. Put the lid on it and simmer till the spuds are soft --around 45 mins. Remove from heat and remove the lid.

Take a spud masher and mash the heck out of the contents. You'll end up with a slurry-type liquid. Now add the next 5 ingredients and give a a good stirring to thoroughly combine everything.

Put the lid on and bring it back up to a simmer. Give it a taste test and season with sea salt and white pepper till it suits your palette.

Serve it up with a crusty bread for dunking!

Optional stuff:

Add the mint at the same time you add the dill. Ditto for the turmeric. The onion greens and chili are for garnish; just sprinkle over the top of the soup. I also sautéed some minced onion in a bit of olive oil and a bit of salt, then deglazed the wok with a splash of chardonnay and cooked the liquid down (that whole procedure took all of about 2 minutes). Those onions were then sprinkled over the top of my soup, along with the chili and greens.

Be creative with this, just try not to overpower the subtle taste and creamy texture of the soup with too many additions.

Monday, March 1, 2010

Char-Grilled Eggplant

Eggplant is one of the most under-rated veggies (it's actually a berry) around. Very nutritious if you eat the skin too.

Aaaaaaannnnnnnnddddddd if you do one simple trick there won't be any perceived bitterness nor will the eggplant soak up loads of oil --this means if you are making eggplant parmesan then you are forgiven for frying the breaded slices of eggplant instead of baking them.

But we aren't making eggplant parmesan today, we are just going to simply grill the slices. First though, we'll "treat" them so they aren't bitter (even if they aren't fresh) and so they don't absorb the olive oil and go mushy.

What you need:
1 eggplant
1 or 2 tsp sea salt
olive oil

What you do:

Slice the eggplant into slices 1 to 2 cm thick. I try to slice them around 1.5 cm which is 3/5 of an inch. Make sure you get the last slice or two under the "hat" of the eggplant as that's the most succulent part. Lightly salt all the slices and let them set for 30 minutes. You'll notice the slices start to sweat a yellowish liquid, that's ok cus they are supposed to.

After 30 minutes, go crank your gas barby on high (if you are using charcoal, then you had better've started the coals 30 minutes ago!). Next, rinse the eggplant slices and pat them dry.

Drizzle olive oil over the slices and gently toss them in a bowl to lightly coat the slices with olive oil.

Grill them slices! 2 or 3 minutes a side is enough. You'll only turn them once so check after 2 minutes that you've got a nice grill pattern on the bottom of a slice before turning them.

After both sides are char-grilled, serve them up as a side dish to pretty much anything. You'll find the skin has a pleasant, nutty flavour and is very tender. The flesh won't be "heavy" or "greasy" since the eggplant didn't absorb the oil!

You can use various spices when you are oiling the slices. I'll be using a combo of turmeric, cumin, and coriander along with the oil next time.

Enjoy!