Showing posts with label cheese. Show all posts

Wednesday, May 2, 2012

Prawn Squid Chili Alfredo

Now does that just sound ultra tasty mates? Well to me it does! And since I uploaded a picture of the final, plated product to twitter and I have a few folks asking for the recipe, I suppose I should share it with YOU.

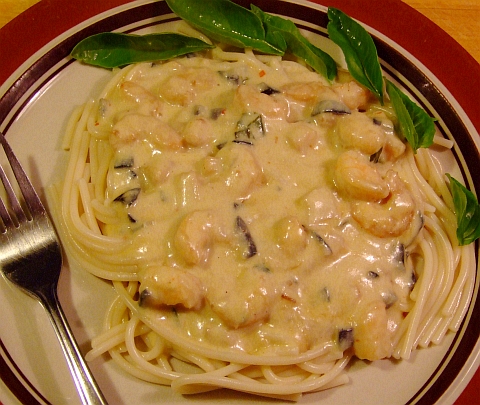
This is what the finished dish should somewhat look like:


DSCF0053s

Your plates and cutlery may vary of course.

 This is also one of dave's (tm) seat-of-the-pants whatcha-got-cuz-I'm-in-a-hurry creations.

The above being typed, this of course means that the following amounts may or may not be somewhere in the general vicinity of the amounts I used. But hey mates, I'm trying! Gotta give a bloke credit for that, right?

Here is what I *sorta* did:

What you need and do:

For the first part...
2 tbsp minced red onion
1 tbsp minced garlic
1 tbsp chili paste (try to find the kind at least 90% chilis)
1 small handful of fresh, minced basil leaves
1 small handful of fresh, minced, onion greens
1 tbsp olive oil
sprinkle of sea salt
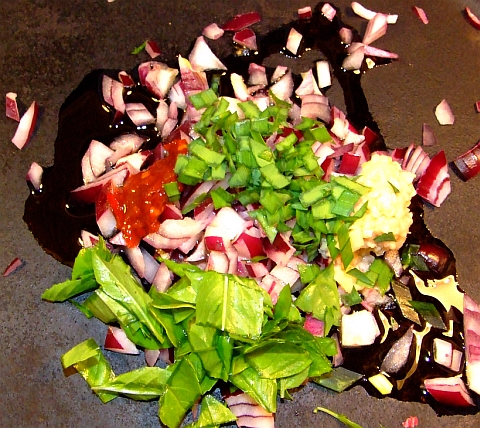
Add all the above ingredients to a large cast-iron skillet.

DSCF0046

Simmer and stir for a few minutes till the garlic is close to browning.

Then add 1 cup of white wine (or water) and let it simmer for a few minutes till the liquid is *almost* reduced to nothing.

For the next part you'll want to have these two things handy:
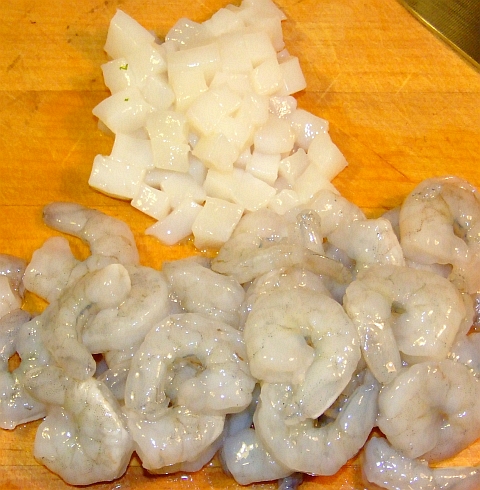
200 grams prawn meat, peeled and deveined
100 grams minced squid tube, cleaned of course

Perhaps your seafood may look something like this:

DSCF0049
Your cutting board may vary of course.

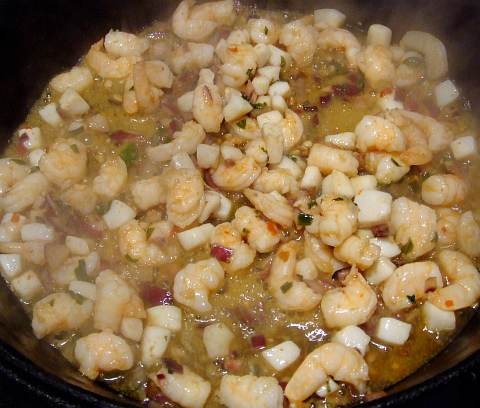
Add that wonderful, delicious seafood to your that large saucepan that has just simmered down!


DSCF0051
Oh yeah, I'm getting hungry just thinking about the wonderful smell from the saucepan last night.

Turn the heat up a bit and stir for a minute, then turn the heat to low. Add 1 cup water, cover and simmer till the liquid is gone.
DSCF0052

Now you get to make it "Alfredo"!

Add 1 cup of full cream milk and 1/2 cup cream. Stir to combine while heating. Grate 1/2 cup cheddar cheese over the simmering mix, sprinkle on a pinch of sea salt. Stir to combine well.

Turn off the heat and cover.

Now you thicken it a bit. I use tapioca flour to thicken these type of sauces but if you only have cornstarch then that's ok.

Mix 1 tbsp tapioca flour with 1/2 cup cold water. Add to the saucepan with all your wonderfully smelling goodies in it; quick stir to combine. Wa-La!

Serve over any kind of pasta as takes your fancy. Garnish with fresh basil.

Note, MIL wanted spaghetti, Wifey-Poo wanted fettuccine, and I wanted angel-hair. Here's a pic of MIL's plate.

DSCF0053s

Enjoy!

Thursday, June 16, 2011

The Perfect Grilled Cheese Sandwich

Or sammy. Or sarnie. Or buttie. Or pieces. They all mean SANDWICH!

I don't think (yes, I'm sure you all know that already) that I've ever posted a sandwich recipe before as they always seemed rather intuitive to mean. I also didn't think anyone would be interested in a sandwich recipe.

Boy was I wrong. I sorta kinda let it slip (accidently of course) that I make a really good grilled cheese sandwich. So I now feel honour-bound to post my Perfect Grilled Cheese Sandwich recipe complete with the high quality pictures you've come to expect from me.

This is my basic, standard grilled cheese. I also make premium ones with various additions which I'll put on the end of the post, no worries.

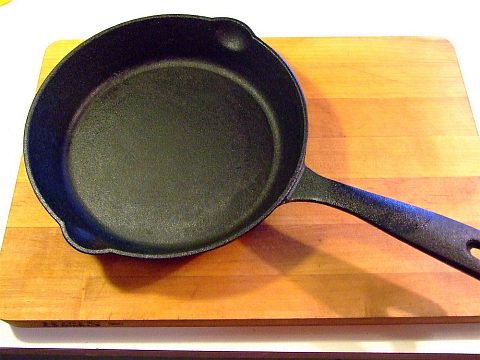
The most important thing for making a grilled cheese sandwich is to have a pan or griddle that heats evenly and holds it's heat for a while. I recommend cast iron. Something like this:
grilledcheese01


If you don't have cast iron, then a thick bottomed stainless steel one will do, no worries. I don't recommend anything thin, but if you are used to that and can control the temp then it should work.

Some folks say white bread only for grilled cheese. I'm not one of them. I prefer wholemeal. I don't use multigrained bread for my grilled cheese sarnies as I don't like the taste of the multigrain bread to interfere with the toasty, gooey, cheesy goodness.

The basics needed for The Perfect Grilled Cheese Sandwich

2 slices of bread, white or wholemeal
2-3 tbsp of butter
4 slices of REAL cheddar cheese

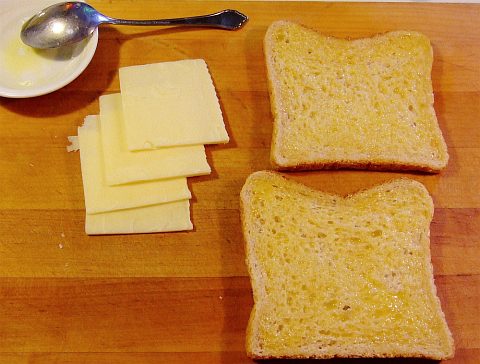
The first thing you need to do is just slightly melt the butter. Just enough to soften it, but not enough to separate the butter. Have a look at the melted butter up at the top of this picture and you'll see what I mean:
grilledcheese02
Don't worry if your cheddar isn't white, but please don't use any of the "processed" stuff.

Spread the melted butter over one side of each bread slice. Make sure you get all the way to the crust as that is VERY important, trust me. What I do is spoon on a bit of the butter, then spread it around with the back of the spoon. Remember, you only want the butter to be *just* melted so it doesn't seep through the entire slice.
grilledcheese03


You should have put your frypan on the heat before you spread the butter, that way it should be just about ready by now. A low heat is to be used as you don't want the bread to burn before the cheese is melted. I've been known to turn the heat off completely for a few minutes and let the residual heat from the pan continue to toast the bread and melt the cheese.

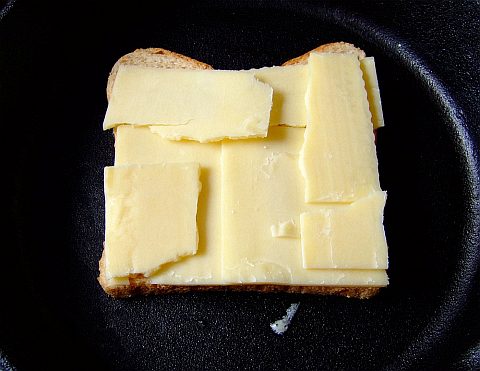
Place one slice butter side down on your pan and cover EVENLY with the cheese. A common mistake is to have too much cheese in the middle. If you do that the edges will be dripping out onto the pan before the middle is melted. Just break up the pieces to whatever shape is needed to cover the bread evenly.
grilledcheese04
Now immediately place the other slice of bread on top, butter side facing up of course.

After about 2 minutes it'll be ready for it's first flip. The first flip is the only one that's hard as the cheese hasn't melted into the "top" slice to hold things together yet. I just lightly place my fingertips on the top slice as I quickly flip the sandwich.

If the fry pan is heating up too quickly at this point you can turn the heat way down or even off. This is the point I turn the heat off for 3 to 4 minutes and let the heat from the cast iron frypan take over. This lets the cheese melt evenly while not burning either slice of bread.

Don't worry if you need to turn the sandwich a couple more times in order to get both slices of bread evenly toasted. Besides, when the bread is evenly toasted it also means the cheese is melted through if you use a low heat.

The finished product should look like this:
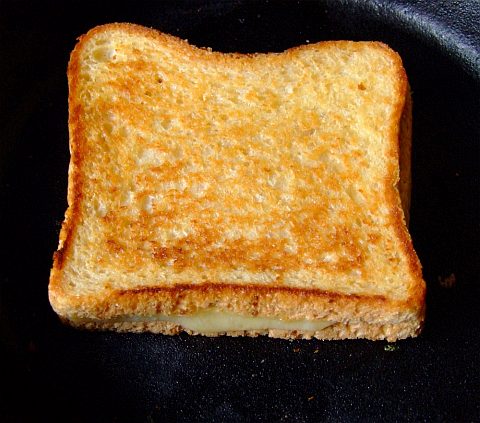
grilledcheese05


And if you are sharing the sandwich with someone and you slice it, you'll notice the cheese is melted evenly throughout.
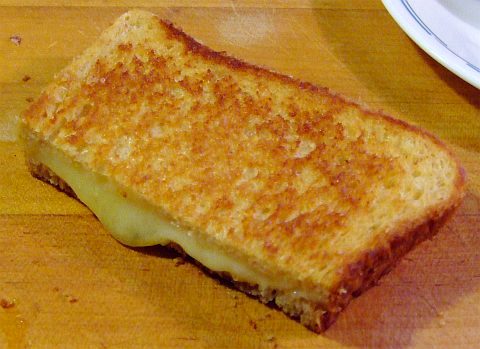
grilledcheese06


That's my basic Perfect Grilled Cheese Sandwich.

There are other things you can do. Some folks like to press the sandwich together. In fact, sandwich presses are very popular down here in Oz. Personally though, I don't like them pressed. But if you do want to press them you can, just don't let me catch you doing it with mine!

Additions:
salt
thin-sliced onion
minced garlic
thin-sliced tomato
shaved ham
various types of salami type meats
any type of pickled veggie

Salt: Some people sprinkle some salt on the buttered side of each bread slice before or after cooking. I've been know to do this, but mostly not.

Thin-sliced onion: And I do mean THIN! I don't like thick slabs of onion on the sandwich as it can (and will) slide apart as you eat it. Put the onion down before the cheese, that way the cheese will melt the onion onto the base slice so it doesn't slide apart as you flip it.

Minced garlic: You can spread it on the buttered side so the garlic toasts along with the bread, or on the inside if you really love that garlicky flavour!

Thin-sliced tomato: Again, very thin slices so the sandwich doesn't slide apart as you eat it. Use same as the onions.

Shaved ham: Same thing as the onion or the tomato.

Salami type meats. Cured meats are much denser than shaved ham so after slicing them I'll slice each slice into strips. That way when you bite into the sandwich you won't pull out a whole wedge of salami at once.

Pickled veggies. Ah yes. Pickled veggies. Obviously pickled cucumber leaps to mind, but pickled cabbage or pickled carrots go quite well. Pickled peppers too! Whatever pickled veg you choose to use, make sure it is drained well! Otherwise the pickle juices will seep into the bread and it won't be nice a crispy, toasty, grilled-like, crunchy texture. It'll be soggy instead and I don't like that --and neither will you I'd imagine.

I will get the seitan recipes up! I promise! I'm doing many different things with it so it'll be like 3 or 4 posts in one, lucky you!
Friday, February 18, 2011

Cheesy Garlic Crumble

Yes, you read that right. No, it has nothing to do with the Aussie candy bar called Violet Crumble. But I thought the name sounded cool when I came up with it so you're stuck with it!

What do you do when it's 10 minutes before your spaghetti dinner and you realize you have no french bread with which to make garlic bread -with cheese, of course? Simple! Come up with something using breadcrumbs, fresh basil, garlic, olive oil, and cheese!

There's no measurements for this as I really did make it up as I went along, but I did take plenty of pics which really illustrate the process.

Garlic crumble

What you need:
some breadcrumbs
fresh basil leaves
garlic (I used the jarred stuff for this)
olive oil
cheese

The cheese I used was cheddar which down here is called Tasty. Cheddar is only called cheddar in Oz if it comes from the Cheddar Gorge which is just outside of Cheddar.


What you do:

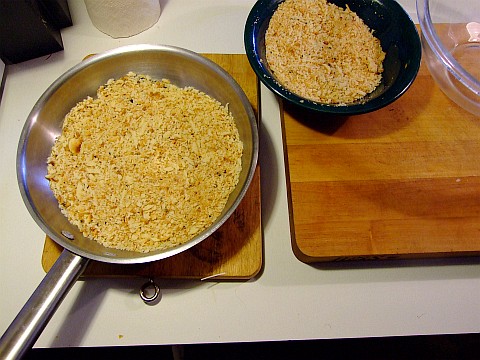
First, you'll need to find out the amount of bread crumbs you need. Use whatever oven-proof saucepan you need for making this and cover the bottom with 1 cm of breadcrumbs.
gc01


Then chuck that in a mixing bowl. See? Easy way to measure, isn't it?

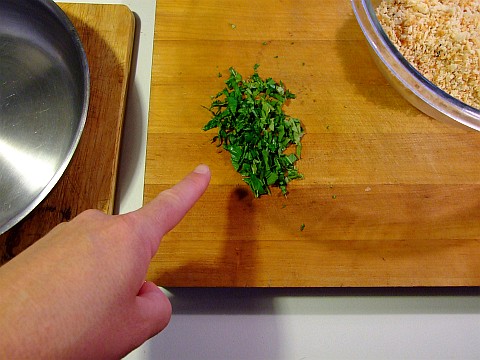
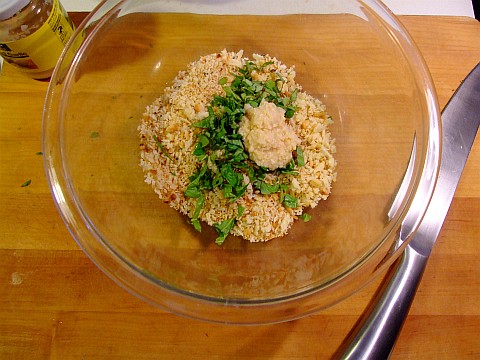
Go outside and snip some fresh basil, then chop it up. How much basil? About this much:
gc02


Now add a good sized splat of garlic. How much is a splat? This much:
gc03


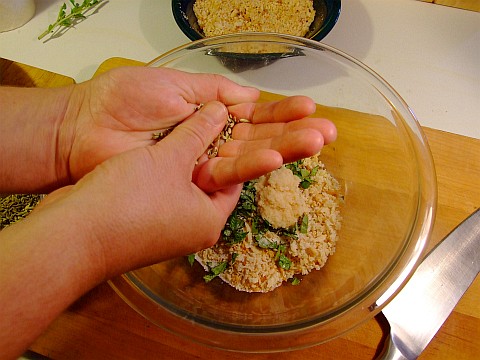
Put some fennel seeds in the palm of your hand. Run the thumb of the other hand over the seeds to partially crunch them, then add to the bowl. Here's what I mean:
gc04

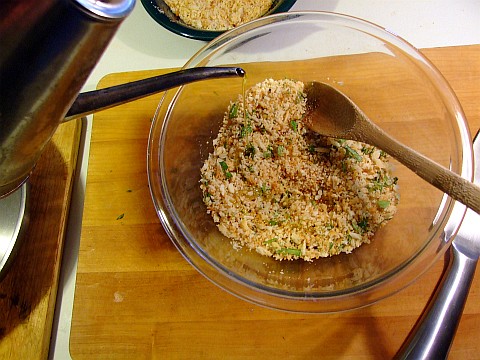
Mix it all together and then add some olive oil. Like my olive oil can? It's from India.
gc05


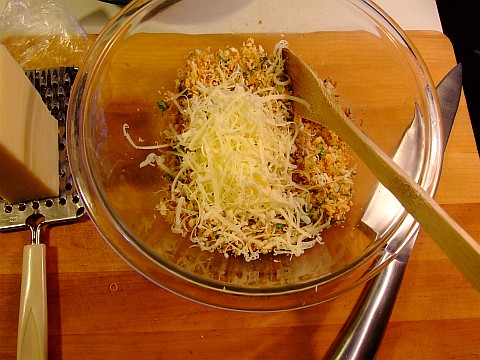
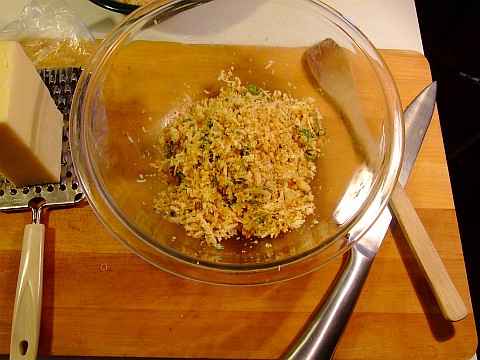
Stir it all together then add some grated cheese. I used around 1 cup's worth of cheddar (tasty).
gc06


Mix it together using your fingers. Make sure you don't let the grate cheese clump together. Your bowl should now look something like this:
gc07


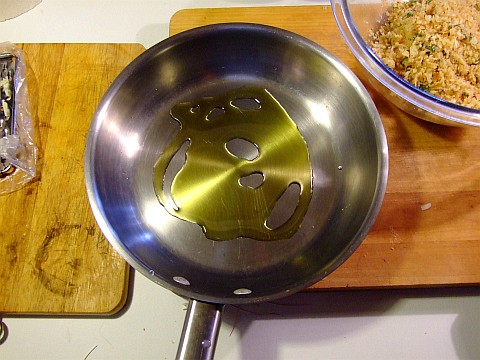
Add a bit of olive oil to whatever ovenable frypan you'll be using:gc08
This is my small Gabrial Gate (tm) small frypan from a set of two. The ONLY reason I have the set is that I got them on an 80% off sale at Harris Scarfe. Otherwise there wouldn't have been no way I could afford those two wonderful frypans.

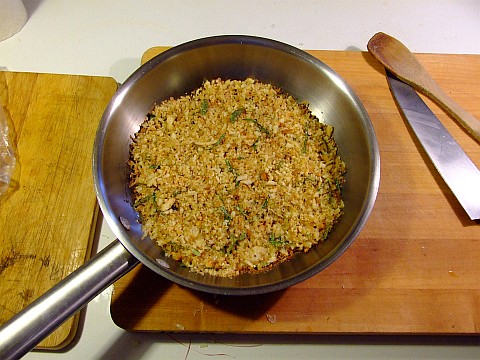
Now spread the mixture evenly over the bottom of the saucepan and cook on low heat on the stovetop till the bottom crumbs JUST start to brown. Do NOT leave the frypan unattended for any length of time as it can go from slightly browned to BURNT in the blink of an eye.

This was actually the second batch I made as I did turn my back on the first batch. Oops.

Now that the bottom is browned, it should look something like this:
gc09


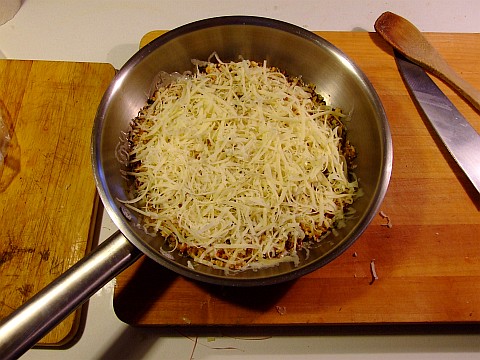
Grate some more cheese over the top:
gc10


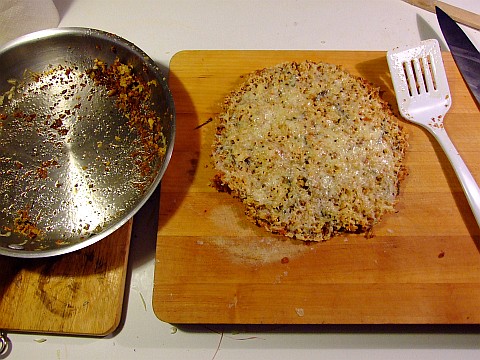
And then bake it in a hot oven till the cheese melts (only a few minutes). Slid it onto a cutting board
gc11


and then cut it up into pieces, serve on the side of your spaghetti in place of garlic bread.

Tada! Garlic Crumble!

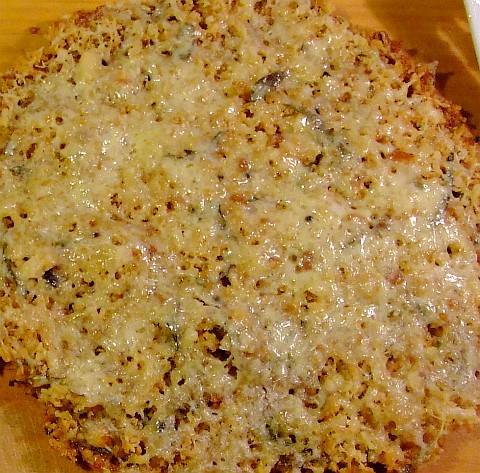
Here's a closeup
gc12


Mmmmm, it was tasty.

Sunday, September 5, 2010

Easy Vegetable Stock AND Easy Cheese Sauce

You get 2 recipes today! Mainly cus I've been negligent in my posting lately, my bad.

These really aren't "recipes" as I think they are just too simple for ingredient lists and the like. Besides, I make each one different each time. Don't worry, I'll write all about various substitutions and methods.

We'll start with the veggie stock. Why make your own? Have you ever looked at the list of ingredients on powdered or liquid stock you buy at the shops? GAAACK! The rule is if you either can't pronounce it or don't know what it is then DON'T buy it. I happen to be able to do both and it scares me just what people put into their bodies.

*dave climbs off soapbox now*

Simple to make you own veggie stock. And you don't even need a bunch of high priced perfect-looking veggies. Cheap ratty-tatty ones on quick sale work great. So do scraps from your meal prep!

Potato peelings? Toss em in the pot. Corn husks? Ditto! Same goes for that corn cobb you just ate. Shriveled garlic or dried out onion? Wee-hoo! Skanky looking outer cabbage leaves? The more the merrier! Shriveled carrot? No worries!

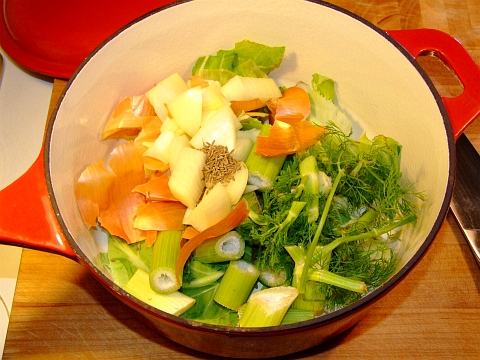
Here's what mine looked like:
veggie stock raw

The pot contains half a dried onion plus it's brown skin and roots, a mashed up garlic clove, fennel stalks and fronds, outer leaves from a cauliflower, and a small handful of cumin seeds.

Added just enough water to cover things as I didn't need too much stock. I was going to use this stock to start the cheese sauce so I didn't need much. If you are making enough for soup then use a larger pot and more water.

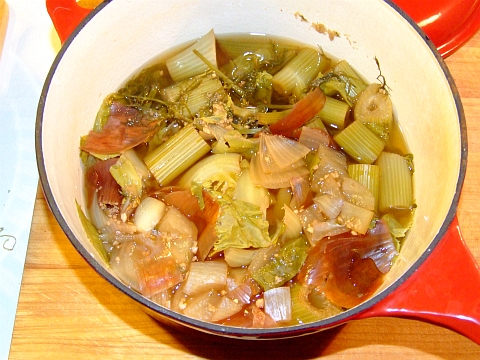
After simmering, covered, on the stovetop for an hour, this is what it looked like:
veggie stock cooked


Just strain it and put it into a small saucepan to make the cheese sauce.

Sometimes I use beer to start the cheese sauce, other times white wine. This time I wanted to use the stock I just made. Which, after all, was the whole reason for making the stock in the first place.

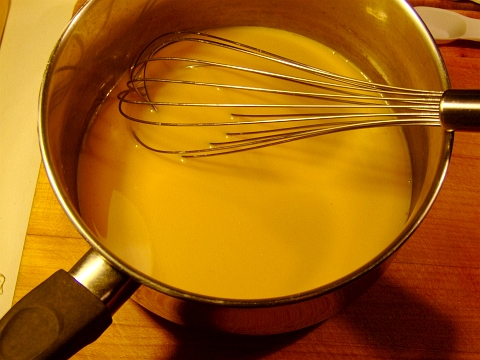
I had around 3 cups of stock and to that I added 1/2 cup cream and a pinch of turmeric (just enough to turn it yellow about 1/8 tsp). Heated it up and whisked till it was all combined.

The saucepan should now look something like this:
cheese sauce01


At this point you can also grate in some chedder; you won't get as creamy a texture though.

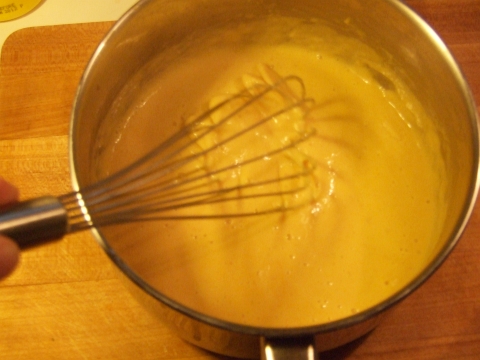
Next I removed it from the heat (thick bottomed saucepan so it held the heat nicely) and whisked in cornflour (cornstarch in the US) 1/4 tsp at a time. It's important to REALLY whisk the sauce at this point as you actually want to aerate the sauce. Once the sauce is just less than your desired consistency (while constantly whisking) then return the pan to the heat for about a minute. Now add 4 or 5 tbsp cream cheese and stir/whisk till cream cheese in incorporated into the nice, fluffy sauce.

Here I am whisking away after the 6th 1/4 tsp of cornflour was added.
cheese sauce02
Notice the aeration already? That'll keep it from "gellifying" when it cools.

Whisk CONSTANTLY. This whole process will take 5 to 8 minutes to get the sauce thickened but airy.

Those cramps in your hand are worth it, trust me. Or you could just use an electric mixer the whole time if you so desire.

Once you've heated it back up for a minute or two (while whisking constantly) and added the cream cheese, then remove the saucepan from the heat and pour it into a bowl.

Now's when you get to add goodies! Chilli flakes? No worries. Cumin powder? Oh yeah! Fresh coriander (cilantro in North America) leaves? You betcha! You are only limited by your imagination.

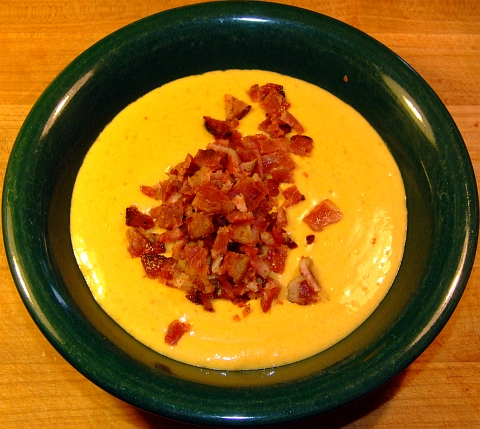
For this sauce I chose bacon. Seriously, doesn't EVERYTHING taste better with bacon?
cheese sauce03


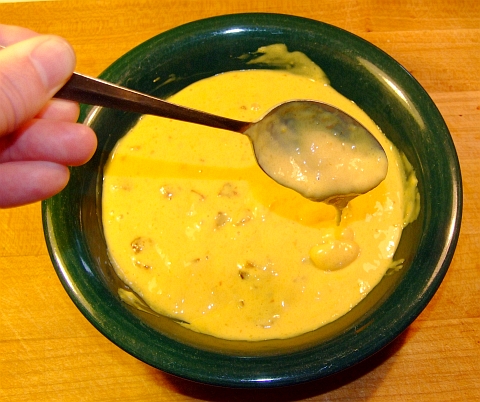
Then just gently stir it in!
cheese sauce04


Notice the creaminess of the sauce? This last photo was taken AFTER the sauce had cooled. Neat huh? So you can make a creamy cheese sauce using cornflour --cornstarch-- provided you whisk or mix well for a bit of time to really aerate the mix so it doesn't congeal as it cools.

Enjoy!

Monday, July 26, 2010

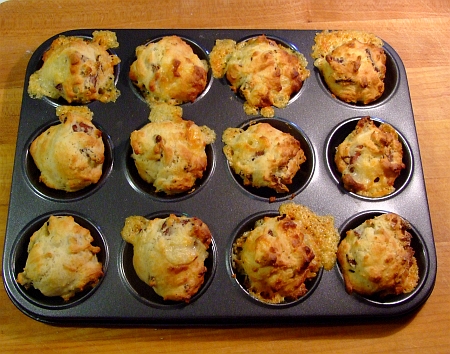
Cheese & Bacon Mini Muffins

And they are oh so tasty! A quick snack, they do make. Bake up a mess of 'em on Sunday and toss a few in your lunch box throughout the week. If they last that long... which I doubt.

I got the idea for these from an Aussie cookbook circa 1972 titled Cooking With Wine & Cheese. 50 cents at a garage sale. And with a title like that I certainly wasn't going to pass it by. No sirree!

The recipe from the book, with it's frail, aged pages, did not call for bacon and some of the amounts were not what I'd use. Especially since they didn't use nearly enough cheese. Also, mine are made in mini muffin tins so they are bite-sized. Very handy. I also use different techniques and different ingredients. But I did get the idea from the book.

But you gotta like any recipe book that says to not only to preheat the oven but to also preheat the "irons". Irons? Yes, "irons" is what any type of metal (always cast iron) baking implement used to be called. These days you'll rarely hear the term outside of grey-haired camping aficionados as some still refer to campfire cooking implements as "irons".

Anyways, just use a muffin tin, no worries. Make sure you use the smallest you can find. These aren't called mini muffins just cuz, you know?

On with the recipe!

Cheese & Bacon Mini Muffins this makes 36 mini muffins

What you need:

1 1/2 cups self raising flour
1 tsp salt
3 tbsp full cream milk powder

1 tbsp butter

3 slices of Aussie sized bacon slices; diced, cooked and drained. 6 if you are using US sized bacon slices.
125 grams diced cheddar (equal to 5.33 ounces or 1/3 of a pound)

1 egg
2/3 cup water (H2O)


What you do:

Put the first 3 ingredients in a mixing bowl. Stir em up so they are combined. Add the butter and cut it in with a fork --if your butter is really cold you can use your fingers if you do it quickly.

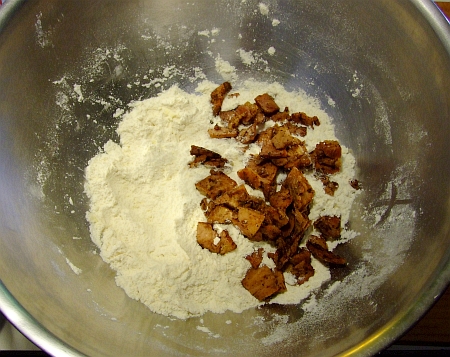
Toss in the cooked & drained bacon pieces:
muff01


Mix it up so the bacon is coated. Then add the cheese:
muff02


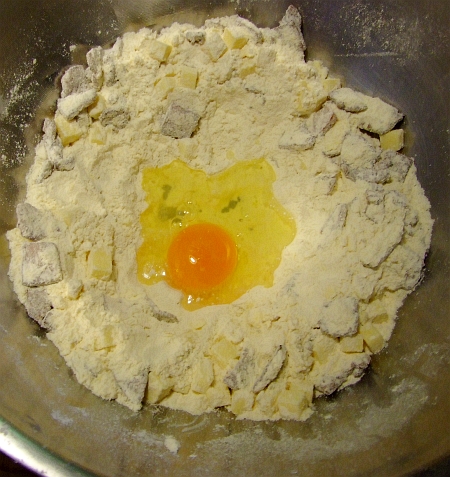
and mix it around so the cheese chunks are coated. Make a small well in the center of the mix and crack an egg into it.muff03


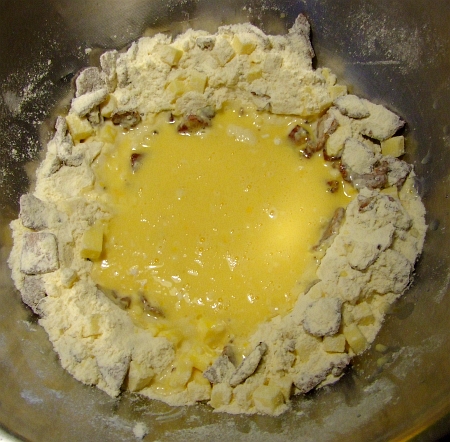
Add the water and beat the egg and water together.
muff04


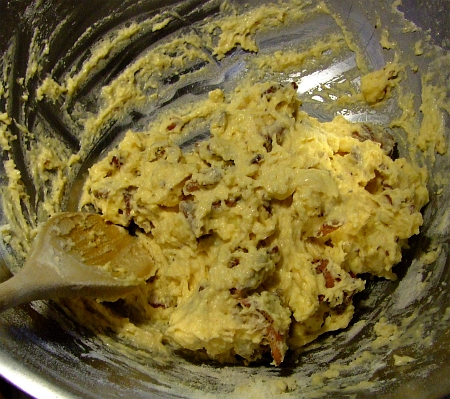
Grab a wooden spoon and mix the whole mess together!muff05


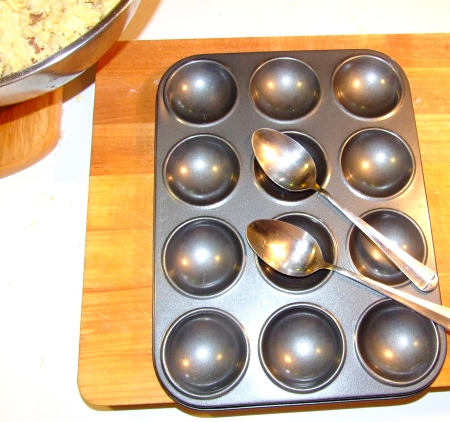
Grab your muffin tray and the spoons. I put a couple of table spoons on the tray so you'd get an idea just how small each muffin hole is.
muff06


Fill the tray with a decent sized spoonful of the mix in each muffin hole:
muff07
As I said earlier, you'll get 36 mini muffins or 3 tray fulls from this recipe.

You should have preheated your oven to 220 C (428 F) a while back. I'd recommend doing that first thing as the preparation doesn't take very long.

Bake them for 12 to 15 mins till they look something like this:
muff08


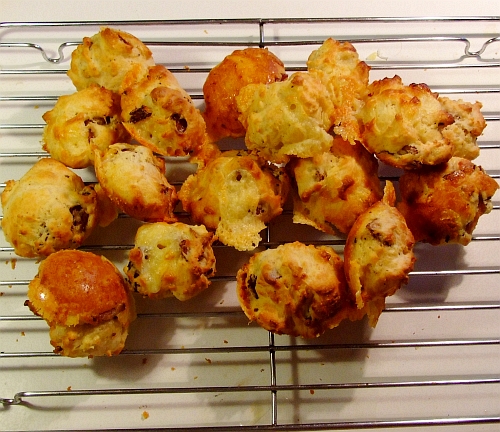
Pop em out and put em on a cooling rack. Load the tray up for the next round. After a while your cooling rack will look something like this:
muff09


That picture was taken after 2 of the 3 rounds were done. You'll notice there is not 24 of the buggas on the rack. They are, ummmmmm, very tasty and very easy to eat as you make them, well at least that's what I've heard. Great hot and great cold.

Make these and you'll be happy. So will your taste buds. So will your tummy. Just try not to eat them all at once.

Monday, May 24, 2010

Biggest Morning Tea

Each year, the Biology dept up at our local Flinders Uni hosts what they like to call "The Biggest Morning Tea". It only costs $4 to get in (that's just a couple of Aussie $2 coins). All the cooking is done on a volunteer basis.

My BIL works at the Paleo lab in the Bio dept so he's on their email list. Last week he received an urgent email asking for more cooking-type folks. So far only 4 people had volunteered, and none of them featured any savory dishes.

Mike (BIL) told them about my cooking prowess, and I got in email contact with the lady in charge. She is very thrilled with what I said I could make for them.

Here's the list of what I'll be making between now (monday arvo) and thurs morn:

Cheese and bacon muffins

soft pretzels w/ cheese sauce

mexican chocolate fondue

zucchini bread

cumin seed crackers

wholemeal chia seed bread w/sunflower and pumpkin seeds

morrocan seasoned pan bread w/ grana padana cheese

fresh homemade ricotta cheese (it's easier than you think) to go with the cumin crackers and whatever.


They are expecting 100 to 150 people... This will be challenging, especially as MIL has a couple of doctor appointments this week.

Wish me luck folks!

Oh, the proceeds from it go directly the Flinders Med Centre (right next to the U) for their cancer research.

Friday, April 2, 2010

Easy Cheesy Tuna & Potato Bake

Yeah, yeah. I hear ya. How can I be putting up a recipe about such a simple, mundane (but tasty) casserole? The answer is simple: mine is better than any type of tuna n spud baked casserole you've ever had.

Yes, this is better than your mother's. Ummmmmm, sorry mum...

It also takes a wee bit more cooking than a "traditional" bake.

What you need:
5 large spuds; scrubbed, peeled and diced into 1 inch chunks
2 cans of chunky tuna in oil
high quality cheddar cheese
Old Bay seasoning --the real kind with NO preservatives


Simple list, eh? The key is in the cooking of the spuds (that'd be potatoes for those of you knot in the know) of course.


What you due:

Put the diced spuds and 1 tsp of old bay into a large steel wok. Cook on low heat for 10 to 15 minutes while stirring/tossing regularly. Once the spuds are seared nicely but still not totally cooked, add the oil from both cans of tuna. Yes, you read that right! Stir to de-glaze the wok of all the yummy seasoned potato brownings, and simmer till most of the liquid is gone.

Into a roasting pan add half of the almost-cooked spuds. Use a fork to break apart the chunky tuna and spread it over the potato. Shred a good amount of cheddar cheese over the tuna and then sprinkle a tsp of Old Bay. Spread the other half of the spuds over the top and add some more grated cheese. Pour the wok juices over the top. Cover and bake till the cheese is melted through.

This is, um, DARNED tasty! Simple, easy and very good. And I'm sure you can think of many things veggie-wise to add to the roasting pan such as broccoli, cauliflower, carrots, pumpkin, green beans, peas, eggplant, whatever.

Cheesy Tuna & Potato Bake

Yeah, yeah. I hear ya. How can I be putting up a recipe about such a simple, mundane (but tasty) casserole? The answer is simple: mine is better than any type of tuna n spud baked casserole you've ever had.

Yes, this is better than your mother's. Ummmmmm, sorry mum...

It also takes a wee bit more cooking than a "traditional" bake.

What you need:
5 large spuds; scrubbed, peeled and diced into 1 inch chunks
2 cans of chunky tuna in oil
high quality cheddar cheese
Old Bay seasoning --the real kind with NO preservatives


Simple list, eh? The key is in the cooking of the spuds (that'd be potatoes for those of you knot in the know) of course.


What you due:

Put the diced spuds and 1 tsp of old bay into a large steel wok. Cook on low heat for 10 to 15 minutes while stirring/tossing regularly. Once the spuds are seared nicely but still not totally cooked, add the oil from both cans of tuna. Yes, you read that right! Stir to de-glaze the wok of all the yummy seasoned potato brownings, and simmer till most of the liquid is gone.

Into a roasting pan add half of the almost-cooked spuds. Use a fork to break apart the chunky tuna and spread it over the potato. Shred a good amount of cheddar cheese over the tuna and then sprinkle a tsp of Old Bay. Spread the other half of the spuds over the top and add some more grated cheese. Pour the wok juices over the top. Cover and bake till the cheese is melted through.

This is, um, DARNED tasty! Simple, easy and very good. And I'm sure you can think of many things veggie-wise to add to the roasting pan such as broccoli, cauliflower, carrots, pumpkin, whatever.

Tuesday, February 16, 2010

Cheese Making Tip

If you don't make cheese, you should start. It's much easier than you may have been led to believe, trust me.

Ok, cheesemaking tip: You can save yourself a lot of pasteurizing time by using milk powder. I use full cream milk powder and add a 1/4 to a 1/2 teaspoon of lipase powder to the milk (gives it a nice, fresher milk taste). I also double the amount of milk powder than usual. Why? Because that way you get *ahem* MORE curds, which is always nice.

I'll be back with recipes soon, just wanted to get this tip up while I was thinking about it.

Saturday, December 19, 2009

Quick and Easy Creamy Cheese Sauce

Have you ever needed to make a really quick cheese sauce to go on something? Then this is for you!
Cheap, easy, simple. I think anyone, and I mean anyone, can make this.

It all started the other day when I had to spin out 2 basa fillets to make a meal for 5 adults. I cubed the fish to about dice size, tossed them in some seasoned breadcrumbs (salt, white pepper, cumin) and then put the tray in the oven. They were to be served over a rice dish --something like a risotto but with way different seasonings.

As the rice was almost done and the fish ready to come out of the oven, I realised that this dish needed a sauce to drizzle over the top! I didn't panic, just took a quick look at what I had on hand so I could make a quick sauce, which would go well with the crumbed whitefish with rice, and decided upon a creamy cheese sauce.

Here's what you need:

1 cup cream
1 tsp crushed garlic
pinch of salt
pinch of ground black pepper
1/2 cup grated colby cheese
1 pinch of dried mint
1 pinch of dillweed


And here's what you do:

Toss everything EXCEPT the cheese into a small saucepan. Light a fire under it and heat till it simmers (DON'T LET IT BOIL OR BUBBLE, else there'll be trouble). Stir it a bit as it heats up. Once it's simmering, add the grated cheese, stir till the cheese is melted and then serve it up!

See? Couldn't be easier. This should also go well over poultry, any non-oily fish, pork or beef roast (drizzle over the slices of beef when you are serving). If you have other thoughts about what this would go well with, just lemme know in the comments.

Oh, if you make this with bleu cheese it'll work great, but the flavour is much stronger so the meat needs to be cooked differently --like fried pork chops with the sauce drizzled over.

Saturday, November 28, 2009

Cheesy Baked Croquettes with Smoked Trout & Prawn Sauce

Yeah, that's quite the title isn't it? The prawn sauce is optional, BTW. One night I served them as a main course without the prawn sauce but with a side salad, and the next night as a side dish with the prawn sauce.

Personally, I like them better with the prawn sauce.

The amounts of each ingredient aren't listed --with one or two exceptions-- you'll see why, no worries.


Cheesy Baked Croquettes with Smoked Trout & Prawn Sauce


What you need:

For the croquettes:

4 to 6 cups of leftover mashed potato --do I REALLY need to explain how to make mashed spuds?
handful of fresh basil leaves
diced cheddar cheese --somewhere around 1.5 cm but please don't be exact
salt
pepper
couple of handfuls of bread crumbs
cumin powder
turmeric powder
thin-sliced smoked trout (or smoked salmon)

For the prawn sauce:

Handful of prawn shells (I ALWAYS keep prawn shells after shelling the prawns, they freeze well and you just break off a hunk whenever you want to make a sauce or stock)
1 crushed garlic clove
1 or 2 tsp dijon mustard
1 tbsp lambrusco wine
1 tbsp cream fraiche OR sour cream OR double cream
dash of sea salt
dash of ground white pepper
4 cups H2O (water)


Whut U Due:


Cube some cheddar cheese to around 1.5 cm (3/5 of an inch) --or somewhere thereabouts. Mince up some fresh basil leaves (rinse them first, could be caterpillars hiding).

Your cutting board should now look thusly:
DSCF6555


Mix the basil into the mashed spuds. Place some of the spuds into your hand --each croquette should be between golfball and tennis ball size.
DSCF6558


Flatten the mashed potato in your palm and place a piece of cheese in the middle.
DSCF6566


Carefully mold the potato around the cheese
DSCF6567


Ta-da!
DSCF6569


Make up as many or as few as you'd like, no worries. I used three per person as a main and one per person as a side dish. Put them on a plate and then refridgerate for an hour. This way they'll be easier to crumb.

So, like, what to do for an hour while the croquettes chill in the fridge? How about make some prawn sauce!

Add your empty prawn shells and the garlic and 4 cups of water into a saucepan. Crank the heat up and simmer for an hour. If the water gets too low, then just add some more water. You want to end up with around 2 cups of liquid.

Turn off the heat. Take a potato masher and mash the shells flat to extract every last bit of prawny goodness. Strain and return the strained liquid to the pan. Cover the saucepan and set aside. Let's return to the croquettes.

Spread your plain bread crumbs on a tray or plate. The sprinkle on a bit of salt and two of my favourite spices; cumin powder and turmeric powder.
DSCF6572


Mix the breadcrumbs around so the crumbs are full of the spices.

After the potato balls have chilled, take them out of the fridge and make up an egg wash: one egg plus equal amount water. And put a bit of flour in a bowl too.
DSCF6576


Roll each bowl in the flour (lightly shake off excess), roll it in the egg wash, and then roll in the breadcrumbs.

This is what they look like before baking:
DSCF6578


Bake them at around 375 F. Long enough to brown the breading, but not so long that the cheese leaks out. 15 mins should do it --I wasn't timing these but I'd check every few minutes to make sure the cheese wasn't running out.

While they bake, shall we finish the sauce?

Turn the heat on the liquid as low as possible and add the mustard, wine, salt and pepper. Whisk it well, let the sauce come up to a simmer (don't boil it) and taste for seasonings. You might want to add a bit more salt or pepper, but don't make it spicy as this isn't a spicy sauce.

Turn the heat off and cover to keep warm. Just before serving whisk in the cream fraiche (or sour cream or double cream). If you need to heat it back up do so, but it'll only take a minute at most --don't let it boil after you've added the cream.

Spoon it over the baked croquettes BEFORE you top with the smoked trout and basil sprig.

This is what the croquettes look like after baking:
DSCF6579


The first night they were a main course without sauce. 3 per plate and a thin slice of smoked trout curled on top. This was my plate:
DSCF6585
No, that's not gunky, fatty dressing. It's my own homemade tzatziki


The next night they were a side dish to baked basa and I made the prawn sauce to drizzle over the top. After the sauce is drizzled over the croquettes, then artfully arrange a slice of smoked trout on top and fresh basil to top it. This plate was MIL's just before I added the side salad.
DSCF6615


This plate was mine:
DSCF6621


I've been told that I can make these ANY time I want, everyone loved them. Enjoy!