Showing posts with label side dish. Show all posts

Sunday, August 26, 2012

Authentic Yorkshire Pudding (Important Update!)

What's that I hear you ask? How does a bloke from the Interior of Alaska who now lives in Adelaide, South Oz know anything about making AUTHENTIC Yorkshire Pudding?

Good question!

The answer is that my MIL is from Stockton-On-Tees which for the longest time used to be part of Yorkshire. She got the recipe from her mom who got it from her mom so this dates back to the mid to late 1800's. I'd say that is pretty darned authentic.

No, this is not the original type where you have the pan of eggy-floury-milky stuff under a roast on a fire where the meat drippings infuse themselves into the pudding as it rises. That's what gravy is for nowadays!

Alrighty then, dave's Authentic Yorkshire Pudding recipe courtesy of his mother-in-law.

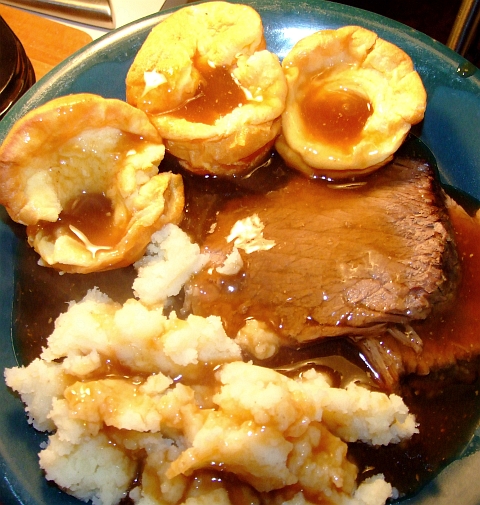
BTW, this dish is a side dish to a nice roast. You must use the pan drippings from the roast to making loads of gravy to go over the puddings and meat slices too. And this will make 12 muffin-sized Yorkshire Puddings.

What you need:
2/3 cup plain flour (NOT self-rising)
4 large eggs
milk
1/4 tsp salt
dash black pepper
butter


DSCF0163

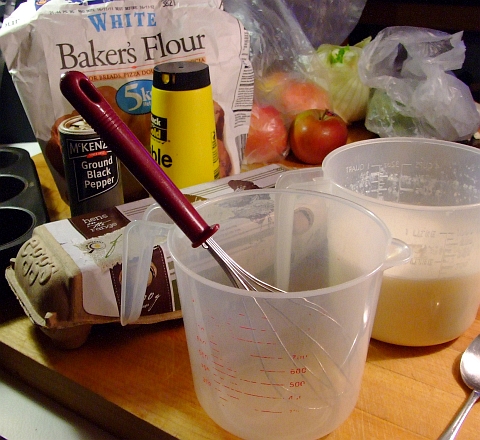
And a muffin tray to cook them in!

What you do:

First thing is to preheat your oven. MIL always says "a hot oven" to which I interpret to mean 210C/425F. You also preheat your muffin tray(s). The muffin tray(s) need be very hot when you pour the batter into them! Butter the muffin trays before you put them in the oven. And do not put them in the oven until the oven itself is preheated.

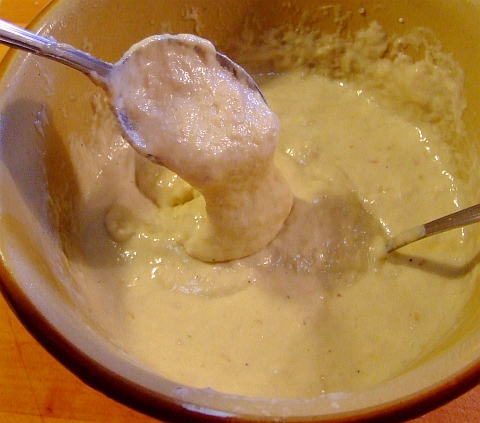
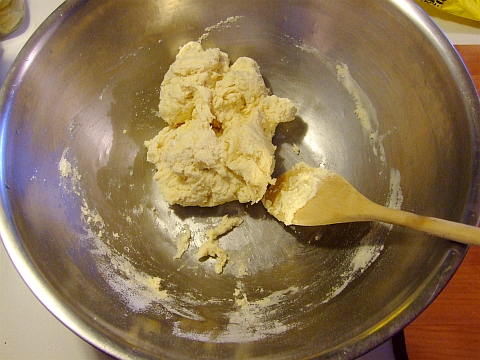
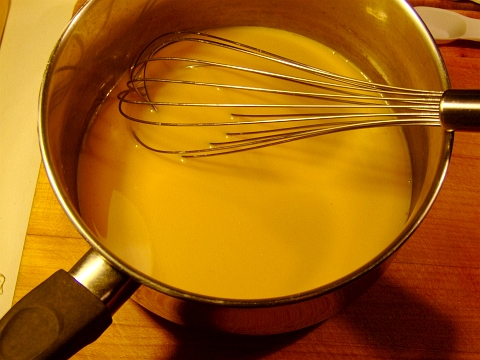
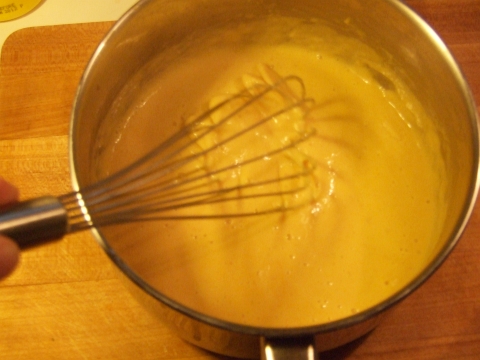
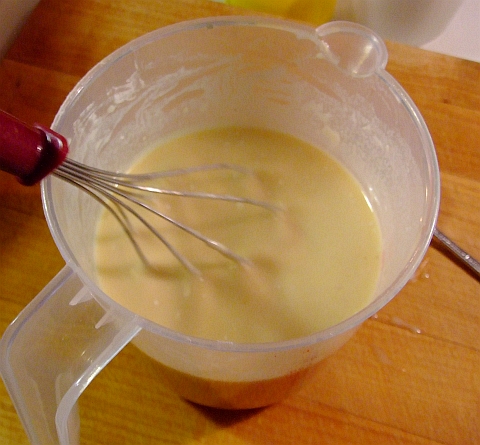
Whisk the eggs together in a large measuring cup. Add the salt, pepper, flour and mix till it's a paste. Then add enough milk to bring the volume to 1/2 pint (600 mls or slightly more than one TWO cups).

Whisk it thoroughly until it is the consistency of cream. It should look like this:

DSCF0168


After whisking the mix thoroughly, take the muffin trays out of the oven. The butter in each muffin cup should be sizzling and bubbling by now, if not then leave them in a bit longer.

Do not fill the muffin cups more than 1/3 full! These babies are going to foof up like you wouldn't believe!

DSCF0180

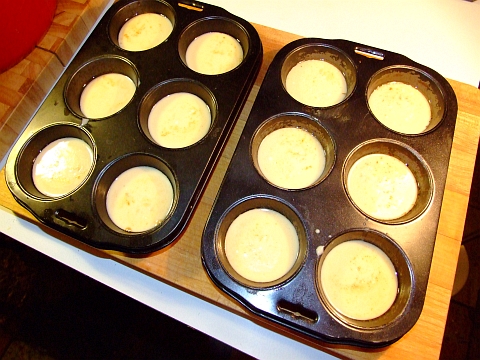
And then immediately put the trays in the hot oven.

After a few minutes you'll notice (don't open the door, just turn on the oven light!) the puddings are rising very quickly around the sides but not the middle. That means you are doing it right!
DSCF0182

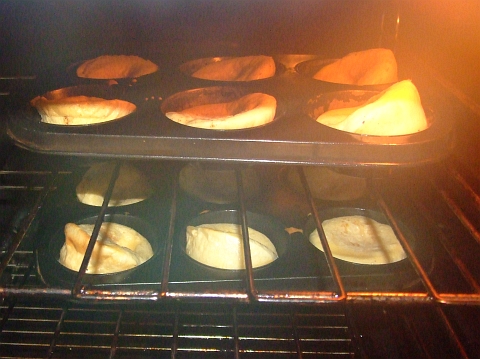
Let the tops brown nicely whilst in the oven. The whole cooking process should take anywhere from 15 to 20. This should be the time when you make your gravy and mash the potatoes. When the tops are browned then it is time to take them out

DSCF0184

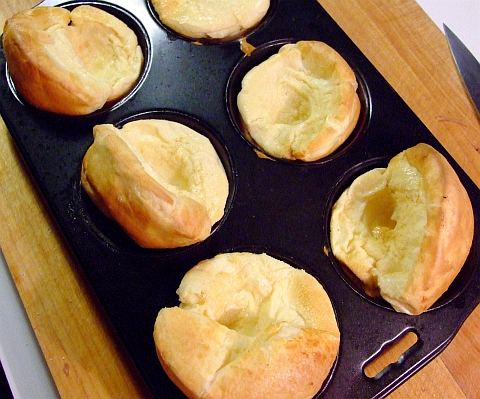
and immediately serve them! A plateful of roast beef, mashed spuds, Yorkshire puddings with lashings of gravy over everything is some seriously great comfort food on a cold day!

DSCF0186

Enjoy.

UPDATE: Important! Did you see where I said that 600 mls was slightly more than ONE cup? My bad. I doubled the recipe to make 12 muffins and went thru and changed everything but I missed the one cup to two cup. Gack! 600 mls is 2 and 1/4 cups!!!!!

Tuesday, July 24, 2012

Deep-Fried Avocado

Yes mates, you can deep fry avocado. And it is oh so tasty too! It's really rather simple. So simple in fact that I wasn't even going to post this.

But since it turned out so great and I have great pictures then I figured I may as well inform you (my loyal readers) of Deep-Fried Avocado!

You'll need an avocado or 2 or 3. Some breadcrumbs. An egg or two. Some cornflour (cornstarch is what it's called in North America). A vessel for deep frying, I prefer a wok. And some deep frying oil --I prefer rice bran oil but peanut oil works great too.

Firstly, peal, pit, slice however many avocados you'll be using. 1 cm thick slices worked just fine for me.

Put some cornstarch on a small plate. Whisk the eggs in a small bowl. Put the breadcrumbs in another small bowl. Your kitchen cutting board should end up looking something like this:
DSCF6748
Or at least the layout of the fixin's should be similar.

As the breading process only takes a minute or two, this would now be a good time to light a fire under your wok which should have some deep frying oil in it at around a 3 cm depth.

To bread the avocado slices just dust them in the cornflour/cornstarch, dunk them in the beaten eggs, then dredge through the breadcrumbs, no worries. Hopefully you'll end up with something resembling this:
DSCF6749

And of course the requisite close-up:
DSCF6750

Alrighty, time to deep fry them! You want the oil temp to be 380F-400F, yes that is rather hot so be careful.

When you deep fry the breaded avocado slices DO NOT TURN YOUR BACK ON THEM! They only take 60 to 90 seconds to fry nicely. You want the breading browned and crispy but the inside NOT turned to mush, hence the high temp and short time.

See what I mean?
DSCF6751

As soon as I pulled them out of the oil to drain I sprinkled a bit of sea salt on them and a pinch of cumin powder. Very very tasty mates!

Mmmmmmmm, seriously yummy.
DSCF6753

Monday, July 11, 2011

Roasted Brussel Sprouts

I've been trying for a month now to get this post up! It's been rather difficult as most of my daytime activities since July 2nd have been seen through a sleep-deprived haze.

"Why?" I hear you ask.

It is because the French decided to have a big ole bike race in the middle of the night. You'd think they could have the decency to have it at normal hours, but no, it's on live in the middle of the night here down unda.

Now that it has been 5 days since the end and I've caught up on a month's worth of sleep, I can now devote time to this here food bloggie thingy.

BTW, Cadel Evans won the Tour de France. Just in case you didn't know.

Back to brussel sprouts.

Brussel sprouts are in season down here now so I've been eating lots of them. I used to just steam them, butter em up, and then eat them. Someone suggested that I bake em with olive oil and garlic. Hey, that works for me! Thanks Arvay!

They were very good, I quite like them that way. I then tried baking them with some other veggies at the same time and found that onions make a nice accompaniment.

I also used them in a couple of stir fries; again success!

But why not combine the two, thought I? Guess what? It WORKED!

ROASTED BRUSSEL SPROUTS

What you need for one serving as a side dish:

4 raw brussel sprouts, halved
1 thick slab of raw onion
2 cloves garlic (I used some that I stored in olive oil), thick sliced
olive oil
sea salt
splash of white wine
freshly grated parmesan
A fry pan that is oven safe (I recommend cast iron)

What you do:

Drizzle a bit of olive oil in your pan, heat it up, then add the brussel sprouts, cut side down. It should look something like this:
DSCF5702
No, these aren't giant brussel sprouts, it's just a small cast iron pan!


When the flat side has browned, turn 'em over and add the onion and garlic. Like this, see?
DSCF5703


Go ahead and give it a sprinkle of sea salt now. Or later, no worries either way.

Once the onions are just starting to cook
DSCF5705


add a splash of white wine --around half a glass-- to deglaze the fry pan. Simmer till the wine cooks down.

Once the wine cooks down put the pan in a medium oven and cook till the garlic is just soft. This should only take 12 to 15 mins. When you take the pan out of the oven it should look something similar to this:
DSCF5708


After plating, grate some high quality Parmesan over the top and enjoy!

Here it is as a side dish to Twice-Baked Potatoes:
DSCF5713


And here is the obligatory closeup:
DSCF5712


Don't forget that brussel sprouts are very healthy! In fact this entire side dish is just oozing with healthy goodness!

Friday, June 3, 2011

Braided Bread Rolls

I'm sure many of you have been wondering why I haven't been posting food stuff lately. Well, I have a very good reason! I've been busy. Working on a project. What kind of project? I'll tell ya at the end of this post. Or you can just scroll to the end but you'll miss all the cool pics.

Braided Bread Rolls. These are very easy to make, look beautiful and taste even better. Plus they'll impress the heck out of whoever you are cooking for!

First you need to make a simple bread dough. Not difficult!

4 cups baker's flour
400 ml water (just over 1 2/3 cups)
1 tsp salt
2 tsp yeast
2 tbsp sugar
2 tbsp olive oil

Mix the dry stuff. Then add the wet stuff. Mix together, then knead in a bowl or lightly floured surface till it is dough.

Drizzle a bit of olive oil over the dough and let it rise in a warm spot for an hour. Punch the dough down, knead for a minute.

Ta-da. Simple bread dough. Your bowl should now look something like this:
DSCF5424


Separate the dough into 9 somewhat, sorta, kinda-like evenly sized pieces. Something like this:
DSCF5426


Now roll out each piece into a strand around 16" long. You'll end up with 9 16" long strands of dough. Here's what they look like. Oh, these are the same length, it's just the perspective distortion that makes the far ones seem shorter.
DSCF5427


Here's where you get to braid them! Do 3 at a time. Lay out 3 strands parallel to each other and start by laying an outer strand over the middle, then the other other strand over the new middle. Like this, see:
DSCF5428
If you aren't sure on how to braid just ask your mother, wife, sister, girlfriend, daughter, gay neighbor, etc. It really is easy to do. My wife showed me how.

Don't worry about finishing the end nicely, no need to. You should now have 3 bread braids and each one should look something like this.
DSCF5429


You'll need a baking dish. I used one that's a foot square. Worked perfect. Olive oil the bottom and sides of the dish. Now lay each braid into the dish. As you stuff them in you'll understand why you didn't need to finish off the braid. Here is what you should have.
DSCF5430

I also drizzled a bit of olive oil along the outer edges of the bread. Put it into a COLD oven, turn heat to around 180 C or 360 F. You want the oven to be cold so that the bread rises in the dish as the oven heats up.

Bake for 40 minutes or so. Or until it looks like this.
DSCF5431


Let it cool in the dish for a few minutes. Put a plate on top, flip over, then flip back over onto a cooling rack. Ta-Da! Done and DONE!
DSCF5432


I made it as a pull-apart for dunking in soup, everyone loved it. You can also separate it along the two central seams and the slice up each braid for rolls.

And it looks as good as it tastes!
DSCF5433

DSCF5434

DSCF5435


Now then, since you've made it this far, I'll tell you why I've been busy. I'm working on a series of cookbooks. Yes, you read that right. The bloke who has no official culinary training nor any official writing training (except for the odd research paper in kolledge) is writing a SERIES of cookbooks.

Needless to say, this project has strained my last few remaining brain cells to the point where food blogging was neglected. But no more!

Next post will be how to make a meat subsitute out of plain ole flour so stay tuned mates.

Friday, March 11, 2011

Soup Fritters

Yes, I can hear the collective head-scratching from all the way down in South Oz.

Lemme 'splain it to ya! Firstly you have to understand that I am the undisputed Iron Chef of leftovers. That's right, I am.

Now then, how soup fritters came about. I made some soup the other day by boiling the dekerneled corn cobs and the husks in a lot of water. Plus 2 bay leaves and a large sprig of fresh rosemary from the garden.

I then diced up a spud (potato), half a leftover onion, and the last 2 rashers of bacon from a kilo pack. Quick fried them all up, then added to the strained soup stock. Simmered till spuds were done. Salt n pepper to taste. Served with a fresh, crusty, pull-apart loaf.

Very tasty. We all loved it.

Surprisingly enough, there were a couple of cups left in the bottom of the pot the next morning. Obviously I wasn't going to toss it. I thought about having it for brekkie but then I thought that just perhaps I could make a nice side dish out of it.

But what?

*insert light bulb here*

I know! I'll put it in the blender to liquefy it, then add an egg or two, then add enough self-raising flour till it's a batter. Then I'll deep fry small spoonfuls of the batter! Instant fritters! Wonderfully flavoured too.

That really is all there is to it. No, I can't give you amounts as this is definitely a "seat of the pants" type recipe. But to help you out, I do have pictures!

First though, if you have over 4 cups of blenderized soup then definitely use 2 eggs.

Here is the consistency of the batter you are aiming for:
soup fritters 01


Now just drop a small spoonful into some hot oil. You don't need a deep fryer, a wok over some flame will do fine. And make sure you use rice bran oil for your deep frying! Very high smoke point and very high in mono-unsaturated fats. It deep fries food wonderfully well!

They'll swell up to around twice their size so don't crowd them. They'll also practically flip themselves in the oil once the submerged half is cooked! Here's a pic of a batch of the them deep frying after turning.
soup fritters 02


Once they are nicely browned all over and are just about done "bubbling" you'll want to remove from the oil and drain on paper towels. Like this:
soup fritters 03


Give em a little sprinkle with salt and ENJOY! When you bite into one it'll be soooooo nice, light, and fluffy on the inside. See, look!
soup fritters 04


I found they are also very nice sprinkled with powdered sugar and cinnamon powder! Like savoury donut holes! Try it, you'll like it.

Friday, February 18, 2011

Cheesy Garlic Crumble

Yes, you read that right. No, it has nothing to do with the Aussie candy bar called Violet Crumble. But I thought the name sounded cool when I came up with it so you're stuck with it!

What do you do when it's 10 minutes before your spaghetti dinner and you realize you have no french bread with which to make garlic bread -with cheese, of course? Simple! Come up with something using breadcrumbs, fresh basil, garlic, olive oil, and cheese!

There's no measurements for this as I really did make it up as I went along, but I did take plenty of pics which really illustrate the process.

Garlic crumble

What you need:
some breadcrumbs
fresh basil leaves
garlic (I used the jarred stuff for this)
olive oil
cheese

The cheese I used was cheddar which down here is called Tasty. Cheddar is only called cheddar in Oz if it comes from the Cheddar Gorge which is just outside of Cheddar.


What you do:

First, you'll need to find out the amount of bread crumbs you need. Use whatever oven-proof saucepan you need for making this and cover the bottom with 1 cm of breadcrumbs.
gc01


Then chuck that in a mixing bowl. See? Easy way to measure, isn't it?

Go outside and snip some fresh basil, then chop it up. How much basil? About this much:
gc02


Now add a good sized splat of garlic. How much is a splat? This much:
gc03


Put some fennel seeds in the palm of your hand. Run the thumb of the other hand over the seeds to partially crunch them, then add to the bowl. Here's what I mean:
gc04

Mix it all together and then add some olive oil. Like my olive oil can? It's from India.
gc05


Stir it all together then add some grated cheese. I used around 1 cup's worth of cheddar (tasty).
gc06


Mix it together using your fingers. Make sure you don't let the grate cheese clump together. Your bowl should now look something like this:
gc07


Add a bit of olive oil to whatever ovenable frypan you'll be using:gc08
This is my small Gabrial Gate (tm) small frypan from a set of two. The ONLY reason I have the set is that I got them on an 80% off sale at Harris Scarfe. Otherwise there wouldn't have been no way I could afford those two wonderful frypans.

Now spread the mixture evenly over the bottom of the saucepan and cook on low heat on the stovetop till the bottom crumbs JUST start to brown. Do NOT leave the frypan unattended for any length of time as it can go from slightly browned to BURNT in the blink of an eye.

This was actually the second batch I made as I did turn my back on the first batch. Oops.

Now that the bottom is browned, it should look something like this:
gc09


Grate some more cheese over the top:
gc10


And then bake it in a hot oven till the cheese melts (only a few minutes). Slid it onto a cutting board
gc11


and then cut it up into pieces, serve on the side of your spaghetti in place of garlic bread.

Tada! Garlic Crumble!

Here's a closeup
gc12


Mmmmm, it was tasty.

Friday, January 7, 2011

Dabbling With Dumplings

My guess is that there are many different ways to make dumplings as there are food bloggers. And that's a lot. Is any one particular way the "right way" to make dumplings? No, of course not silly. It's whatever suits YOU!

This happens to be the way I like them. I like them soft, fluffy and simple. And they should pick up the flavour of the soup nicely.

The very first time I wrote this recipe down would be... oh, right about NOW! It's one of those ones that is so simple you really don't need exact measurements and the ingredients are pretty easy to remember. And this is one of the few times I use self-raising flour.

Dave's Dumplings

What you need:
A big pot of soup you've made that the dumplings will go into
1 to 1 1/2 cups self-raising flour
2 to 4 tbsp butter
dash of salt
1 or 2 tbsp sugar
some water

See? Isn't that an easy list? You'll find you can vary the amounts easily, very forgiving it is.

What you do:
Mix all the dry ingredients together. Then add the butter and work the butter in using your fingers. Add water a few tablespoons at a time whilst mixing the dough --I use a wooden spoon for the mixing part. You want to end up with an almost sticky dough. Hopefully it'll look something like this:

dumpling dough


Now you want to tear off small pieces of the dough and quickly roll them into small balls. How small? Smaller than a ping pong ball. About the size of those small, bouncy, superballs you had when you were a kid.

Your plate should end up looking like this:
raw dumplings
I put a 1/2 cup measuring cup so you can see the size of the dumplings.

The last step is to put them in your lightly boiling soup. Don't crowd them as they'll more than double in size. Let them cook, covered for 20 to 25 minutes. Your soup pot should now look like this:
cooked dumplings


That cast iron dutch oven holds a lot of soup, more than enough for 2 days worth in fact. The plate you saw in the second picture fits inside it with room to spare. That should give you an idea at how large the dumplings get!

Dish it up, eat, and enjoy!

Sunday, September 5, 2010

Easy Vegetable Stock AND Easy Cheese Sauce

You get 2 recipes today! Mainly cus I've been negligent in my posting lately, my bad.

These really aren't "recipes" as I think they are just too simple for ingredient lists and the like. Besides, I make each one different each time. Don't worry, I'll write all about various substitutions and methods.

We'll start with the veggie stock. Why make your own? Have you ever looked at the list of ingredients on powdered or liquid stock you buy at the shops? GAAACK! The rule is if you either can't pronounce it or don't know what it is then DON'T buy it. I happen to be able to do both and it scares me just what people put into their bodies.

*dave climbs off soapbox now*

Simple to make you own veggie stock. And you don't even need a bunch of high priced perfect-looking veggies. Cheap ratty-tatty ones on quick sale work great. So do scraps from your meal prep!

Potato peelings? Toss em in the pot. Corn husks? Ditto! Same goes for that corn cobb you just ate. Shriveled garlic or dried out onion? Wee-hoo! Skanky looking outer cabbage leaves? The more the merrier! Shriveled carrot? No worries!

Here's what mine looked like:
veggie stock raw

The pot contains half a dried onion plus it's brown skin and roots, a mashed up garlic clove, fennel stalks and fronds, outer leaves from a cauliflower, and a small handful of cumin seeds.

Added just enough water to cover things as I didn't need too much stock. I was going to use this stock to start the cheese sauce so I didn't need much. If you are making enough for soup then use a larger pot and more water.

After simmering, covered, on the stovetop for an hour, this is what it looked like:
veggie stock cooked


Just strain it and put it into a small saucepan to make the cheese sauce.

Sometimes I use beer to start the cheese sauce, other times white wine. This time I wanted to use the stock I just made. Which, after all, was the whole reason for making the stock in the first place.

I had around 3 cups of stock and to that I added 1/2 cup cream and a pinch of turmeric (just enough to turn it yellow about 1/8 tsp). Heated it up and whisked till it was all combined.

The saucepan should now look something like this:
cheese sauce01


At this point you can also grate in some chedder; you won't get as creamy a texture though.

Next I removed it from the heat (thick bottomed saucepan so it held the heat nicely) and whisked in cornflour (cornstarch in the US) 1/4 tsp at a time. It's important to REALLY whisk the sauce at this point as you actually want to aerate the sauce. Once the sauce is just less than your desired consistency (while constantly whisking) then return the pan to the heat for about a minute. Now add 4 or 5 tbsp cream cheese and stir/whisk till cream cheese in incorporated into the nice, fluffy sauce.

Here I am whisking away after the 6th 1/4 tsp of cornflour was added.
cheese sauce02
Notice the aeration already? That'll keep it from "gellifying" when it cools.

Whisk CONSTANTLY. This whole process will take 5 to 8 minutes to get the sauce thickened but airy.

Those cramps in your hand are worth it, trust me. Or you could just use an electric mixer the whole time if you so desire.

Once you've heated it back up for a minute or two (while whisking constantly) and added the cream cheese, then remove the saucepan from the heat and pour it into a bowl.

Now's when you get to add goodies! Chilli flakes? No worries. Cumin powder? Oh yeah! Fresh coriander (cilantro in North America) leaves? You betcha! You are only limited by your imagination.

For this sauce I chose bacon. Seriously, doesn't EVERYTHING taste better with bacon?
cheese sauce03


Then just gently stir it in!
cheese sauce04


Notice the creaminess of the sauce? This last photo was taken AFTER the sauce had cooled. Neat huh? So you can make a creamy cheese sauce using cornflour --cornstarch-- provided you whisk or mix well for a bit of time to really aerate the mix so it doesn't congeal as it cools.

Enjoy!