Showing posts with label spices. Show all posts

Sunday, September 5, 2010

Easy Vegetable Stock AND Easy Cheese Sauce

You get 2 recipes today! Mainly cus I've been negligent in my posting lately, my bad.

These really aren't "recipes" as I think they are just too simple for ingredient lists and the like. Besides, I make each one different each time. Don't worry, I'll write all about various substitutions and methods.

We'll start with the veggie stock. Why make your own? Have you ever looked at the list of ingredients on powdered or liquid stock you buy at the shops? GAAACK! The rule is if you either can't pronounce it or don't know what it is then DON'T buy it. I happen to be able to do both and it scares me just what people put into their bodies.

*dave climbs off soapbox now*

Simple to make you own veggie stock. And you don't even need a bunch of high priced perfect-looking veggies. Cheap ratty-tatty ones on quick sale work great. So do scraps from your meal prep!

Potato peelings? Toss em in the pot. Corn husks? Ditto! Same goes for that corn cobb you just ate. Shriveled garlic or dried out onion? Wee-hoo! Skanky looking outer cabbage leaves? The more the merrier! Shriveled carrot? No worries!

Here's what mine looked like:
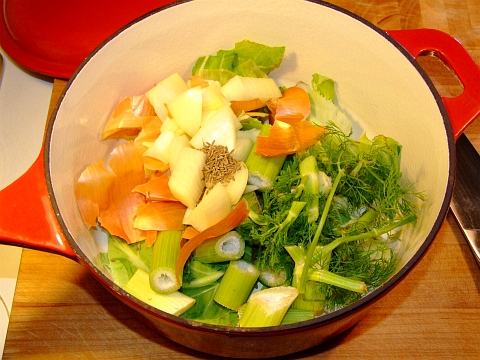
veggie stock raw

The pot contains half a dried onion plus it's brown skin and roots, a mashed up garlic clove, fennel stalks and fronds, outer leaves from a cauliflower, and a small handful of cumin seeds.

Added just enough water to cover things as I didn't need too much stock. I was going to use this stock to start the cheese sauce so I didn't need much. If you are making enough for soup then use a larger pot and more water.

After simmering, covered, on the stovetop for an hour, this is what it looked like:
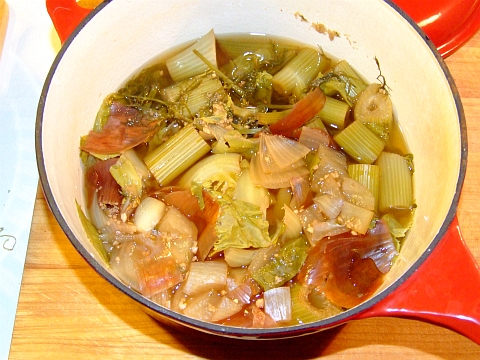
veggie stock cooked


Just strain it and put it into a small saucepan to make the cheese sauce.

Sometimes I use beer to start the cheese sauce, other times white wine. This time I wanted to use the stock I just made. Which, after all, was the whole reason for making the stock in the first place.

I had around 3 cups of stock and to that I added 1/2 cup cream and a pinch of turmeric (just enough to turn it yellow about 1/8 tsp). Heated it up and whisked till it was all combined.

The saucepan should now look something like this:
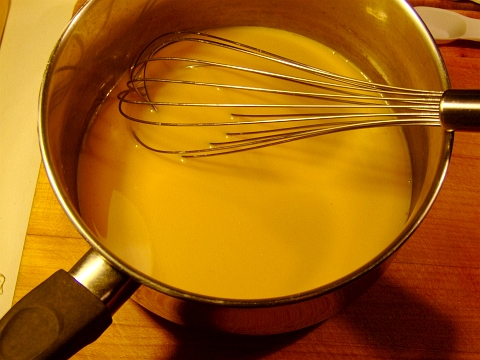
cheese sauce01


At this point you can also grate in some chedder; you won't get as creamy a texture though.

Next I removed it from the heat (thick bottomed saucepan so it held the heat nicely) and whisked in cornflour (cornstarch in the US) 1/4 tsp at a time. It's important to REALLY whisk the sauce at this point as you actually want to aerate the sauce. Once the sauce is just less than your desired consistency (while constantly whisking) then return the pan to the heat for about a minute. Now add 4 or 5 tbsp cream cheese and stir/whisk till cream cheese in incorporated into the nice, fluffy sauce.

Here I am whisking away after the 6th 1/4 tsp of cornflour was added.
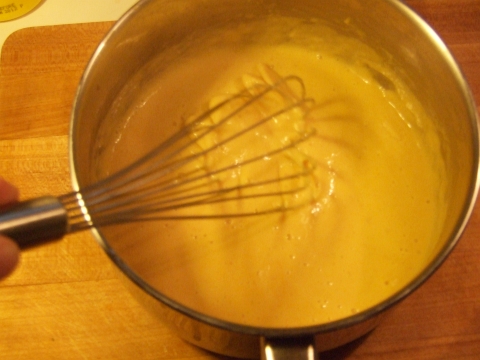
cheese sauce02
Notice the aeration already? That'll keep it from "gellifying" when it cools.

Whisk CONSTANTLY. This whole process will take 5 to 8 minutes to get the sauce thickened but airy.

Those cramps in your hand are worth it, trust me. Or you could just use an electric mixer the whole time if you so desire.

Once you've heated it back up for a minute or two (while whisking constantly) and added the cream cheese, then remove the saucepan from the heat and pour it into a bowl.

Now's when you get to add goodies! Chilli flakes? No worries. Cumin powder? Oh yeah! Fresh coriander (cilantro in North America) leaves? You betcha! You are only limited by your imagination.

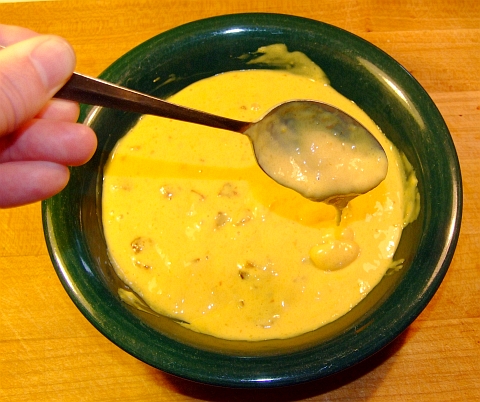
For this sauce I chose bacon. Seriously, doesn't EVERYTHING taste better with bacon?
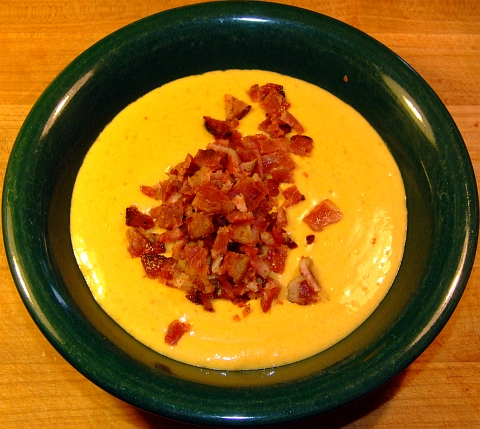
cheese sauce03


Then just gently stir it in!
cheese sauce04


Notice the creaminess of the sauce? This last photo was taken AFTER the sauce had cooled. Neat huh? So you can make a creamy cheese sauce using cornflour --cornstarch-- provided you whisk or mix well for a bit of time to really aerate the mix so it doesn't congeal as it cools.

Enjoy!
Tuesday, June 15, 2010

Cumin Seed and Cayenne Crackers *updated*

Making your own crackers is not all that difficult. If you are a person who does your own baking all the time *cough, cough Rachel* then these'll be very easy.

And you can change around the seasonings too! Nothing wrong with experimenting around with flavours as Naturelady certainly knows all about that.

I got the idea for these from a cookbook (I have a whole bookshelf of those darned things), but I'm not going to tell you which one as not only were there numerous typos throughout all the recipes, but the crackers (which didn't include cumin seeds or chili or SALT or turmeric) tasted HORRIBLE! I also had to change around the amounts of dry stuff.

Kinda tells you about the editing prowess of the folks at Newscorp, eh?

Anyways, here's a fairly simple recipe for making your own crackers and not having to worry about pronouncing all the unpronounceable chemicals in the commercial crackers.

What you need:

1 cup of flour
1 tbsp cumin seeds
1/8 tsp turmeric powder
1/2 tsp baking powder (I know it seems low, but we are making crackers, not bread)
1/2 tsp raw sugar
3/4 tsp sea salt
1/8 tsp cayenne powder OR 1/4 tsp chili flakes (double it if you really like spicy stuff)

1/4 cup of milk
2 tbsp olive oil


What you do:

Mix all the dry ingredients together --that'd be the first 7 of the above list. Add the milk and olive oil and stir lightly, then knead a few times.

THIS DOUGH WILL BE CRUMBLY! But that's OK.

Now let's roll this out! Grab off about half or a third of the dough, plop it on your counter, and start rolling! You want to get it to betwixt 1mm and 2mm thick. I like to err on the thin side personally.

Once you have it rolled out, you then get to cut the dough into cracker sized pieces. Before you do that though, you can prick the thin rolled dough with a fork if you so desire. Cookie cutter, kitchen knife, pizza cutter... whatever you want to use to cut the dough into whatever sized crackers you prefer. Your choice!

Then, of course, roll out and cut the rest of the dough.

Sprinkle some sea salt on a baking tray, put the crackers on it (you can crowd them, no worries) and sprinkle a bit of salt on the top.

Bake for about 10 minutes in a 350-400 F oven. Once the bottoms are slightly browned, then turn em over and bake for about 3 or 4 more minutes.

LET THEM COOL! They are *ok* when hot, but soooooo very tasty once they've cooled. They're also strong enough to scoop up any amount (or type) of dip you care to use.

Making your own crackers is an easy thing to do, and you get to stay away from all the chemical crud in the store-bought crackers.

*update*

Feel free to play around with the flavourings, please let me know if you find a really great spice/herb/seed combo, thanks for that.

Monday, June 14, 2010

Easy chocolate sauce

Yes I know I've written quite a few posts that involve chocolate (food of the Gods) sauce, but I thought I'd sorta consolidate them. Maybe give some tips, tricks, what goes well in it, etc.

The basic chocolate sauce has just three things: dark chocolate, butter, and cream. The less cream and butter, the thicker the sauce will be and if you only use a tiny amount of each then it'll harden upon cooling --great for things like chocolate coated strawberries. Or pretty much ANYTHING you want to chocolate coat (^_^)!

And the best thing is that you DO NOT NEED A DOUBLE BOILER! And it's quick too. You will need a thick-bottomed saucepan though so if you don't have one then go run out to the shops right now and get one.

I'll start with the basic sauce, and then talk about the various additions you can, ummm, add.

The basic chocolate sauce (this makes A LOT):

What you need:
One bar (375 grams or 12 ounces) of dark cooking chocolate
3 tbsp butter
1 cup cream

This'll make a sauce that is liquid at room temp, but thicker than motor oil. If you want a thicker sauce, just use less cream and less butter.


What you do:

Break the chocolate bar into pieces and put them all into your saucepan. Add the butter and the cream. Turn on the heat to low. Give it a stir to mix things well. Once the chocolate starts to melt, then take out a whisk and start whisking it. Almost continuously, in fact.

Once all the chocolate is melted and everything is thoroughly incorporated together, turn the heat off and continue whisking for another 30 seconds or so. Make sure you get to the bottom of the saucepan during the whisking so nothing burns.

Ta-da! Done! The whole process should have taken 2 or 3 minutes.

Now comes the FUN part! What you can add and when you should add it.

Substitute half the cream with a dark red wine like shiraz. Add at the same time as the cream, of course.

1 tsp of cinnamon powder and a half tsp cayenne powder. Add while whisking. Taste it afterwards and add more of either if you wish, no worries.

Cumin powder and cardamom powder go well too!

If you want it slightly tart, add some ground sumac.

Hard to go past ginger powder too.

My point is, the possibilities for flavorings are endless. I can tell you for a fact that the cinnamon and cayenne combo is wonderful! I'm still experimenting with the others to find the best combos that suit my palette.

So have some fun and experiment! Heck, make a batch of standard sauce and then divvy it up into bowls and mix different spices into each. Just make sure you write down which spices went into which bowl. And be sure to let me know what combinations of spices you find that are really good!

Saturday, March 27, 2010

Squid Chili

The other day I actually got to make a dinner JUST FOR ME! Ahhhhhhhh, bliss. Of course I had to make other stuff for the rest of the clan. Why? Well, firstly, I thought B.I.L. would be heading out to teach before dinner so I hadn't planned anything for him --turned out that not only would he be around for dinner but that I would also have to give him a ride to the U. And M.I.L. is having teeth probs so it was going to be something soft yet tasty for her. Wifey-Poo had some tummy probs so she was wanting something very mild and light.

Needless to say, I ended up making four completely different main courses. But the one I had was THE BEST! Mine was the chilli, of course.

Normally if I'm going to make chilli then I'll get the beans soaking the night before. I did not have that luxury this time so it meant extra cooking time for the beans, but that's ok since I can do loads around the house and grounds while the beans simmer, no worries.

So, here is what I did for my Squid Chilli!

To a large pot, I added the following:

150 gm dried berlotti beans
8 dried curry leaves
1/2 an onion, diced
4 cloves of garlic, crushed
sprinkle of sea salt
lots of water

I put it on to boil and boiled till almost no liquid left, added a few more cups of water and boiled it down again till the beans were soft.

Into a hot, oiled wok I added the following:

1 squid tube --cleaned, sliced into rings, and blanched*
1/2 an onion, diced
2 cloves of garlic, crushed
3 tbsp chilli paste (use the kind that's at least 90% thai chillis)
2 tsp ground cumin
2 tsp ground coriander
1/2 tsp ground cardamom
1 tsp ground ginger
1 tbsp dried basil
sprinkle of sea salt


*if you blanch the squid rings after cleaning and slicing then you can use them in any sauces and any cooking length without them going "tough" or "chewy".

I seared all that in the wok for 5 to 6 minutes, stirring/tossing regularly. I deglazed the wok with 2 glasses of shiraz and cooked it down till there was only a bit of liquid left.

The contents of the wok were then added to the pot with the cooked beans (and all that other stuff). One can of peeled roma tomatoes was added along with 2 tsp of chilli powder.

Simmered down till it was thick but not sticking and then served up! I did grate some fresh onion and cheddar cheese over the top of my bowl and I used some of my wholemeal flatbread as scoopers.

This was darned good! No reason why this can't be done for pretty much any type of meat you want to use in the chilli. Ground roo (kangaroo) instead of the squid would be particularly nice I think, as would moose.

Sunday, February 21, 2010

Dingo Dave's Dangerously Hot Chili Sauce

Yes folks, I like chillis. I also spell chilli with two l's as that's how we spell it down here in Oz.

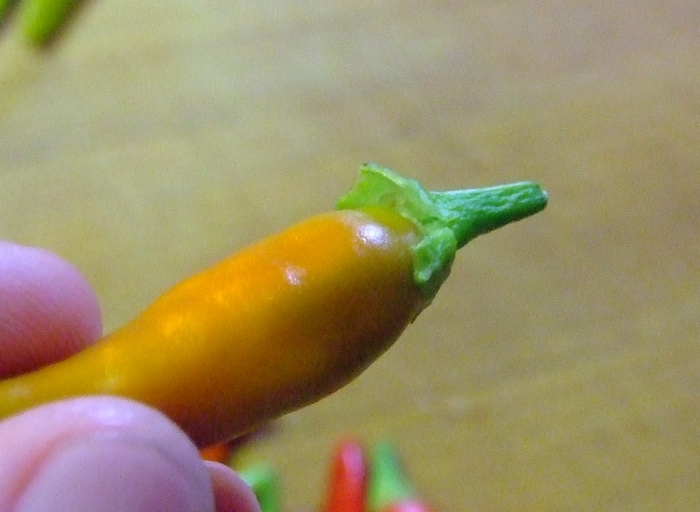
Have I mentioned I grow my own chillis? Well, I do grow them. I currently have 8 plants of an African Bird's Eye variety growing and I should have no problems keeping them through the winter (I haven't seen frost in Adelaide for 8 years now).

Normal Bird's Eye top out at around 200,000 scoville heat units (SHU) but I'm pretty sure these are in the 300,000 to 350,000 scu range. Why do I think that? Because I know how to properly grow chillis in pots so that you get maximum fruit and maximum amounts of capsaicin. And I've eaten a regular Habanero which tops out at 350,000 and these puppies are as hot as them.

Not as hot as the Red Savina Habanero and not near the famous Bhut Jolokia that tops out at over 1,000,000 SHU, but still pretty damned hot. BTW, I'll be getting some Bhut Jolokia seeds for next season... Wife thinks I'm crazy.

These chillis and this recipe is NOT for you if you think a Jalapeno is hot, my chillis are 70 times hotter.

These chillis and this recipe is NOT for you if you think Tabasco sauce is hot, my chillis are 70 times hotter than the original Tabasco sauce and 43 times hotter than their hottest sauce.

These chillis and this recipe is NOT for you if a Cayenne chilli is toxic to your taste buds, my chillis are 7 times hotter.

These chillis and this recipe is NOT for you if you a Thai chilli means instant death to your taste buds, my chillis are 3 and 1/2 times hotter.

For those of you with the guts (in every sense of the word) to read on, then please, by all means, READ ON!


Dingo Dave's Dangerously Hot Chili Sauce

I was going to wait to make this sauce till more of the chillis are completely red and half dried, but we had a big windstorm last night and two branches broke on one of the plants. Keep in mind that even in their green state these puppies are as hot as a Thai chilli.

What you need (besides a great love of chillis):

30 Habanero chillis --this is about the SHU equivalent of the variety of African Bird's Eye I grow
1/2 an onion, minced
5 cloves garlic, crushed and minced
1 tsp of each of the following powders: Cardamom, Ginger, Sumac, Coriander, Cumin
1 tbsp tamarind paste
1 tbsp wasabi paste (the really hot green paste you get with sushi)
1 tsp sea salt
2 tbsp olive oil

1 to 2 cups red wine (I used a shiraz-cabernet)
1 cup water (the wet type, not the dehydrated type)

1/2 cup apple cider vinegar


What you do:

Firstly, you need to snip the chilli fruit off your plants, or go to a shop and buy 30 Habaneros. If the wind broke some of your branches then it should go from this:
chillis on stalks

to this:
chillis with stems


Please notice I left the "hats" on the chillis. Why? Because under the hat on chillis (eggplant too) is where the most tenderest, succulent part of the fruit is. That's also the area with lots of capsaicin in chilli fruit.
under the chilli hat


You'll notice I'm not wearing rubber gloves whilst handling the chillis. That is because I'm not a wuss. Although my wife thinks/knows it's cus I'm crazy.

Anyways, remove the hats from the chilli keeping as much fruit as possible:
chillis destemed


And then rough chop them:
chillis rough chopped


Now add all the ingredients EXCEPT the wine, water, vinegar to a saucepan. You'll notice I grouped those at the top of the ingredient list for your convenience; you're welcome. Make sure you add the seeds too!

Mix it well and then crank the heat up. Cook for around 5 mins while stirring often. The idea is to sear stuff without burning it. It should look something like this:
searing chillis

The above pic is after 2 mins. After 5 mins you'll notice some of the mix getting stuck to the pan. Once it starts to stick you should also notice the chillis, onion, and garlic are well-seared. Time to add the wine and the water!

So, add the wine and the water, stir well making sure you scrape the pot so everything is incorporated into the liquid. Simmer the pot till the liquid is reduced by at least 3/4 and then add the vinegar. Turn the heat off and let it cool.

Add the whole mix to a blender and blend for a few mins so that every little bit of chilli, onion, and garlic are pureed. Put the mix back in the pot and simmer to reduce the liquid by 1/4.

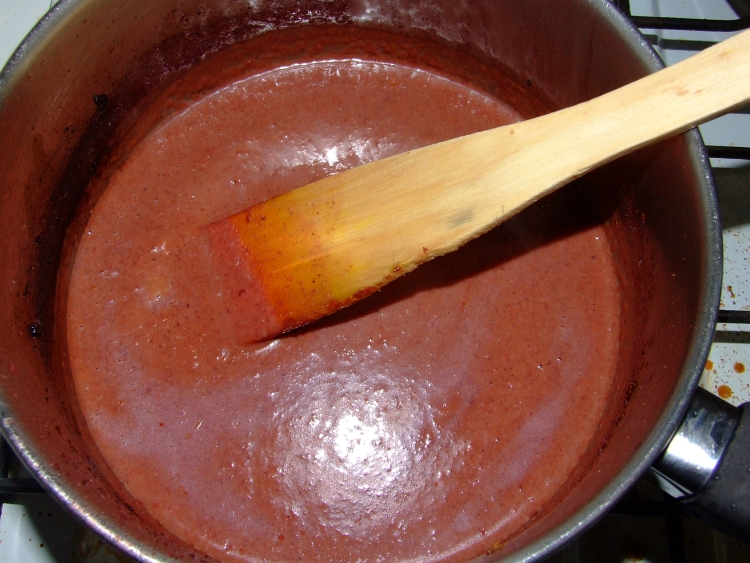
Your saucepan should now look like this:
chilli sauce simmered


TADA! Done! Now just pour it into a jar you've disinfected, cap it, and refridgerate. Use when needed. It ages quite well and gets smoother over a couple of weeks. No preservatives are needed, I seriously doubt anything has the temerity to grow in it.

Enjoy!

Oh, btw... chilli enthusiasts (snobs) are constantly debating the heat and taxonomy of various chillis so if you think that African Bird's Eye can't get as hot as a regular Habanero then I say you are mistaken. My opinion, and I'm sticking to it.

Monday, December 21, 2009

Cardamom Lamb Curry

I was planning on putting up a shortbread recipe today --it being the holiday season dontcha know-- but I've just found out that someone way up north is interested in a lamb curry. Specifically, a lamb curry that features cardamom.

Now, I don't have enough time to write a dissertation on cardamom (a spice I LOVE) cus it's already 4:30 pm and I've got a crew to cook for. And I also don't have enough time to completely list exact amounts of every single item. However, she won't mind cus she cooks this way too so I'm sure she'll figure it out --you will too, no worries.

I do have time to tell you that I make many many many different kinds of curries and that this particular one could maybe be classified as a massaman type curry (from Thailand, but this is waaaay different) but until 5 minutes ago I had never even heard that name.

Therefore I think I can safely claim this curry as one of my own.

Alrighty, clock is ticking and after this post I need to get cooking!

Here we... GO!


Dingo Dave's Cardamom Lamb Curry


What you need:

8 green cardamom pods
small palmfull crushed peanuts (put some shelled peanuts in the cupped palm of one hand and run the thumb from your other hand over it; tada! crushed nuts!)
1 crushed garlic clove
2 tsp chilli flakes
1 tsp dried mint

2 tbsp tamarind paste
1 tsp cardamom powder
1 tsp cinnamom powder
1 tsp cumin powder
2 tsp coriander powder*
1 tsp turmeric powder
1 tsp ginger powder

2 lbs diced lamb --whether from chops, a roast, leg, etc. Doesn't matter.

2 or 3 tbsp olive oil

1/2 an onion, finely minced
1 tbsp lemon grass (just use the jarred kind), finely minced

1/2 glass lambrusco wine (it's what I had in my hand at the time)
1/2 glass dark ale (it's what I had in my other hand at the time)

1 can (400 mls --around 13 ounces) coconut cream

*coriander is called cilantro in North America. The powder is the dried, ground seeds of the plant; NOT the leaves.


What you do:

Put the first 5 ingredients (notice how I grouped the goodies so it's easy to see?) in a dry (no oil) wok. Fry for 3 minutes while tossing/stirring. Add the mixture to a mortar and go to town on it with your pestal! Don't worry about the shells of the pods, they'll get ground up and add to the flavour, trust me.

Mix the next 7 ingredients (tamarind paste through ginger powder) in a bowl. Add the diced lamb to the bowl and mix to coat the lamb pieces well.

Put the olive oil (traditionally you'd use ghee, but I use olive oil) in your wok and crank up the heat. After about 30 seconds it should be ready to add the coated lamb, the onion and the lemongrass. Cook and sear for about 2 minutes, tossing/stirring regularly.

Turn the heat down to low, add the wine and the beer. Stir to deglaze the wok. Add the cardamom spice mix from the mortar, stir it in. Let the liquid cook down by half --should only take 1 or 2 minutes. Add the coconut cream, stir everything together and simmer till the texture is to your liking. Just make sure you don't boil the coconut cream or else it'll separate.

Serve it over jasmine or basmati rice (I suggest you cook the rice). If it's too spicy for someone at the table just top their's with some plain yoghurt, no worries. Garnish with fresh basil leaves.

This is good stuff, really.

Saturday, November 28, 2009

Cheesy Baked Croquettes with Smoked Trout & Prawn Sauce

Yeah, that's quite the title isn't it? The prawn sauce is optional, BTW. One night I served them as a main course without the prawn sauce but with a side salad, and the next night as a side dish with the prawn sauce.

Personally, I like them better with the prawn sauce.

The amounts of each ingredient aren't listed --with one or two exceptions-- you'll see why, no worries.


Cheesy Baked Croquettes with Smoked Trout & Prawn Sauce


What you need:

For the croquettes:

4 to 6 cups of leftover mashed potato --do I REALLY need to explain how to make mashed spuds?
handful of fresh basil leaves
diced cheddar cheese --somewhere around 1.5 cm but please don't be exact
salt
pepper
couple of handfuls of bread crumbs
cumin powder
turmeric powder
thin-sliced smoked trout (or smoked salmon)

For the prawn sauce:

Handful of prawn shells (I ALWAYS keep prawn shells after shelling the prawns, they freeze well and you just break off a hunk whenever you want to make a sauce or stock)
1 crushed garlic clove
1 or 2 tsp dijon mustard
1 tbsp lambrusco wine
1 tbsp cream fraiche OR sour cream OR double cream
dash of sea salt
dash of ground white pepper
4 cups H2O (water)


Whut U Due:


Cube some cheddar cheese to around 1.5 cm (3/5 of an inch) --or somewhere thereabouts. Mince up some fresh basil leaves (rinse them first, could be caterpillars hiding).

Your cutting board should now look thusly:
DSCF6555


Mix the basil into the mashed spuds. Place some of the spuds into your hand --each croquette should be between golfball and tennis ball size.
DSCF6558


Flatten the mashed potato in your palm and place a piece of cheese in the middle.
DSCF6566


Carefully mold the potato around the cheese
DSCF6567


Ta-da!
DSCF6569


Make up as many or as few as you'd like, no worries. I used three per person as a main and one per person as a side dish. Put them on a plate and then refridgerate for an hour. This way they'll be easier to crumb.

So, like, what to do for an hour while the croquettes chill in the fridge? How about make some prawn sauce!

Add your empty prawn shells and the garlic and 4 cups of water into a saucepan. Crank the heat up and simmer for an hour. If the water gets too low, then just add some more water. You want to end up with around 2 cups of liquid.

Turn off the heat. Take a potato masher and mash the shells flat to extract every last bit of prawny goodness. Strain and return the strained liquid to the pan. Cover the saucepan and set aside. Let's return to the croquettes.

Spread your plain bread crumbs on a tray or plate. The sprinkle on a bit of salt and two of my favourite spices; cumin powder and turmeric powder.
DSCF6572


Mix the breadcrumbs around so the crumbs are full of the spices.

After the potato balls have chilled, take them out of the fridge and make up an egg wash: one egg plus equal amount water. And put a bit of flour in a bowl too.
DSCF6576


Roll each bowl in the flour (lightly shake off excess), roll it in the egg wash, and then roll in the breadcrumbs.

This is what they look like before baking:
DSCF6578


Bake them at around 375 F. Long enough to brown the breading, but not so long that the cheese leaks out. 15 mins should do it --I wasn't timing these but I'd check every few minutes to make sure the cheese wasn't running out.

While they bake, shall we finish the sauce?

Turn the heat on the liquid as low as possible and add the mustard, wine, salt and pepper. Whisk it well, let the sauce come up to a simmer (don't boil it) and taste for seasonings. You might want to add a bit more salt or pepper, but don't make it spicy as this isn't a spicy sauce.

Turn the heat off and cover to keep warm. Just before serving whisk in the cream fraiche (or sour cream or double cream). If you need to heat it back up do so, but it'll only take a minute at most --don't let it boil after you've added the cream.

Spoon it over the baked croquettes BEFORE you top with the smoked trout and basil sprig.

This is what the croquettes look like after baking:
DSCF6579


The first night they were a main course without sauce. 3 per plate and a thin slice of smoked trout curled on top. This was my plate:
DSCF6585
No, that's not gunky, fatty dressing. It's my own homemade tzatziki


The next night they were a side dish to baked basa and I made the prawn sauce to drizzle over the top. After the sauce is drizzled over the croquettes, then artfully arrange a slice of smoked trout on top and fresh basil to top it. This plate was MIL's just before I added the side salad.
DSCF6615


This plate was mine:
DSCF6621


I've been told that I can make these ANY time I want, everyone loved them. Enjoy!

Monday, August 31, 2009

Spicy Indian Peanuts

I know, you are asking yourself just what the heck does an Indian recipe have to do with Polynesia? Well, lots. Really.

This recipe comes from Fiji. Yes, I know that *technically* Fiji is Melanesia, not Polynesia. But if you look at the boundaries of Mela- and Polynesia, you'll see that geographically Fiji should be Poly. I quite understand the classification of Fiji as it is not only linguistically based but also based upon settling/migration waves.

But there has been so much Poly influence on the Fijians over the last few hundred years that their foods nowadays have a much more Polynesian tone to them than Melanesian. Especially during all their wars with Tonga in which prisoners from both sides would be taken as slaves and servants which vastly influenced the food.

But dave, what do the Indians have to do with all this?

Good question. It deserves a good answer!

In the late 1800's and early 1900's over 60,000 Indians (60,533 to be exact) came over to Fiji to escape economic bad times bad in India. The worked in the sugar cane fields and in the sugar refineries.

Needless to say, they've rather flourished lately and there are now more Indians than Native Fijians living in Fiji. They've also brought a lot of their cuisine with them. I think this'll be the only Indian/Fijian recipe I'll put up, all the other Fijian recipes will be much more traditional island goodies.

Oh, I do know that peanuts are not nuts. They are beans. Buuuuuuut since we all know them as nuts, I'm keeping them as nuts. Aw, nuts.


Spicy Indian Peanuts from Fiji

What you need:
1 pound of shelled, roasted peanuts --you know, the kind you buy in the store, ready to eat
1 tbsp ghee (clarified butter) OR coconut oil OR peanut oil OR olive oil --I use olive oil
2 crushed garlic cloves
2 tsp curry powder
1/4 tsp to 2 tsp chili powder --just how hot do you want them?
sea salt


What you do:
This is pretty simple... Heat the oil or ghee in a frypan, then fry the garlic, curry powder and chilli powder for 30 to 45 seconds (DON'T BURN THE GARLIC!!!). Add the peanuts, turn the heat way down, toss to coat the nuts, and fry (while shaking those nuts) for a minute or two.

Put em in a bowl, sprinkle with your sea salt and enjoy with a crisp lager.

A note to all you Barkeeps, Taverners, Hoteliers, Publicans, etc. Make these nuts and also my spicy almonds in a large batches, keep em on the counter. You will be GUARANTEED to sell boatloads of cheap beer at highly inflated prices!

BTW; Barkeeps, Taverners, Hoteliers, Publicans translates to bloke or blokette who owns a bar, tavern, hotel, or pub.

Saturday, July 18, 2009

Moroccan Lamb Shish-Kebobs

It's the seasonings that make any shish-kabob unique. Whether it's Indian, Persian, Turkish, Greek, or say perhaps Moroccan, the key is in the seasonings and the way they are cooked.

Many kibob dishes aren't cooked on a grill even! However, we'll be sticking with the one most Westerners are familiar with and that means grilling them. Open flame, gas, or charcoal, your choice.

Shish-kibabs specifically refer to those that are grilled. Yummers!

BTW have you noticed I've used a lot of different spellings for "kabob"? You have? Good for you. I'm doing that since there are many different correct spellings depending on what country you are from.

I'll go with kebob from here on out. Also, I'll drop the "shish" since this whole post is about kebobs cooked on a grill. The reason why you are getting this wonderful dish is that a blog-buddy of mine had a Moroccan Feast Night and I thought this would make a good addition. I was right, of course.

I'm not going to give you an exact amount of meat to use. Why? Well you can use this as a side dish or a main course AND once you have the spice mix you can use it for other things. I keep a tin of it made up in the pantry so I only have to use what I need for the amount of lamb I have.

Oh, this also makes a very good rub for lamb roasts, chicken and beef. It's very versatile.

I realize that not all of you will have access to all the ingredients, so I'm also including appropriate substitutions, no worries.

If using bamboo skewers, make sure you soak them for an hour before using, don't want them to flame.

Here's what you need:

Lamb, cut into 1 inch cubes
bbq skewers
Some kind of grill. Gas, charcoal, open flame (be careful!). Heck, you can even do them under the broiler in your oven if need be.

Equal amounts (by volume) of the following:
coriander powder
dried red bell pepper powder
cumin powder
ginger powder
garlic powder
ground, dried sumac
chilli powder (only a bit though)
cassia powder
ground up cloves
sea salt

A tsp of each will make enough for several meals, no worries.

What can be substituted:


Coriander is called cilantro in North America, no worries.

Mild paprika powder can be used in place of the dried bell pepper powder (that's what paprika is, BTW).

Cinnamon can be subbed for cassia -they are so similar some folks think they are the same thing.

Ground sumac is one of the main ones. If you absolutely can't find it, then tamarind powder will work, and as a last resort: Lemon pepper powder.


Here's what you do:

Mix all the powders and seasonings in a bowl. You should have a wonderful, earthy smell from the powder combination. Thread the lamb pieces onto your skewers, and coat them with the rub. If the rub won't stick then you can drizzle a SMALL amount of olive oil on the kebobs to help the rub stick. You shouldn't have do do that though, the rub should stick. Especially if you, ah, rub the rub in.

A little bit goes a long way, btw.

Grill them on a low heat till they are done to your liking.

Serve with a bowl of greek yoghurt for a dipping sauce.

Enjoy!

Thursday, June 18, 2009

Tortilla Wrapped Baked Feta with Nopalito Sauce

That certainly does sound like a mouthfull. And yes, they are a mouthfull! Tasty too. I was originally planning on using tomatillas instead of the cactus for the sauce, but I couldn't see opening a HUGE can of tomatillas (since I only needed a bit of sauce) when I had a jar of cactus strips.

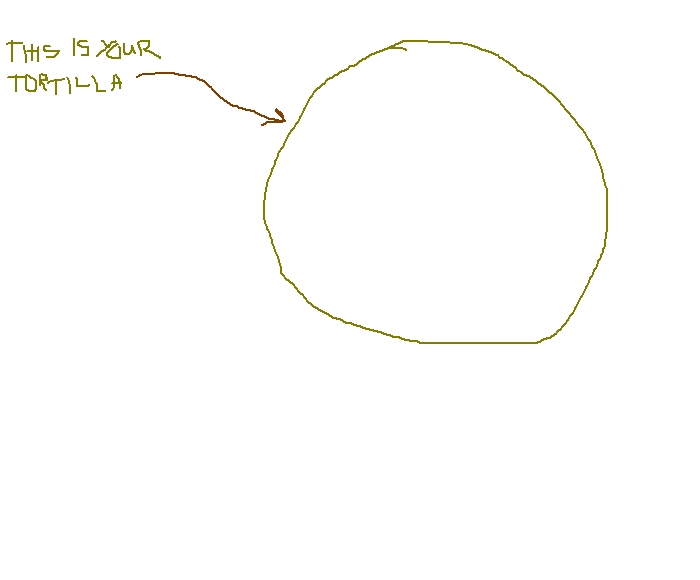
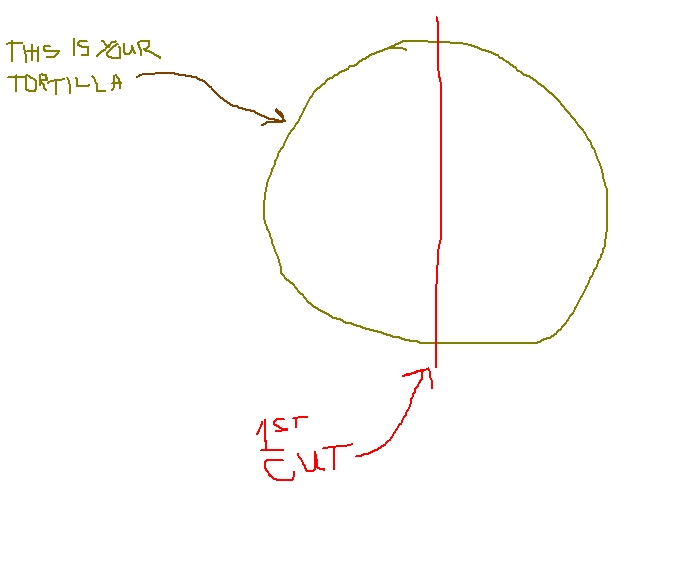
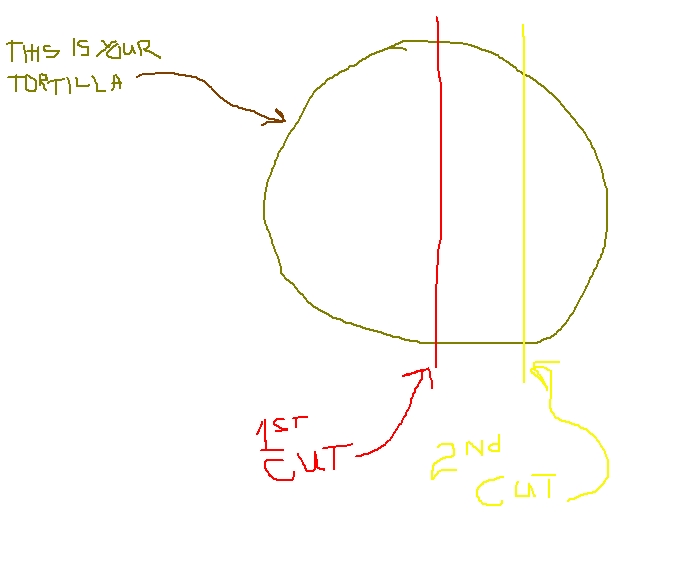
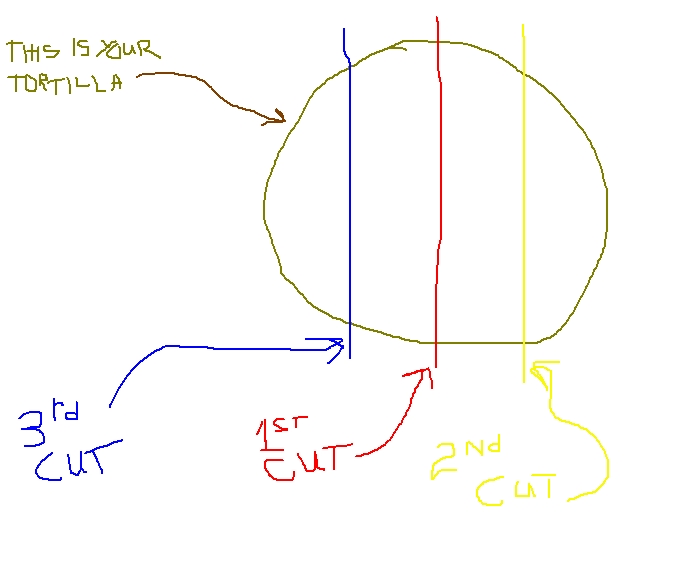
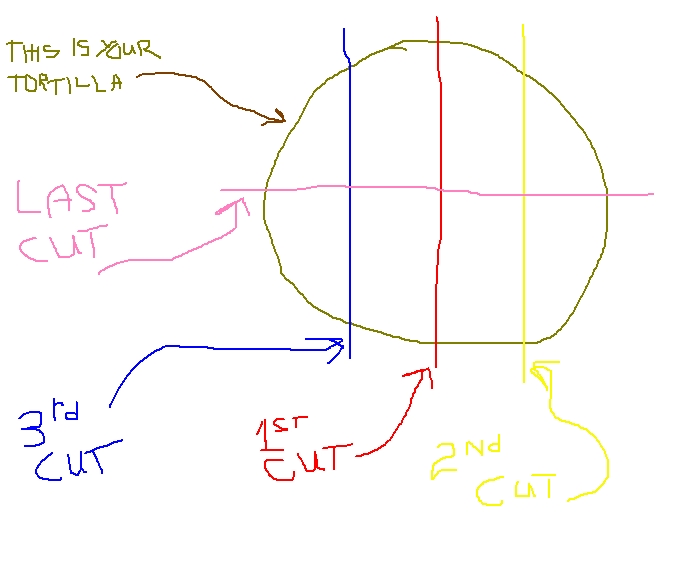
There's also no pretty pictures of the process as I had a few other things to make and this was kind of a last minute throw-together. BUT, I do have some cool crayon drawings for slicing up the tortilla!

No idea what to call this, but it certainly was tasty. Here's what you need to make a side dish for 2 to go along with a big ole Mexican meal.

What you need:
One 10-inch flour tortilla
8 pieces of feta cheese, two inches by a half-inch by a half-inch
20 to 30 pickled nopalito cactus strips (with some of the sticky juice)
one fourth of a small onion, chopped
2 garlic cloves
1/2 tsp Mexican seasoning
1/2 tsp cumin powder (I LOVE cumin powder and seeds!)
a small bit of minced coriander (cilantro) leaves
1/4 tsp ginger powder
dash of sea salt
1/4 tsp cinnamon powder
1/2 cup water


What you do:

Put the nopalito strips (with a couple of tbsp of the sticky juice from the jar), the onion, the garlic cloves, and the water into a blender. Then blend it. Blend it a lot.

Put the sauce (it should be a bit runny, if not add a bit more water) in a saucepan and add the 1/2 tsp Mexican seasoning, 1/2 tsp cumin powder, a small bit of minced coriander (cilantro) leaves, 1/4 tsp ginger powder,dash of sea salt, and the 1/4 tsp cinnamon powder.

Give it a good stir and simmer till reduced by half. Stir occasionally.

While that's simmerin', we get to slice the tortilla into 8 equal (sorta) pieces. It goes thusly:
tortilla 01
tortilla 02
tortilla 03
tortilla 04
tortilla 05


See? Wasn't that easy?

It gets even easier. Just roll each piece of feta in one of the tortilla pieces. Pack four of the rolled feta pieces into a large (4 and 1/2 inches in diameter) ramikin dish --four should pack in quite nicely. Then pack a second ramikin dish with the other four. Pour the reduced nopalito sauce into each dish. Cover with foil and bake for 20 mins at around 350 F.

This made a very nice side dish with the shredded pork and other sundries. I'm sure you can adapt it to a main course, just depending on how much feta you can get your hands on or make.

When cutting the feta, use a wire. That way no matter how crumbly the feta is the piece will hold together. Also, the creamier the feta is, the easier it is to use in this recipe. I tend to make my feta so that it's consistency is halfway between Danish and Bulgarian; just creamy enough to spread, but still firm enough to sprinkle over salad: the perfect texture for wire slicing.

For the semi-creamy feta, you can substitute Quarg, Queso Blanco, or my Lemon Cheese. Or you could just go down to the shops and get some feta. Whatever is easiest for you!

BTW, WP (Wifey-Poo) said I can make this anytime, don't have to wait for a full-on Mexican meal.

Monday, May 25, 2009

Prawn and Bacon Curry

I mean really, just what DOESN'T go well with bacon? You can do loads of different dishes with bacon. Ahhhhh, the humble pig; Mother Nature's gift to the culinary world.

Don't worry about me abandoning the cheesy goodness, I'll be back with a How To Make Awesomely Good Feta Cheese soon --complete with pictures. But I've been told by the clan that I'd better write this one down cus they are going to want it again.

See, when I make curries I usually make them with whatever I can find in the pantry. They always come out great, but every once in a while one stands out. Two nights ago was a "once in a while" curry.

Note about the prawns (shrimp): I used already peeled and cooked prawns cus that's all I had at the time. Feel free to use fresh ones, no worries. Just make sure you keep the shells, tails, and heads as they make a very flavourful seafood stock when boiled and strained.

Feel free to use lemon grass or kaffir lime leaves if you'd like, they should go in at the same time you add the garlic. Speaking of the garlic, I used jarred, prepared, minced garlic as I was out of fresh garlic heads.

Alright, I've blathered enough! Let's get cookin'!

Prawn and Bacon Curry


What you need:

Prep wok-ing:
5 or 6 large rashers of bacon, diced (for you US'ns that'd be about half a pound of bacon strips chopped up)

For the initial wok-ing:
bacon fat (see above)
1 small onion, minced
1 tbsp minced garlic
1 tbsp tamarind paste
2 tbsp Tom Yum paste
1 small red capsicum (bell pepper), minced
1 small can (225 grams around 8 oz) whole water chestnuts

For the prawn part:
350 grams (3/4 of a pound) of shelled, deveined, de-tailed, small prawns (think cocktail shrimp size)
1/4 cup cornflour (called cornstarch in the US)
2 tsp curry powder --I used Clive of India, but any good one will do
1 tsp ginger powder
1 tsp cumin powder
1 tsp turmeric powder
1 tsp cinnamon powder
2 tbsp olive oil

For the cookin' part:
1 can (400 mls or 13 oz) coconut milk or coconut cream (whichever is in your pantry)
1/2 cup cream
semi-cooked bacon pieces from prep wok-ing

For the serving part:
Bed of cooked, white, long-grained rice (I used jasmine)
1 cup of greek yoghurt


Yeah I know, seems like a long list. You'll be happy that I broke it up into sections though, makes the instructions very easy to follow.


What you do:

Start with the bacon in the prep wok-ing section. Toss the cut up bacon into a large wok and cook on low heat till the bacon is about halfway cooked --you don't want it to be crispy. Take the semi-cooked bacon pieces out of the wok, but leave the bacon fat in the wok.

Next add the minced onion to the wok and cook in the bacon fat for a minute or 2 on medium-low heat. Then add the next four ingredients in the "initial wok-ing" section. Give it a good stir. Once it starts to really sizzle (and smell OH SO GOOD!), add the water chestnuts plus the water from the can they were in. Give it a good stir.

While the can water is cooking down (it'll only take a minute) you get to do the prawn part! Put the prawns in a large bowl and then add everything from the "prawn part" section. Toss to coat everything evenly.

By the time you take the bowl with the coated prawns over to the sizzling wok the water should have cooked down. Add the olive oil and then add the prawns to the wok (which is smelling really good by now). Stir and toss and then turn the heat up for a minute.

Add the coconut cream, the cream, and the semi-cooked bacon pieces. Give it a good stir to combine, turn the heat to low and simmer for 5 or 10 mins. Stir it every now and then.

Serve it over a bed of the cooked long grain white rice, and each plate gets a dollop of greek yoghurt on the top of the curry.

Why? Well, this could be a bit hot for some folks and the yoghurt takes care of the heat but you still get the flavours.

Some people will think this isn't hot enough! If you're one of those folks who likes your curries really hot, then double the amount of Tom Yum paste and add a few chopped up thai chilli peppers at the time you add the garlic. That'll be guaranteed to clear the sinuses!

Sunday, April 12, 2009

Chicken Korma

I was reading one of my recipe books the other day, trying to get inspired for a new dish to cook for the clan. This can be difficult as 3 of the 4 folks here never used spices and such in their cookin' before I arrived.

Fortunately, that has changed. However, I still have to be careful and sometimes disguise things that I know for a fact if I told two people here what was in it they'd opt for fish sticks or oatmeal.

This dish is one of those... About half of the ingredients my BIL thinks he hates, and MIL wouldn't touch it if she knew what was in it. So I just didn't tell them, it's better that way. Everyone loved it. Ha!

Now, the original recipe was for lamb korma and the only lamb I have is in the freezer. However, we had half a roast chook from the night before, so shredded chicken meat would have to suffice --it did.

I also had to substitute around half the ingredients, and also change the cooking times and techniques around a bit.

Because of that, I do believe I can call this my own recipe. What do y'all think? Lemme know, eh.

Chicken Korma


What you need:


1 tbsp crushed sesame seeds*
1 tbsp slivered almonds
1 tbsp shelled, roasted, slightly crushed, peanuts**
1 tbsp shelled, roasted, slightly crushed, cashews**
1 tbsp minced garlic
1 tsp minced, pickled, ginger
1 scallion, finely minced
2 pinches of dried chilli flakes (or more if you'd like)

a few tbsp olive oil
1 tsp cardamom powder
1 tsp cinnamon powder
1 tsp cumin powder
1 tsp coriander powder

Cooked, shredded meat from half a chook
1 cup water

1 cup cream
1/2 cup sour cream
salt to taste

This is easy to cook in a wok, BTW.

* Just put some sesame seeds in a mortar, grind them around with the pestal for about 10 sec.

** Put the peanuts and cashews in palm of your cupped hand, use your thumb from the other hand to work the nuts around for a few seconds. Piece of cake!


What you due:

Add the first 8 ingredients to a DRY wok (or a DRY frypan). Notice how I separated the list to make it easy for ya? Dry fry on low heat for about 5 mins, stirring/tossing frequently. Set aside and let cool.

When the mix has cooled for about 10 mins, put it in a mortar and go to town on it with a pestel till it's pastey (should only take a minute).

Put the next 5 ingredients PLUS the paste from the mortar into your wok and fry it on medium for 1 to 2 mins, while stirring. You should be getting a seriously AWESOME scent from that thar wok by now!

Add the shredded chicken meat, plus the water. Give it a good mixing so all the chicken is thoroughly coated. Cook till the water is gone and the mix is dry --but don't let it burn!

Turn the heat to very low and add the last 3 things. That'd be the cream, the sour cream, and however much salt you want (do a taste test before adding any salt, you may not even need it). Give it a good stir and simmer till the cream is warmed through.

Serve over rice (I made curried rice; topic for another post) with Naan Bread (another post topic) on the side.

You'll like this, trust me.

Wednesday, September 3, 2008

Bacon Wrapped Fish Fillets with Pineapple, Peanut, and Coconut Curry

Oi, don't that sound like a mouthful? That's cus it is, and a darned tasty one at that! If you like fish and pork, then this is the dish for YOU. Mmmmmmmmmm... I drool on the keyboard as I type this and remember the flavours... ahhhhhhh...

Ok dave, take a deep breath and calm down; your stuffed pumpkin will be out of the oven soon so you can eat. Mmmmmmm...

Oops, back to the topic. So, like, what kinda fish? I used basa. Basa is a freshwater white fleshy fish found in the Mekong Delta (that'd be Vietnam). I do believe it's a type of catfish. I wouldn't want to use US catfish for this as they are darned flavourful on their own (deep fried with a cajun chili dipping sauce). Basically, any small whitefish fillets will do. Hake, Whiting, Hoki, Basa, Cod, Halibut, whatever.

One of the nice things about this is that it only takes 20 mins and it'll feed four hungry adults (provided they like bacon and fish, of course).

A note about Bacon... American bacon is from pork bellies, whereas Canadian bacon, UK, Aus, Kiwi, etc is from the pork back. The difference: The belly pork is fattier than the back pork. Thin-sliced American bacon probably won't work too well for this as it would crispy up before the fish was done; I'd suggest for you US'ns to use either Canadian bacon, or thick sliced US bacon.

Alrighy, here we go with Dingo Dave's Bacon Wrapped Fish Fillets with Pineapple, Peanut, and Coconut Curry.

What you need:

4 whitefish fillets (I used basa, but hoki, hake, cod, or halibut would be fine)
8 LONG slices of THICK bacon

rice

For the curry sauce:
one can (400 ml or 16 oz) coconut cream
1/3 to 1/2 cup finely chopped pineapple
one good sized handful of coarsely chopped roasted peanuts
2 to 3 tbsp of minced onion
a couple of tbsp olive oil and a 1/2 tsp sesame oil
2 tbsp tamarind paste
1 tsp prepared lemon grass
1 or 2 cloves crushed garlic
1 tbsp minced ginger
pinch or two of chilli powder
1 or 2 tsp turmeric powder

Optional garnish stuff:
thin sliced red capsicum (red bell pepper)
fresh coriander leaves (cilantro)
parsley sprigs
fresh basil leaves
etc (use your imagination)

What to do:

First, put your rice on to cook. 1 cup of uncooked should be enough, but don't short yourself as leftover rice is a very good thing to have in the kitchen. Short, long, medium, jasmine, basmati, whatever you prefer. You should have some rice cooking technique where you can go away and leave it for 20 mins, and then POOF perfect rice. A microwave oven makes a great rice cooker.

Once the rice is on, wrap each fish fillet with two slices of bacon. You don't need to pin the bacon on with toothpicks. Start cooking the bacony-fish either on your big grill hotplate, or a large frypan. Low heat. You can also bake it in a hot oven, but if you do that you'll want to get them in the oven before the rice as they'll take 20 or so mins to cook in the oven. I prefer the hotplate on the outdoor grill thankyouverymuch.

Once the bacony-fish starts cooking, you'll start the curry. Put the olive oil and sesame oil in a wok, add the pineapple, onion, and peanut. Crank the heat medium-high. Just when the wok starts to sizzle, add the rest of the curry stuff. Toss it every ten or 15 secs so it doesn't burn, then after 2 mins (you'll smell WONDERFUL spicy aromas) add the coconut cream, stir, and turn the heat down low.

By now, it should be time to turn the bacony-fish. They really only need 7 or 8 mins a side. It should smell really really really good by now.

While the fish finishes cooking, give the curry a stir every minute or so. Give it a taste, adjust seasonings: if it's not spicy enough for you then add some more chili powder, if it's too hot then add some cream, if it's too tart, then add a bit of sugar.

It should all come together 20 mins after you started the rice. Each plate gets a bed of rice, then the bacon wrapped fish, and the curry sauce poured over the top. It'll look something like this:

bacon wrapped fish fillets

I know, my parrot pics are a heckuva lot better than my food pics, but I was rushed a bit.

Oh, I didn't have any fresh red bell peppers, so I added some dried ones to the curry --as I'm sure you can tell from the pic, eh? Garnish with whatever herb you'd like. Or not, your choice.

Saturday, August 16, 2008

Chicken Coconut Curry

This is one of those dishes you make when you have some leftover chicken from the chook roast you did the night before. You really don't need much chicken meat, just make sure you've got plenty of chicken stock from the roasting pan.

This can easily be made into a flamethrower dish if you are so inclined. As much as I like spicy and hot foods, I *do* like to actually taste the subtle flavouring nuances of the meal.

*********************************************************************************
Holy CRAP! I can't believe I just typed "subtle flavouring nuances" without even thinking about it! Gack! Somebody pass the pitcher of cheap american beer, a chili dog, a platter of nachos, the buffalo wings, and turn the channel to pro wrestling, QUICK!
*********************************************************************************

Sorry about that... back to your regularly scheduled culinary blog...

Chicken Coconut Curry

What you need:

1 to 2 cups leftover, cooked, diced, chicken meat
1 can coconut cream (400 ml or 12 oz)
a small dollup sour cream (if it's too spicy for you)
1/2 cup cream (in case it's still too spicy for you)
2 cups chicken stock from last night's roast chook
1 tbsp chicken stock powder (if you don't have last night's chicken stock)
1 cup of basmati rice (or any long-grained rice)
1 or 2 tbsp olive oil

Spices needed:
2 tbsp vindaloo paste (really really really HOT stuff, you may want to use less)
2 tbsp tamarind paste
1 tbsp prepared lemon grass
2 cloves crushed garlic
1 tsp turmeric powder
small handful of finely minced onion
1 tbsp minced ginger


What you do:

Put the rice on to cook. Whether it's in your microwave, rice cooker, or stovetop. Remember, 1 cup of rice to 2 (or 2 1/2) cups of water.

Put the coconut cream, chicken stock and diced chicken into a large saucepan. Low heat, simmer with lid on.

While the rice is cooking and the saucepan is simmering, you get to prepare the spices! The spices AND the way they are prepared is (are) the key to this dish! So if you don't do anything else I say, just make sure you prepare the spices PROPERLY! Excuse me while I get off my soapbox now.

Put the 2 tbsp of olive oil in a wok. Flame on medium to medium high (depends on your cooker). Now, you're going to be adding the spices all at once so while the oil is heating (should only take 1 min at the most) you can add all the spices (including the minced onion) to a bowl. As soon as the oil is hot enough (just BEFORE it starts to smoke) add all the spices at once. Move the searing spices around well, toss them a few times, use a wooden spoon, do what you'd like to keep it moving while hearing that wonderful sizzling sound. No, I don't have pics of this procedure cus it's over so fast! One or two minutes in the wok should do it. You'll be smelling some of the most GORGEOUS aromas you've ever smelt... hmmmm can aromas be gorgeous?

Add the seared spices to the saucepan with the chook stock, coconut cream and chook pieces. Give it a good stir. Cover and let it simmer til the rice is done.

Ta-Da! From start to finish only 18 mins!

Oh, wait... you are gonna ask where the cream and the sour cream come into play, aren't you? Just before the rice is done, give the curry a taste. If it's too spicy, then add the sour cream and stir well. If it burns your mouth, then add not only the sour cream but the cream too. If it's still too spicy, then maybe you'll believe me when I tell you that vindaloo paste is very hot!

Nah, all joking aside: 3 of the 4 house folk down here think a quick grind of black pepper in a soup pot is spicy, and they all LOVE this dish! The trick is to sear the spices first.

Serve it over the rice, have plenty of fried pappadams on the side.  

Thursday, July 10, 2008

Mild Malaysian

I do have to apologise for offending anyone who's reading this from SouthEast Asia... Please keep in mind I cook for a family that (until recently) thinks a pinch of ground black pepper in 2 gallons of soup is spicy and hot!

Fortunately, I've (slowly) gotten them to see the good side of spices and their uses in food. The key I've found is not to overdo it, and have plenty of cream and sour cream around to "dampen" the spices if I've miscalculated for their sensitive taste buds.

Can you tell I like to experiment in the kitchen? Huh, CAN YOU? Yes, I do like to experiment in the kitchen. 18 out of 20 times it comes out fine, 1 out of 20 is crap, and 1 out of 20 is DAMNED GOOD TUCKA!

Just a note, this will serve 4 adults with normal appetites. So, like, vary the amounts depending on how many you're serving, eh?

This recipe is one of those "Damned Good Tucka" ones... Hmmmmm, what shall we call it? Think, think, think... Ah! Got it!

Dingo Dave's Spicy Coconut Fish Over Rice

Yeah, that's a good name for a recipe, cool! Normally I like to use fresh stuff in my cooking (no preservatives or "flavour enhancers") but there I times when I have to dip into a jar of something. Fortunately, most everything in jars and cans down here (in Oz) don'ts gots no preservatives and other crap in it.

Here we go, kiddies:

What you knead:

2 or 3 tbsp olive oil (or peanut oil if you have it)

1/4 cup of minced onion
1/2 tsp to 3 tsp chilli powder (your palate, not mine)
1 tsp prepared garlic (or one crushed garlic clove)
1/2 tsp turmeric powder (keeps cancer away)
1/2 tsp dried mint leaves
1 tsp prepared ginger (or 1/2 inch grated ginger root)
1 1/2 tsp jarred lemon grass
2 tbsp tamarind paste

1 or 2 tbsp raw sugar

small can of bamboo shoots
a pound of white fish, cut into bite sized chunks (I usually use hake or hoki)
one can of coconut cream (400 mls down here, I think that's 12 oz in the US)
sour cream for garnish (optional, this is in case you have someone who doesn't like spices)
fresh coriander leaves (cilantro for you US'ns) for garnish

cooked long grain rice --hey, you gotta serve it over something!

What you due:

Put the oil in a wok and turn the gas to medium-low. At this point you'll want to start your rice cooking. For the rice I use Basmati or Jasmine, but any long grain will do. Start it cooking as you would normally (18 mins in microwave, eh).

To the hot oil add the next 8 ingredients. You'll notice I separated them so you can easily count to eight. Give the spices a quick stir and after 45 secs to a min add the water from the can of bamboo shoots. Stir it quickly and you'll find you have yourself an AWESOME smelling reddish sauce. Then add the sugar and give it one more quick stir.

The fish pieces (chunks or whatever you'd call them) go in now. Toss them around in the wok to thoroughly coat them in the sauce. Turn the heat down to low.

Pour in the coconut cream and the bamboo shoots. Give it a good stir and then let it simmer gently for 10 mins.

Well, ten min later it's done! And your rice should be done to (did you remember to put the rice in the rice cooker 18 minutes ago?).

Serve it up over a bed of rice, yummy! If you've added extra chilli and someone in the household doesn't like spicy food, then just put a dollop of sour cream over the top of theirs, no worries. Garnish with sprigs of fresh coriander and there ya go.

This is really, really, really tasty and I've been told by the clan (from the Scottish border country) that I can make it any time I'd like to. Keep in mind that these are people that used to break out in a sweat just by looking at a mild chilli pepper.

BONUS: Got some prawns? Add them in the same time you'd add the fish. Got some water chestnuts? Add them in the same time as the bamboo shoots; same goes with any veggies you want to put in, no worries.

Sunday, March 30, 2008

Roasted Leg o' Lamb

Ahhhhh, lamb... Anyone remember that sock puppet character that Shari Lewis (lady ventriliquist) did back in the 50's and 60's called Lambchop? It was on a childrens show, I do believe.

For those of you who are Lambchop fans, you may shudder as you read this: LAMB TASTES GOOD! I don't think I had ever eaten lamb till I arrived down unda, but I can understand why folks like it.

Lamb has a very delicate flavour compared to other meats. Very tender and it takes seasonings very well. Obviously, a strong, bold marinade or seasoning will overpower the lamb taste, so only use something like that if the lamb you are using is either a lesser cut, or you just happen to really like that flavour. BTW, teriyaki lamb chops on the grill are really good!

But, we aren't doing teriyaki lamb chops today. Neither are we doing the english minted lamb either. Oh, if you have lamb chops in certain parts of the UK it WILL be served with mint sauce.

No, today we are doing a leg of lamb roast with rosemary (drool)!

Rosemary is a great herb and it seems to be made for lamb. It's also one of the main herbs for chicken too (thyme and sage being a couple of others for them thar chooks). It'll grow wild down here with pretty much ZERO maintenance. If you'd like to grow it yourself you can. It propogates very well from cuttings, so if your neighbour has some, then you can have some too. If you live in an area that has winter *shudder*, then you better grow it in a pot cus you'll have to take it indoors when it's cold. It likes lots of sun and well drained soil. Don't let your indoor rosemary plant get too humid! Did you know that rosemary is part of the mint family? Well, know you do.

Quick aside: I was inspired to write this recipe down cus rachel did a grill lamb recipe on her blog and that reminded me of my steam roasted lamb. So thanks go to her, otherwise I might not of even thought of typing this in! BTW, hers sounds really really good.

Back to the food...

Roasted Leg o' Lamb

Whut u knead:

One leg of lamb on da bone
5 or 6 sprigs of rosemary, each one 8 to 10 inches long
a bit of sea salt
a bit of ground white pepper
a bit of dried mint leaves
one or two bamboo (or metal) skewers about the same diameter of the woody part of the rosemary sprigs
water
one big roasting dish with lid (it'll need to be big enough for the lamb leg)


Whut u due:

You might be able to see where I'm going with this, but for those of you who haven't figured it out... Here ya go:

Take a skewer and skewer the leg (of the lamb, not your own). Make sure you ream the hole out a few times, then follow the skewer with a rosemary sprig (the woody part of the sprig *should* push the skewer all the way through). If you can get the rosemary sprig all the way through (so that a bit of it sticks out on each side) then great. If not, no worries; just try to get it in a far as possible. Oh, push the thicker end of the sprig through first so you aren't "going against the grain" of the rosemary needles.

Same thing for the rest of the rosemary. Depending on the leg size and how far in you get the rosemary you'll use probably 4 to 8 sprigs.

Mix the bit of salt, pepper and dried mint in a bowl. Then give the leg (the one with the rosemary sticking out of it) a good rubdown with the seasonings. Place the leg in the roasting dish and pour about an inch of water around the leg. Cover that sucker and chuck it in a low oven for a couple of hours.

After 1.5 to 2 hours, turn the oven off, take lamb out, and pour the juices into a saucepan. At this point you have two was to go: cover the lamb and put it back in the oven for 15 mins while you do stuff with the juices, or leave it uncovered to "rest" while you make gravy from the juices.

I'll go through both!

1) Put the lid back on the lamb and return it to the oven (remember you turned the oven off already). To the saucepan that has pan juices, add a splash of red wine and then boil it till it's reduced by at least half.

After the sauce has been reduced, take lamb out of oven and carve it. You'll find it's very easy to carve; very very tender. Serve with roasted or boiled spuds and garden peas (cooked). Drizzle the sauce over everything.

2) Ok, so you've decided to do gravy, no worries. Gravy doesn't take long at all, so the lamb can set on you cutting board to rest for 5 mins while you make the gravy. It's easy: mix a tbsp or two of cornstarch (it's called corn flour down here) in some cold water. Bring the pan juices to a boil, turn the heat off, and whisk while pouring in the dissolved cornstarch. See? EASY!

Carve up the lamb, serve with spuds and peas; don't forget to put lashings of gravy on everything!


Hmmmmmm, what to do with the bone and all the offcuts... Well, there'll be some meat, gristle, cartilege etc hanging on it. Chuck it all in a big pot with lots of water and boil the heck out of it for a few hours! All the tasty marrow and great flavourings will be added to that water! TaDa: instant soup stock! Just make sure you strain it before storing it. You'll also want to defat the stock. I know of several ways to do that so just ask if you are interested, no worries.

Thursday, March 27, 2008

Worcestershire Sauce

Oh boy am I gonna open a big ole can o' worms with this one! To begin with... just how the hell is "worcestershire" pronounced? Fortunately, I am related to some folks from that part of the world by virtue (HA!) of marriage. So I have learned a wee thing or two about how I'm supposed to pronounce words from Wales, Ireland, Scotland, Cornwall, London, and many of the surrounding shires.

Ahem. Here's the fo-nah-teek way to pronounce it (according to a well place source whom I sleep with):  Worchestershire is pronounced   wuss-tu-shuh   

I'm not kidding! Even though the word has 3 r's, not a one of them is pronounced! The first part "worches" is "wuss", then the "ter" is "tu", and "shire" is "shuh". See, you learn something new every day by reading my useless tidbits. Oh yeah, an aussie would pronounce it "wuss-ta-shah".

Back to the sauce...

About a year ago or more, I needed some wusstushuh sauce for making something (it was even going to be edible). However, I was out of the sauce with the exception of a tiny bit of really cheap gunky wusstushuh. "Well," thought I, "I certainly can't use that crappy sauce for this! It'd be ruined!"

What to do... hmmmm, gotta think... I know! I'll make my own.

Fortunately there's this really cool thing y'all may have heard about; it's called The Internet. Just imagine, any info you want about anything or anybody is yours for the pilfering right at your fingertips without ever having to get your lazy ass out of the chair! Wow! Someone shoulda invented this a lot sooner... heck, there'd be even more couch potatoes!

Whoops, back to the recipe.

Now, I *know* that a lot of wusstushuh sauce recipes say you gotta have tamarind paste. Mine doesn't. Why? Cus the idea was to make it with only items that were in the pantry at the time. Going out and buying something would be cheating cus I could just grab a bottle of Lea & Perrins and be done.

After extensive reading and research on this great thingy called The Internet, I had compiled my own list of ingredients (all of which I had on hand, thank you) and a vague idea of what to do.

Soooo, here ya go: homemade wusstushuh sauce! I'm sure you will all have the ingredients in your kitchen pantry :)


Worcestershire sauce

What you need:

1 chopped tomato(e)
1 small chopped onion
3 cloves garlic, minced
1 inch of fresh ginger root, peeled and minced
3 anchovy fillets, minced
1 small handfull of raisins
1/3 cup treacle OR molasses
1 cup balsamic vinegar
1/2 cup red wine vinegar
1/4 cup soy sauce
1/2 tsp sea salt
1/2 tsp ground black pepper
1/4 tsp chilli powder
1 cup water
1 tbsp lime juice
2 tbsp raw sugar
2/3 cup beer (a dark lager works well)


Whew! That's quite the list, eh?


What you do:

Chuck it all in a pot, bring it to a boil (I'd suggest using some kind of heating device under the pot to do this) and then let it simmer for 1 hour (keep it covered, very important so you don't lose liquid). Let it cool.

Pour the cooled semi-lumpy stuff into a blender and then blenderize it till there ain't no lumps left. Should only take a minute or two.

Strain the liquid, then bottle the liquid in a jar, seal it, let it sit overnight in the fridge, and then
use it! See, simple! Easy!

You'll also note that this tastes much better than anything you'll buy off the shelf; trust me on that!

Oh, for the jarring part: just pour boiling water into the glass jar (toss the lid into the pot of boiling water for a moment too), then empty the jar and let it cool for a few. That's it, easy.

Tuesday, March 11, 2008

Croutons and Spices

Quick Croutons:

This is for when you need some croutons in a hurry, and you don't feel like running out to the shops and paying for them!

Take some white bread slices, either fresh or semi-stale. Slice em into crouton sized pieces (about the size of dice). Toss them into a wok, and add some seasonings. The other day when I made them I used Egyptian type seasonings and they are GREAT!

All seasonings are either dried, ground, or crushed. Here's the Eqyptian seasonings I used:

Aniseed
Thyme
Sumac
Hazelnut
Coriander
Sea Salt

Oh, if you've been wondering how to get that beautiful Moroccan flavour (or any North African or Middle Eastern flavour) then you'll want to note that the key ingredient not known in many western kitchens is ground sumac.

Anywho, toss the seasonings into the bread cubes and drizzle some olive oil on them. Put the wok on a high heat, toss the cubes frequently (if you let them sit for more than 30 secs you'll burn them). After a couple of mins (add more olive oil as needed) you'll have nicely toasted and seasoned croutons.

Remove from heat and let cool --they are even better the next day.

You can use any kind of seasonings, whatever your taste buds like.

Oh, regarding sumac: There are quite a few edible types of sumac berries; when used in cooking they are generally dried and then crushed. There are, however, six type of sumac berries that are poisonous and (for the most part) the berries are white. These include stuff like poison ivy, poison oak and (of course) poison sumac. I wouldn't suggest going out and picking your own sumac berries, just buy the powdered stuff at your local shops!