Showing posts with label healthy. Show all posts

Saturday, January 7, 2012

Maggie's Creamy Vegetarian Pepper Pot Soup

DSCF7784

I have fun trading recipes, cooking tips n tricks, ingredients substitution, etc on twitter. One of my most wonderfullest twitter mates is named Maggie. She's a vegetabletarian but she also puts my meatiness recipes on her daily paper.

The other day (month!) we were chatting about soups and she said she'd send me her pepper pot soup recipe.

Of course I had to make it!

And of course I had to change it around a bit! Why? Cuz I didn't have all the ingredients at hand so I subbed a couple of items. I also changed the amounts a bit as I was only making it for myself.

She later told me that she herself had modified the original recipe from the person she received it from! Hey, all's fair in the kitchen mates!

Here is her original ingredient list plus directions:

PEPPER POT SOUP

2 Cups Water
2 Cups Veggie Stock
2 Good Sized Potatoes, Shredded
2 Medium Carrots, Shredded
2 Celery Stalks, Chopped fine
2 Medium Onions, Chopped fine
1 Green Pepper, Chopped fine
½ Cup All-Purpose Four
2 tsp Salt
½ tsp Pepper, fresh hand milled
1 Cup Water
6 Cups Milk

Mix first 7 ingredients together in a large saucepan. Bring to boil. Cover and simmer for 20 minutes. Mix flour, salt, pepper, and 1 Cup Water together in a small container until no lumps remain. Stir into the simmering soup to thicken it slightly. Add milk. Heat through. Check for seasoning.

Makes 12 ½ Cups

Not being one to take directions too well, I decided to make a few changes based upon why I had on hand. And remember, I was only wanting to end up with 6 to 8 cups. Here's what I came up with:

Maggie's Modified Vegetarian Pepper Pot Soup


1 Cup Water
2 Cups Veggie Stock
1 Good Sized Potato, Shredded
1 Medium Carrot, Shredded
1 Bok Choy, rough chopped, leaves included
1 Medium Onion, Chopped fine
1 Red Bell Pepper, Chopped fine
1 Handfull of fresh Rocket (the peppery kind)
A few fresh basil leaves, rough chopped.
A few fresh coriander leaves (cilantro to North Americans)
½ Cup All-Purpose Four
2 tsp Salt
½ tsp Pepper, fresh hand milled
1 Cup Water
2 Cups Milk

DSCF7774

DSCF7777

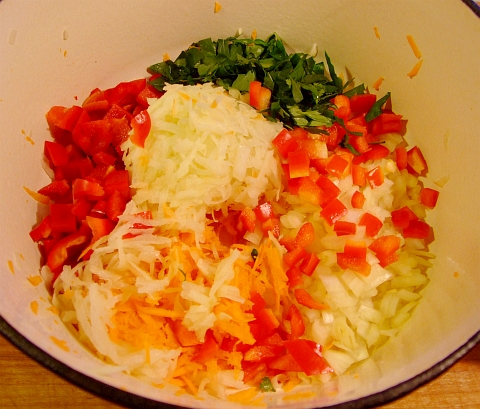
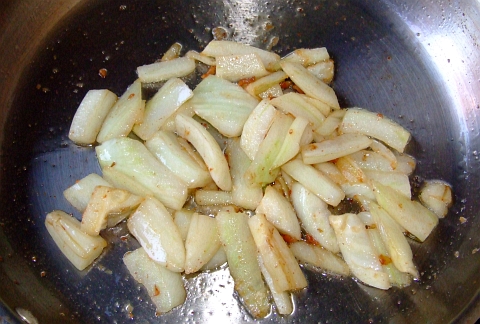
I mixed first 10 ingredients together in a large saucepan and brought it to a boil.

It was then covered and simmered for 30 minutes.
DSCF7780

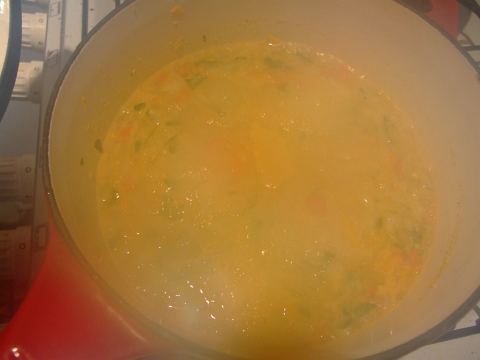
Then the flour, salt, pepper, and 1 Cup Water were whisked together and that slurry was stirred into the simmering soup as a thickener and a spicy-er.

DSCF7782

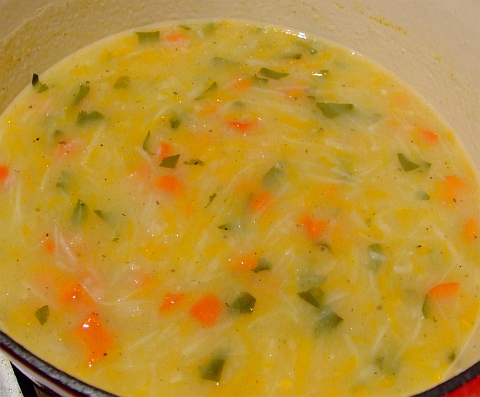
The milk was added and the soup was brought back up to temperature.

DSCF7783

I checked to see if it needed any more seasonings (like salt) and I added a pinch of sea salt.

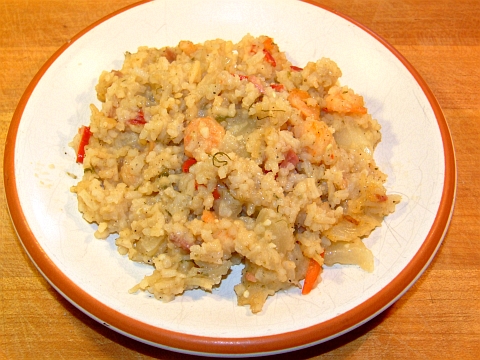
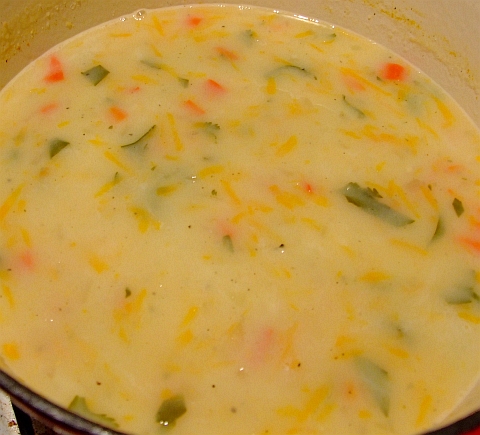
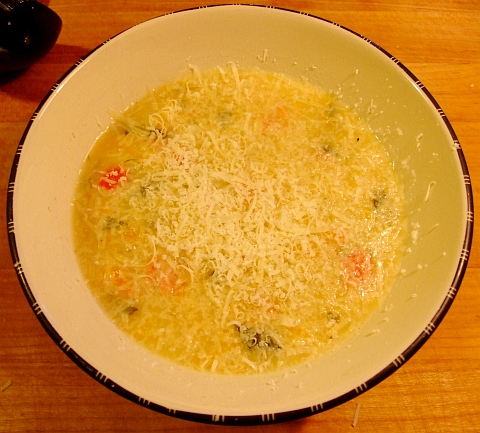
And it of course looks great in a bowl!
DSCF7784

I of course just had to make one little, itsy, bitsy, teeny, tiny final adjustment...


Fresh grated Parmesan!
DSCF7785

The soup was very very tasty, I thoroughly enjoyed it. And you can all thank Maggie up in Canada for sending me the recipe!

Thursday, August 12, 2010

Fennel and Prawn Risotto with Prosciutto

A risotto is actually a very easy dish to make so if you've never made one cus you think it's hard; it is not! Just go for it! And don't be snobbish about using ONLY arborio rice. You don't need to do that.

Yes, I know I've just offended millions of untold readers who are risotto aficionados. Tough. Tough, I say. I've made it with arborio, jasmine, basmati, long-grain, short-grain, medium grain, and probably a few others. Heck I even did one with half basmati and half long-grain brown rice.

You know what? They all tasted great. The key (for me at least) is to dry fry the rice a bit first so it goes from translucent to opaque, THEN start on the liquid it'll be cooking in.

I used prosciutto in this because I got a large, unsliced slab of it half off at the shops and after I finished thin slicing it I had a small piece leftover that just wouldn't go through my meat slicer.

Well, it probably would have but I doubt I'dve had any fingertips left for typing.

Obviously, a piece of ham or bacon can be substituted for the prosciutto, no worries.

You'll also notice that this risotto is not heavily seasoned as I really wanted the fennel flavour to stand up and be noticed. It was.

What you need:
1 hunk of prosciutto --about the weight of a full sized bacon rasher

1/2 of a large fennel bulb

1 cup of rice --any kind, uncooked
1 or 2 tbsp olive oil
sprinkle of sea salt

2 litres (1/2 gallon) of MY fennel stock
handful of dried red capsicums, minced
fronds from the fennel bulb

250 grams (about 1/2 pound), peeled, cooked, deveined small prawns


What you do:

First, prepare the fennel. Remember what a fennel bulb looks like?
fennel bulb


Trim the stalks off.
fennel bulb no stalks


Hey look! A pile of fennel stalks with fronds!
fennel stalks


Trim the fronds off the fennel, you'll use the fronds for flavouring the risotto.
fennel fronds


Then chop up all the fronds. I don't need to show you a picture of that, do I? Thought not.

Next, cut your fennel bulb in half.
fennel cut in half

Notice that thick core? Some people cut that away. I don't. Especially since it'll be so soft and succulent in this dish.

Slice one of the fennel halves (or both, your choice). Try to make them about 5 mm or 1/4 of an inch thick.
fennel sliced

Then, for this dish, I cut the slices in half. You don't need a picture of that, right?

Take your hunk of prosciutto and trim the fat off. Keep the fat! Chop the fat up finely and put it in the large fry pan you'll be using for the risotto. Cook it till the fat is liquid and the little bits left over are browned.

Now add you sliced, cut, fennel bulb and cook it till it looks about like this.
fennel fried
Slightly caramelized, but not soggy. Stir whilst frying, of course.

Next, add the rice, the olive oil, and the sea salt. Fry it (whilst stirring) till the rice turns opaque. This'll only take a minute or two.

Now add 1 litre of the fennel stock, the minced fennel fronds, and the dried red capsicums (bell pepper). Give it all a good stir, turn the heat down to medium low. Cover it.

Check it in 5 minutes. Stir it. If the liquid isn't cooking down and being absorbed into the rice the turn the heat up a bit higher. Stir it every few minutes. Add more fennel stock as need until the rice is done and there's almost no liquid left.

The above paragraph should take around 18 minutes.

Turn the heat off and add the prawns, give it a mix. Put the lid on and let it stand for a few more minutes. Now's a good time to finely mince the rest of the prosciutto. Add the minced prosciutto, mix well.

Serve it up!
fennel prawn risotto


Obviously, you can modify and add ingredients to your heart's content. With this one though, I really wanted to get the fresh fennel flavour.

Tuesday, April 20, 2010

Wholewheat Seed Bread with Chia, Sunflower & Pepita

This is quite possibly the healthiest bread you'll ever make or eat. I'm not kidding! It is also very easy to make.

Have any of you heard of chia seeds? No, not those silly chia pets, sheesh. To find out just how healthy chia seeds are for you, I'd suggest letting Ma Google lead the way. I throw a handful of chia seeds in all my curries now, btw.

Back to the recipe. Easy, very easy.

Just start with my standard, easy, white bread recipe.

Instead of 4 cups of unbleached bakers flour, use 2 cups of the bakers flour and 2 cups of wholewheat flour (called wholemeal flour down here in Oz). So that means half white, half whole wheat flours.

When you add the dry stuff (sugar, seasalt, yeast, etc) you also add 1 TBSP chia seeds, 2 TBSP shelled sunflower seeds, and 3 TBSP pepitas.

Pepitas are raw, shelled, pumpkin seeds.

Then just follow along with the rest of the how-to and then you'll be eating some very healthy and TASTY bread.

Monday, March 1, 2010

Char-Grilled Eggplant

Eggplant is one of the most under-rated veggies (it's actually a berry) around. Very nutritious if you eat the skin too.

Aaaaaaannnnnnnnddddddd if you do one simple trick there won't be any perceived bitterness nor will the eggplant soak up loads of oil --this means if you are making eggplant parmesan then you are forgiven for frying the breaded slices of eggplant instead of baking them.

But we aren't making eggplant parmesan today, we are just going to simply grill the slices. First though, we'll "treat" them so they aren't bitter (even if they aren't fresh) and so they don't absorb the olive oil and go mushy.

What you need:
1 eggplant
1 or 2 tsp sea salt
olive oil

What you do:

Slice the eggplant into slices 1 to 2 cm thick. I try to slice them around 1.5 cm which is 3/5 of an inch. Make sure you get the last slice or two under the "hat" of the eggplant as that's the most succulent part. Lightly salt all the slices and let them set for 30 minutes. You'll notice the slices start to sweat a yellowish liquid, that's ok cus they are supposed to.

After 30 minutes, go crank your gas barby on high (if you are using charcoal, then you had better've started the coals 30 minutes ago!). Next, rinse the eggplant slices and pat them dry.

Drizzle olive oil over the slices and gently toss them in a bowl to lightly coat the slices with olive oil.

Grill them slices! 2 or 3 minutes a side is enough. You'll only turn them once so check after 2 minutes that you've got a nice grill pattern on the bottom of a slice before turning them.

After both sides are char-grilled, serve them up as a side dish to pretty much anything. You'll find the skin has a pleasant, nutty flavour and is very tender. The flesh won't be "heavy" or "greasy" since the eggplant didn't absorb the oil!

You can use various spices when you are oiling the slices. I'll be using a combo of turmeric, cumin, and coriander along with the oil next time.

Enjoy!

Sunday, February 21, 2010

Dingo Dave's Dangerously Hot Chili Sauce

Yes folks, I like chillis. I also spell chilli with two l's as that's how we spell it down here in Oz.

Have I mentioned I grow my own chillis? Well, I do grow them. I currently have 8 plants of an African Bird's Eye variety growing and I should have no problems keeping them through the winter (I haven't seen frost in Adelaide for 8 years now).

Normal Bird's Eye top out at around 200,000 scoville heat units (SHU) but I'm pretty sure these are in the 300,000 to 350,000 scu range. Why do I think that? Because I know how to properly grow chillis in pots so that you get maximum fruit and maximum amounts of capsaicin. And I've eaten a regular Habanero which tops out at 350,000 and these puppies are as hot as them.

Not as hot as the Red Savina Habanero and not near the famous Bhut Jolokia that tops out at over 1,000,000 SHU, but still pretty damned hot. BTW, I'll be getting some Bhut Jolokia seeds for next season... Wife thinks I'm crazy.

These chillis and this recipe is NOT for you if you think a Jalapeno is hot, my chillis are 70 times hotter.

These chillis and this recipe is NOT for you if you think Tabasco sauce is hot, my chillis are 70 times hotter than the original Tabasco sauce and 43 times hotter than their hottest sauce.

These chillis and this recipe is NOT for you if a Cayenne chilli is toxic to your taste buds, my chillis are 7 times hotter.

These chillis and this recipe is NOT for you if you a Thai chilli means instant death to your taste buds, my chillis are 3 and 1/2 times hotter.

For those of you with the guts (in every sense of the word) to read on, then please, by all means, READ ON!


Dingo Dave's Dangerously Hot Chili Sauce

I was going to wait to make this sauce till more of the chillis are completely red and half dried, but we had a big windstorm last night and two branches broke on one of the plants. Keep in mind that even in their green state these puppies are as hot as a Thai chilli.

What you need (besides a great love of chillis):

30 Habanero chillis --this is about the SHU equivalent of the variety of African Bird's Eye I grow
1/2 an onion, minced
5 cloves garlic, crushed and minced
1 tsp of each of the following powders: Cardamom, Ginger, Sumac, Coriander, Cumin
1 tbsp tamarind paste
1 tbsp wasabi paste (the really hot green paste you get with sushi)
1 tsp sea salt
2 tbsp olive oil

1 to 2 cups red wine (I used a shiraz-cabernet)
1 cup water (the wet type, not the dehydrated type)

1/2 cup apple cider vinegar


What you do:

Firstly, you need to snip the chilli fruit off your plants, or go to a shop and buy 30 Habaneros. If the wind broke some of your branches then it should go from this:
chillis on stalks

to this:
chillis with stems


Please notice I left the "hats" on the chillis. Why? Because under the hat on chillis (eggplant too) is where the most tenderest, succulent part of the fruit is. That's also the area with lots of capsaicin in chilli fruit.
under the chilli hat


You'll notice I'm not wearing rubber gloves whilst handling the chillis. That is because I'm not a wuss. Although my wife thinks/knows it's cus I'm crazy.

Anyways, remove the hats from the chilli keeping as much fruit as possible:
chillis destemed


And then rough chop them:
chillis rough chopped


Now add all the ingredients EXCEPT the wine, water, vinegar to a saucepan. You'll notice I grouped those at the top of the ingredient list for your convenience; you're welcome. Make sure you add the seeds too!

Mix it well and then crank the heat up. Cook for around 5 mins while stirring often. The idea is to sear stuff without burning it. It should look something like this:
searing chillis

The above pic is after 2 mins. After 5 mins you'll notice some of the mix getting stuck to the pan. Once it starts to stick you should also notice the chillis, onion, and garlic are well-seared. Time to add the wine and the water!

So, add the wine and the water, stir well making sure you scrape the pot so everything is incorporated into the liquid. Simmer the pot till the liquid is reduced by at least 3/4 and then add the vinegar. Turn the heat off and let it cool.

Add the whole mix to a blender and blend for a few mins so that every little bit of chilli, onion, and garlic are pureed. Put the mix back in the pot and simmer to reduce the liquid by 1/4.

Your saucepan should now look like this:
chilli sauce simmered


TADA! Done! Now just pour it into a jar you've disinfected, cap it, and refridgerate. Use when needed. It ages quite well and gets smoother over a couple of weeks. No preservatives are needed, I seriously doubt anything has the temerity to grow in it.

Enjoy!

Oh, btw... chilli enthusiasts (snobs) are constantly debating the heat and taxonomy of various chillis so if you think that African Bird's Eye can't get as hot as a regular Habanero then I say you are mistaken. My opinion, and I'm sticking to it.

Saturday, November 28, 2009

Cheesy Baked Croquettes with Smoked Trout & Prawn Sauce

Yeah, that's quite the title isn't it? The prawn sauce is optional, BTW. One night I served them as a main course without the prawn sauce but with a side salad, and the next night as a side dish with the prawn sauce.

Personally, I like them better with the prawn sauce.

The amounts of each ingredient aren't listed --with one or two exceptions-- you'll see why, no worries.


Cheesy Baked Croquettes with Smoked Trout & Prawn Sauce


What you need:

For the croquettes:

4 to 6 cups of leftover mashed potato --do I REALLY need to explain how to make mashed spuds?
handful of fresh basil leaves
diced cheddar cheese --somewhere around 1.5 cm but please don't be exact
salt
pepper
couple of handfuls of bread crumbs
cumin powder
turmeric powder
thin-sliced smoked trout (or smoked salmon)

For the prawn sauce:

Handful of prawn shells (I ALWAYS keep prawn shells after shelling the prawns, they freeze well and you just break off a hunk whenever you want to make a sauce or stock)
1 crushed garlic clove
1 or 2 tsp dijon mustard
1 tbsp lambrusco wine
1 tbsp cream fraiche OR sour cream OR double cream
dash of sea salt
dash of ground white pepper
4 cups H2O (water)


Whut U Due:


Cube some cheddar cheese to around 1.5 cm (3/5 of an inch) --or somewhere thereabouts. Mince up some fresh basil leaves (rinse them first, could be caterpillars hiding).

Your cutting board should now look thusly:
DSCF6555


Mix the basil into the mashed spuds. Place some of the spuds into your hand --each croquette should be between golfball and tennis ball size.
DSCF6558


Flatten the mashed potato in your palm and place a piece of cheese in the middle.
DSCF6566


Carefully mold the potato around the cheese
DSCF6567


Ta-da!
DSCF6569


Make up as many or as few as you'd like, no worries. I used three per person as a main and one per person as a side dish. Put them on a plate and then refridgerate for an hour. This way they'll be easier to crumb.

So, like, what to do for an hour while the croquettes chill in the fridge? How about make some prawn sauce!

Add your empty prawn shells and the garlic and 4 cups of water into a saucepan. Crank the heat up and simmer for an hour. If the water gets too low, then just add some more water. You want to end up with around 2 cups of liquid.

Turn off the heat. Take a potato masher and mash the shells flat to extract every last bit of prawny goodness. Strain and return the strained liquid to the pan. Cover the saucepan and set aside. Let's return to the croquettes.

Spread your plain bread crumbs on a tray or plate. The sprinkle on a bit of salt and two of my favourite spices; cumin powder and turmeric powder.
DSCF6572


Mix the breadcrumbs around so the crumbs are full of the spices.

After the potato balls have chilled, take them out of the fridge and make up an egg wash: one egg plus equal amount water. And put a bit of flour in a bowl too.
DSCF6576


Roll each bowl in the flour (lightly shake off excess), roll it in the egg wash, and then roll in the breadcrumbs.

This is what they look like before baking:
DSCF6578


Bake them at around 375 F. Long enough to brown the breading, but not so long that the cheese leaks out. 15 mins should do it --I wasn't timing these but I'd check every few minutes to make sure the cheese wasn't running out.

While they bake, shall we finish the sauce?

Turn the heat on the liquid as low as possible and add the mustard, wine, salt and pepper. Whisk it well, let the sauce come up to a simmer (don't boil it) and taste for seasonings. You might want to add a bit more salt or pepper, but don't make it spicy as this isn't a spicy sauce.

Turn the heat off and cover to keep warm. Just before serving whisk in the cream fraiche (or sour cream or double cream). If you need to heat it back up do so, but it'll only take a minute at most --don't let it boil after you've added the cream.

Spoon it over the baked croquettes BEFORE you top with the smoked trout and basil sprig.

This is what the croquettes look like after baking:
DSCF6579


The first night they were a main course without sauce. 3 per plate and a thin slice of smoked trout curled on top. This was my plate:
DSCF6585
No, that's not gunky, fatty dressing. It's my own homemade tzatziki


The next night they were a side dish to baked basa and I made the prawn sauce to drizzle over the top. After the sauce is drizzled over the croquettes, then artfully arrange a slice of smoked trout on top and fresh basil to top it. This plate was MIL's just before I added the side salad.
DSCF6615


This plate was mine:
DSCF6621


I've been told that I can make these ANY time I want, everyone loved them. Enjoy!

Sunday, September 27, 2009

Polynesian Hibiscus Water

Yes, we are staying in the South Pacific. Why? Cus I like the region, that's why.

Hibiscus...

I'm assuming everyone knows that the flower petals and stamens are edible, and tasty too. If you don't know what an hibiscus flower looks like, just think of any movie set in the South Pacific with the island girls (scantily or unscantily clad) having flower blossoms in their hair. Those flowers are hibiscus. Depending on which island you are on you're supposed to wear the flower over a certain ear during certain times doing certain things. Not many white fellers know that, btw.

There are probably as many different ways to make this as there are islands in Oceania, so don't think this is "The" way.

Oh, it's also made in parts of the Carribean and in the Bajio region of Mexico where it's called Agua de Jamaica. Jamaica flowers are known as hibiscus flowers elsewhere.

Some recipes call for dried flowers, others for fresh; some with dark red flowers only, others with pink. There is no hard and fast rule so feel free to experiment.

Oh, a note or two about the flowers. After you snip them make sure you rinse them well, otherwise you'll have tiny black ants floating in your beverage. Ants are one of the main pollinators of hibiscus. Also make sure you carefully remove the green calyx at the base of the flower.

If your hibiscus bush or tree is flowering profusely now, then harvest a boatload of flowers and put them in your food dryer so you can make this and serve it to your friends in the middle of winter. Lunchtime is an ideal time to start making the drink to serve with dinner.

Here's how I make mine...

Hibiscus Water

What you knead:
20 fresh, clean hibiscus flowers (any colour) OR 10 dried ones
1 to 2 cups of raw sugar --this is to taste
2 quarts --8 cups or 1.892 litres-- of water
2 tbsp grated ginger
juice from 2 limes (1/2 to 3/4 cup) --this is added at the end so it's also "to taste"

What you due:
Put the water, sugar and ginger in a pot. Heat it to boiling (a stovetop works well to boil the water) and then cover and bring it down to a simmer for 10 minutes. Turn the heat off and toss in the hibiscus flowers. Give it a little stir so the flowers don't float on the top and then replace the cover.

Let it sit for a while till it comes down to room temp. Add PART of the lime juice and then give it a taste, add more lime juice (or sugar --just stir it in well) for your taste.

Let it stand for an hour.

Strain the liquid through a cheesecloth (give the bundle a good squeeze to get all the flavourful liquid).

Next... Serve it up and drink it!

This makes a nice mixer with rum or vodka if you are so inclined.

ENJOY!

Saturday, November 15, 2008

Prawn-Flavoured Miso and Seaweed Soup

Ever done any cooking with prawns (shrimp)? Ever had to shell them? Did you ever wonder what you could do with the "heads" and the rest of the shells besides chucking them in the bin? Well, you are about to find out what you can do with them.

This easy and tasty soup makes a great side dish to whatever you are doing with the shrimp (prawn) meat for the main course.


Here's what you need:

Prawn (shrimp) shells and heads from about 1 pound of shrimp (prawn)
1 or 2 tbsp light miso paste
1 or 2 sheets of yaki-nori seaweed (the kind you make sushi rolls with)
8 to 10 cups of water
a large saucepan
a heat source

There's some optional stuff, like shitake shrooms, chillis, or some of the prawn meat, but the above will give you a very nice, refreshing soup. Oh, the light miso paste refers to the color and has nothing to do with reducing calories.


What you do:

Dump the prawn shells and heads into your saucepan along with the water. Crank up the heat source, cover and simmer till the liquid is reduced by around half. This'll take anywhere between 30 mins (minutes) and an hour (3,600 seconds).

Remove from heat. Take a potato masher and mash the shells (while still in the broth) to extract every last bit of prawny goodness from them. Strain to get rid of the shells. Put the strained broth back in the saucepan and add the miso paste. Put it back on the heat to bring it up to a simmer.

A couple of minutes (a few hundred seconds) before serving, shred the seaweed sheets into the soup. Let it stand for a minute.

Serve it up!

Tasty, simple, healthy!

Makes about a litre. If you want more soup, then use more water initially.

If you are using dried shitakes, try reconstituting them in half water and half dry sherry --it'll take an hour or so depending on how dry they are (if they've been in your pantry for a few years it'll take a long soak). And add the reconstipated shitakes to the soup the same time as the miso.

Sunday, October 12, 2008

Cheesy Steamed Cauliflower

This is a main dish. Yes, that's right. It'll feed 3 hungry adults --provided they all like cauliflower, of course. It's dead easy to make and is quick. Heck, I'll bet even Ishmael could make it (but I doubt he'd eat it).

Here's what u knead:


one big ole cauliflower
1 litre full cream milk
1/2 cup cream
1 cup white wine
salt
ground white pepper
2 to 3 cups grated cheddar cheese
1/2 cup minced onion
corn flour (corn starch for you yanks)

What to due:

Cut the cauliflower up into large sized chunks --depends on the size of your steamer, the chunks should be as big as you can make them and still fit into the steamer. Don't forget to steam the greens too, very tasty and nutritious!

They'll need to steam for a good 30 mins and the sauce only takes 10 mins. That'll give you an idea of when to start the sauce. The sauce really makes this dish, yum!

Put the milk, cream, and white wine in a large saucepan heat it slowly. Keep the flame low as you don't want to scald the cream, but you should be able to get it bubbling without burning it. Add 1/2 tsp sea salt, and a few good shakes to white pepper --this is to YOUR taste.

Once the sauce in simmering, start sprinkling in the corn starch (corn flour for you Aussies) while whisking like crazy. Once the sauce is as thick as you like it (it should be fairly thin for this so that it soaks into the cauliflower) then add the minced onion and the CHEESE. Mmmmmmmm, cheese... drooooo-al...

Turn the heat off the sauce and let it sit for a few mins while you plate up the big cauliflower chunks. Liberally ladle the sauce over the cauliflower and use some process to get the food from your plate into your stomach.

Options:
Use a beer instead of the white wine
Use some cayenne powder
Use some garlic
Use some bleu cheese along with the cheddar
Parmesan along with the cheddar works well too
Serve with piping hot, soft, fresh, homemade bread (with lots of butter)

Mmmmmmmm

Wednesday, October 1, 2008

Sweet And Spicy Cabbage

Whoa, hold on a minute. Just cus I can hear the groans from way down in Oz doesn't mean it's not good! In fact, it's very good. Well, at least to me it is.

As many of you are aware, I tend to experiment a bit. Sometimes in the kitchen even! Most of the kitchen experiments are pretty successful, once in a while something bombs totally, and once in a while something is awesome (like the special meat balls last night).

This one is one of the awesome ones. Provided, of course, that you like cabbage and spicy food. Otherwise, I don't think you'll enjoy this.

But if you're brave and like spicy food and cabbage, then read on.

This whole thing started when I noticed that I had some leftover cabbage the other day (just steamed a bunch, it was very mad) and I didn't want it to go to waste. Hmmmm, I'll just thin slice it (shred) and marinate it in *something* to have on the side tonight with the fish stir-fry.

6 hours go by while the shredded cabbage marinates...
.
.
.
.
.
.
.
.
.

Well, that sure didn't "take" the flavors well. Let me add some more sugar and then simmer the mess.

simmer

simmer

simmer


Ah, ready to have as a side dish!

Not ultra yummy, but tasty.


*The next morning*

*picture dave staggering down the stairs in his robe*

*to feed the birds*

*and the cat*

*dave is hungry*


What's this? Some leftover cabbage! Well, the spices will help clear the sinuses.

*Eat*

WOW!

*Eat some more*

WOW!!!! That's great! Now I just need to remember how I made it...

Which brings us to:

Dingo Dave's Sweet and Spicy Cabbage

Please note that this is a very ad hoc recipe...

What you need:

1/8 (or so) of a cabbage head, shredded
1/4 cup very thin sliced red onion
1/2 cup fermented white vinegar (never use distilled, I took organic chem and I know where the distilled garbage comes from)
1 cup white wine vinegar
3 or 4 cups haitch-too-o (water)
2 tsp grated ginger
2 cloves crushed garlic (or 2 tbsp of the jarred stuff)
1 to 4 tsp chil(l)i flakes (just how hot do you like it?)
1 cup raw sugar

What you do:

This is so easy. Even you blokes or blokettes that can't cook can do this!

Put everything EXCEPT THE CABBAGE AND THE ONION in a saucepan. Whisk the heck out of it so the sugar is dissolved. Crank on the burner and simmer for 15 mins (stir it once in a while, eh) and then let take it off the heat. Toss in the cabbage and onion, cover, and let it sit for a few hours.

A few hours later, turn the heat back on. Boil it till there's almost no liquid left. Strain off the liquid. Let the cabbage and onion cool, then cover and toss that puppy in the fridge till the next day (or even two).

If you like spicy and if you like cabbage, then this is awesomely good!

Saturday, September 20, 2008

Seafood Chowder

This may seem to be a fairly simple menu item, but no matter how you make your chowder and whatever you put into it (clams, prawns (shrimp), crab, fish chunks, mussels, etc) there are a couple of very important techniques to getting it right.

For those of you in the US who make your own New England Clam Chowder, you'll feel right at home with this.

There are also many many different ingredients you can use. I'm going to give you the recipe as I made it two nights ago, and then give you a bunch of different things you can use/substitute. That way no matter where in the world you are and no matter what local ingredients you can lay your hands on, you'll always be able to make Dingo Dave's Seafood Chowder!

Oh, I tend to make it slightly different each time, depending on what I have in the pantry and the freezer that day or what was fresh at the fish shop that morning. So there's no real hard and fast rule, except for a couple of techniques.

On with the show!

Dingo Dave's Seafood Chowder

What you need:
2 or 3 rashers of bacon cut into small pieces
bacon fat from the above bacon (this is IMPORTANT)
1 can (400 mls or about 14 oz) coconut cream
200 gms small whole prawns (1/2 pound small shrimp) with the shells on
1 litre seafood stock (made from the above prawn shells)
1 whitefish fillet cut into small chunks (I used hoki)
small can of crab meat (or fresh if you've got it)
1/2 to 1 litre milk (2 to 4 cups)
a small minced (or diced) onion
2 cloves crushed garlic
2 tsp minced ginger
2 tbsp olive oil
1 tsp sesame oil
3 or 4 small diced potatoes
sea salt
ground black pepper
ground white pepper
1 tbsp dried basil
1/4 cup flour
a couple of litres of H-TWO-OH(water)

What you due:

Firstly, make the seafood stock (start this a few hours before you want to make the chowder). To make it you'll need to peel and devein the prawns. Toss the veins (alimentary tract, ahem...) but keep the heads, shells, legs etc and throw them in a big ole saucepan. Add a litre (4 cups) of water and boil the heck out of it. Once it's almost boiled down, add another litre of water and boil for a short time. Let cool. Take a potato masher and mash down the shells --this is to extract every bit of flavourful prawny goodness from the shells. Strain the stock (this is IMPORTANT). Save the stock, dump the shells.

Ok, your seafood stock is made, no worries.

Now for the nuts and bolts.

Cook the bacon pieces in the pot you plan to make the chowder in (use a low flame). Once the bacon is done to your liking (crispy or not, your call), remove the bacon but LEAVE THE BACON FAT IN THE POT. Add the diced potatoes to the pot, and cook in the bacon fat for a few mins; stir regularly. After a couple of mins, add the minced onion, some salt, some ground black (or white) pepper and a bit of dried basil. Stir it around. You should have some very nice aromas by now; just keep the heat low so nothing burns. Add the flour and mix well.

Yes, you'll have some browned on gunky looking stuff in the pot along with the spuds and onions. Don't worry, you're about to take care of that.

Now add the seafood stock you made earlier in the day. Give everything a good stir and use your wooden spoon to scrap the bottom and sides of the pot. Ain't deglazing pots great? Very flavourful. Oh, and, ummmmm, it's a FRENCH cooking technique!

Now add the coconut cream and about 1/2 litre of milk (2 cups). Let it simmer for a few mins.

While that's simmering, you get to sear the spices and seafood.

I use a wok, but feel free to use a saucepan if you'd like.

To the wok add the olive oil, sesame oil, garlic, ginger, fish chunks, crab meat, prawn (shrimp) meat. Crank the heat to HIGH and sear that stuff while tossing/stirring regularly. It'll only take 2 to 3 mins.

Dump the entire contents of the wok into the chowder pot. Also add the bacon pieces. This is the point where you can add more milk if you think the chowder is too thick. I, however, feel that chowder can never be too thick --but that's just me.

Let it simmer for a couple of mins, then serve it up! Have a fresh made loaf of bread or a fresh cobb or a fresh baguette around for dunkers.

This is seriously good!

And now for the substitutions and garnishes!

Well, most of you may not want to make your own fish stock. I can respect that, really! So get a bottle of clam juice instead. Oi! Can't find clam juice, use white wine! Don't drink? Don't worry, the alcohol will cook off.

Fake crab can be subbed for crab meat, no worries.

If you sub clams for the prawns, then DON'T sear them and only add them to the chowder in the last couple of minutes --otherwise they'll be really tough and chewy.

Don't like coconut (heathen scum)? No worries, just use milk cream instead.

Allergic to lactose? Well... this really isn't the recipe for you, sorry.

Garnish with any herbs you want, just make sure they are fresh; chives, basil, parsley, coriander (cilantro if you are in N.A.) etc.

Want it spicy? Add a tbsp or two of vindaloo paste to the wok when you sear the seafood and spices. Oh YEAH! That'll get them capillaries dilated!

Friday, July 4, 2008

Veggie Soup Stock

This is so tasty! It's something I've wanted to try for a while and was finally able to cus we got some fresh corn with ALL the husk on. Now I know many of you are going to say to make tamales with the husks, and others of you are going to say to grill them with the husks on (I love em that way) but no one else in the household down here will touch them that way. To them, the corn cob has to be boiled... for a long time... sigh; heathens they are!

So I always end up with a huge pile of corn husks and nothing to do with them (yes, I'll make tamales for myself and grill mine in the husk but there's still a lot left over).

So how's about making soup stock with them!? Why the heck not? Here we go with


Dave's Veggie Stock


What you need:

a big pile of fresh corn husks
lots of water
lots of sea salt
ground black pepper
dried onion flakes (I make my own)
dried red bell pepper (I make my own of them too)
dried basil


What you do:

Fill your largest stock pot with water, toss in all the corn husks. Sprinkle with sea salt, cover, and crank some heat under that sucker. Turn the heat way down once it's boiling, push down any floating corn husks (use something besides your bare hand), and then go away for an hour.

When you come back in an hour, top the water up, sprinkle in some more sea salt, add some ground black pepper, onion flakes, dried red bell pepper strips and some dried basil. Put the lid back on and go away for another hour.

Ok, you've now come back; it's been a total of two hours since you started the whole process. The stock in your stock pot should be tasting pretty darned tasty right about now. Now's the time to adjust the seasonings. Add more salt or pepper if you think it needs it (hey, they are your taste buds, not mine). If it's too salty you have two options. One is to add more water without adding more salt (I don't favor this as it dilutes the overall flavor of the stock), the other is to add a chunk or two of raw potato and simmer for another 15 to 20 mins. Take the chunks of potato out (they will be darned salty after having absorbed a lot of the salt in the stock) and do what you'd like with them (I usually chuck them in the freezer and use them to add to mashed spuds when I need to). And now your stock has been desalted without the rest of the flavor being diluted. Presto!

Well now, you should have about a gallon of good veggie stock. It should only have cost you 50 cents, maybe a dollar. You had the corn husks anyways cus of the corn cobs, a small handfull of onion flakes and a few strips of dried bell peppers are pretty cheap especially if you dry your own, and who doesn't keep salt, pepper and basil in their kitchen? Go run to a store RIGHT NOW and price how much a PINT of veggie stock is, and then look at all the crap that's been added to it! Are you back? Yeah, see: it's much better to make your own!

What to do with the stock? Well, you can use it as soup broth right now, no worries. You can toss it in the freezer for future use. Use it the next time you are making a risotto! Makes a great cream soup too! Use your imagination and your kitchen ingenuity and you'll be amazed.

Yeah, a gallon of veggie soup stock for 50 cents... pretty darned good the way food prices are, eh?

Tuesday, May 20, 2008

Hummus

WARNING! WARNING! DANGER!!!! EXTREMELY HEALTHY RECIPE!!!!!

Hmmmm, now how many different spellings are there for hummus... humus, humous, hummos, humos, hommus, homus, homos, hommos, hommous. I think that about covers it, no worries.

How many different ways are there to make hummus (sp)? An unimaginable amount! Really, there's lots. There ain't nothin special about mine. But what will make this post special, you ask? I'm going to give you a bunch of tips, tricks, variations and more info than you could possibly want about humos (sp) and it's ingredients.

Ready? Here we go!

Firstly, let me say that if you buy premade humous (sp) in a store then you are wasting money and your health. Make it fresh! Cheaper and better for you (meaning no preservatives nor trans fats). It is also the EASIEST thing you'll ever make. Well, except for maybe that cracker plate you served with processed cheese goop on top of each cracker and thought you were being clever and sauve; you naughty person you.

Back to the post.

Some of you in the US may have heard of garbonzo (garbanzo) beans and some of you may have heard of chick peas. Guess what? They are the exact same thing! They are also one of the most healthiest things you could eat, and when made into humous (sp) you'll have pretty much a super food.

Canned or fresh chick peas? I use canned, but only because down here in Oz the ingredient list is: chick peas, water, salt. I can handle that, no worries.

What the heck is tahini? Quite simply, tahini is ground up sesame seeds. That's it. This is also one of the best things you can eat, and it has a very long shelf life even without preservatives. Why? Cus it's got something that other seeds don't have: Sesamol. Sesamol is a natural preservative so your jar of stone ground sesame seeds (which is tahini) will last a long time without the oils breaking down.

You can make your own tahini, but most shops sell it in a jar. How do you know which to buy? Just look for the brand where the sesame oil has separated and is on top of the goop. That's the one you want. Oh, and make sure the ingredient list has only one thing: sesame seeds. Just give it a quick stir to re-emulsify it. Also don't worry about it getting cloudy if you store it in your fridge; it's supposed to do that at cooler temps.

Alrighty then; on with the recipe!


Hummus (and all the spelling thereof)

What you need for the basic recipe:

One food processor
One can of chick peas --425 grams, drained (I think that'd be about a 12 oz can for those of you in that other hemisphere)
2 tsp tahini
2 cloves garlic
1 tsp sea salt
1 or 2 tsp olive oil (if needed)

Supplemental bonus stuff:
Please note: I wouldn't try all of these together

cumin powder
coriander powder
chilli flakes
onion
white pepper
lemon juice
lime juice
roasted garlic
powdered sumac
black pepper
cardamon
aniseed
curry powder
oregano

Mix and match depending on the style you'd like.

Moroccan: sumac, aniseed, cardamon, lemon
Mexican: cumin, coriander, chilli, lime
Indian: curry powder, black or white pepper
Eastern Med: roasted garlic, oregano, onion

this list can go on...


What you do:

This is easy! Chuck it all into a food processor and push the button. "Push the button, Max!" Ummm, that quote is a reference from Jack Lemon shouting to Peter Falk about 50 or 60 times during the movie The Great Race, circa 1960's. I have it on DVD (good sword fight scene in it too).

Back to the recipe...

Ahhh, ummm... that's it! Now wasn't that so easy? And very very very very healthy too.