Otherwise known as Mock Oxtail Soup. Oh heck! Let's just shorten it to Moxtail Soup!
This recipe is kind of a cross betwixt a traditional UK oxtail soup, a Scottish Cock-A-Leekie soup, and a Sri Lankan mulligatawny soup.
Given all that, it is SSSSOOOOOOOOOOOO GOOD!
And you don't knead an oxtail either. But you do need a leek. And some ground (minced) meat. I used beef this time but I've also made it with ground kangaroo, ground moose, ground lamb, and ground caribou.
It's very easy, few ingredients, but it does take some time for the flavours to develop. There are also many additions to this, I'll mention a few at the end of the post, no worries.
What you need:
500 grams beef mince (ground beef)
1 fresh leek
water (H2O)
1 can of roma tomatoes (diced, whole, whatever; as long as the ingredients are: Tomatoes, water, salt)
2 or 3 glasses of red wine --I usually use shiraz for this
1 to 4 tbsp vindaloo paste (not vindaloo sauce, but the REAL stuff)
sea salt
ground white pepper
What you do:
Slice the leek into 1 cm disks. Put the disks into a colander and rinse them well. If you've never used a leek before then you may like to know that dirt can hide in the darnedest nooks and crannies of the leek --so rinse the disks well.
Lightly cook the meat in the pot you intend to make the soup. As soon as the meat is JUST barely cooked through then remove the meat from the pot so as to leave all the wonderful juices behind. Set the meat aside.
Add the leek disks to the meat juices along with 1 litre of water. Simmer till the liquid is reduced by half. Add a half litre of water (or so) plus 2 or 3 glasses of red wine. Simmer for a few mins to bring it back up to temp.
Toss in the can of tomatoes --oh, make sure you OPEN the can first and only add the CONTENTS of the can. This is a good time to add the cooked meat too. A sprinkle of sea salt and a few grinds of fresh black pepper should be added now.
Give it a taste. Rather bland, eh? Now add the vindaloo paste a tbsp (or tsp if you are a wuss) at a time. Stir well after each addition and give a taste test. Once you've got the spiciness up to where you want it then (obviously) stop adding the vindaloo paste.
Turn the heat off. Cover and let stand for the afternoon. Crank the heat up before serving so it's close to piping hot. A good hunk of crusty, homemade, buttered, bread goes great with this.
What else can be done with this soup? Well, pretty much any red, ground meat can be used, game or not. Yes, that includes emu and ostrich. Use the ground (minced) meat as you would the minced (ground) beef.
Celery and/or cabbage make nice flavour additions. For the cabbage, shred it as thinly as possible and add it at the same time as the leek. I'd add the celery (very thinly sliced) a little bit through the simmering though. Carrots are a nice addition too. The softness of the carrots depends upon when you add them to the simmering leeks, your call.
For a slightly different flavour you can sear the leek (and whatever veggies you are using) in the pot first with some butter or olive oil along with a sprinkle of sea salt. Deglaze with the meat juices and a bit of red wine and then continue on with the recipe.
Anyways, loads of variations and loads of flavours can be yours just from this one simple soup.
Enjoy!
Showing posts with label spicy. Show all posts
Showing posts with label spicy. Show all posts
Monday, May 3, 2010
Saturday, March 27, 2010
Squid Chili
The other day I actually got to make a dinner JUST FOR ME! Ahhhhhhhh, bliss. Of course I had to make other stuff for the rest of the clan. Why? Well, firstly, I thought B.I.L. would be heading out to teach before dinner so I hadn't planned anything for him --turned out that not only would he be around for dinner but that I would also have to give him a ride to the U. And M.I.L. is having teeth probs so it was going to be something soft yet tasty for her. Wifey-Poo had some tummy probs so she was wanting something very mild and light.
Needless to say, I ended up making four completely different main courses. But the one I had was THE BEST! Mine was the chilli, of course.
Normally if I'm going to make chilli then I'll get the beans soaking the night before. I did not have that luxury this time so it meant extra cooking time for the beans, but that's ok since I can do loads around the house and grounds while the beans simmer, no worries.
So, here is what I did for my Squid Chilli!
To a large pot, I added the following:
150 gm dried berlotti beans
8 dried curry leaves
1/2 an onion, diced
4 cloves of garlic, crushed
sprinkle of sea salt
lots of water
I put it on to boil and boiled till almost no liquid left, added a few more cups of water and boiled it down again till the beans were soft.
Into a hot, oiled wok I added the following:
1 squid tube --cleaned, sliced into rings, and blanched*
1/2 an onion, diced
2 cloves of garlic, crushed
3 tbsp chilli paste (use the kind that's at least 90% thai chillis)
2 tsp ground cumin
2 tsp ground coriander
1/2 tsp ground cardamom
1 tsp ground ginger
1 tbsp dried basil
sprinkle of sea salt
*if you blanch the squid rings after cleaning and slicing then you can use them in any sauces and any cooking length without them going "tough" or "chewy".
I seared all that in the wok for 5 to 6 minutes, stirring/tossing regularly. I deglazed the wok with 2 glasses of shiraz and cooked it down till there was only a bit of liquid left.
The contents of the wok were then added to the pot with the cooked beans (and all that other stuff). One can of peeled roma tomatoes was added along with 2 tsp of chilli powder.
Simmered down till it was thick but not sticking and then served up! I did grate some fresh onion and cheddar cheese over the top of my bowl and I used some of my wholemeal flatbread as scoopers.
This was darned good! No reason why this can't be done for pretty much any type of meat you want to use in the chilli. Ground roo (kangaroo) instead of the squid would be particularly nice I think, as would moose.
Sunday, February 21, 2010
Dingo Dave's Dangerously Hot Chili Sauce
Yes folks, I like chillis. I also spell chilli with two l's as that's how we spell it down here in Oz.
Have I mentioned I grow my own chillis? Well, I do grow them. I currently have 8 plants of an African Bird's Eye variety growing and I should have no problems keeping them through the winter (I haven't seen frost in Adelaide for 8 years now).
Normal Bird's Eye top out at around 200,000 scoville heat units (SHU) but I'm pretty sure these are in the 300,000 to 350,000 scu range. Why do I think that? Because I know how to properly grow chillis in pots so that you get maximum fruit and maximum amounts of capsaicin. And I've eaten a regular Habanero which tops out at 350,000 and these puppies are as hot as them.
Not as hot as the Red Savina Habanero and not near the famous Bhut Jolokia that tops out at over 1,000,000 SHU, but still pretty damned hot. BTW, I'll be getting some Bhut Jolokia seeds for next season... Wife thinks I'm crazy.
These chillis and this recipe is NOT for you if you think a Jalapeno is hot, my chillis are 70 times hotter.
These chillis and this recipe is NOT for you if you think Tabasco sauce is hot, my chillis are 70 times hotter than the original Tabasco sauce and 43 times hotter than their hottest sauce.
These chillis and this recipe is NOT for you if a Cayenne chilli is toxic to your taste buds, my chillis are 7 times hotter.
These chillis and this recipe is NOT for you if you a Thai chilli means instant death to your taste buds, my chillis are 3 and 1/2 times hotter.
For those of you with the guts (in every sense of the word) to read on, then please, by all means, READ ON!
Dingo Dave's Dangerously Hot Chili Sauce
I was going to wait to make this sauce till more of the chillis are completely red and half dried, but we had a big windstorm last night and two branches broke on one of the plants. Keep in mind that even in their green state these puppies are as hot as a Thai chilli.
What you need (besides a great love of chillis):
30 Habanero chillis --this is about the SHU equivalent of the variety of African Bird's Eye I grow
1/2 an onion, minced
5 cloves garlic, crushed and minced
1 tsp of each of the following powders: Cardamom, Ginger, Sumac, Coriander, Cumin
1 tbsp tamarind paste
1 tbsp wasabi paste (the really hot green paste you get with sushi)
1 tsp sea salt
2 tbsp olive oil
1 to 2 cups red wine (I used a shiraz-cabernet)
1 cup water (the wet type, not the dehydrated type)
1/2 cup apple cider vinegar
What you do:
Firstly, you need to snip the chilli fruit off your plants, or go to a shop and buy 30 Habaneros. If the wind broke some of your branches then it should go from this:
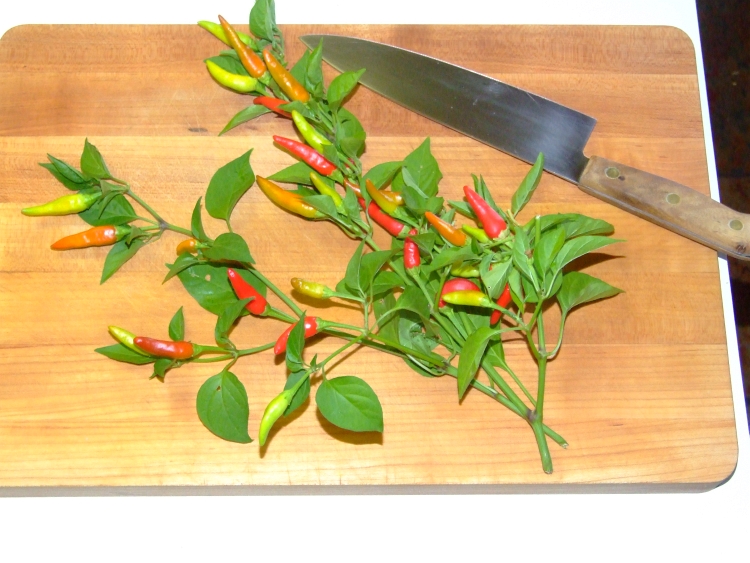
to this:

Please notice I left the "hats" on the chillis. Why? Because under the hat on chillis (eggplant too) is where the most tenderest, succulent part of the fruit is. That's also the area with lots of capsaicin in chilli fruit.
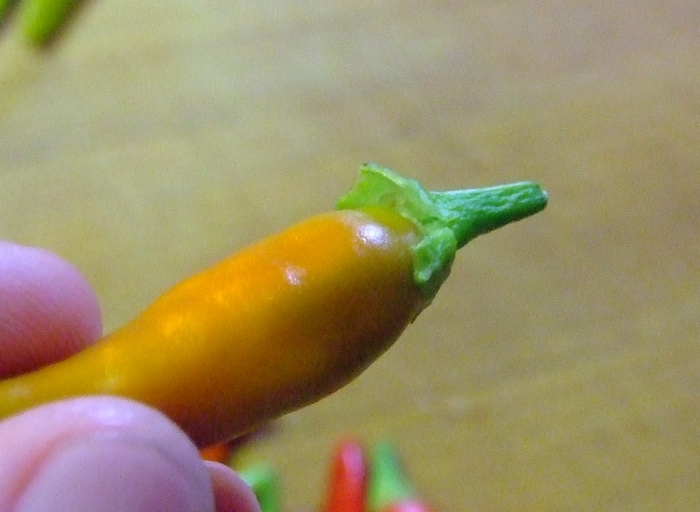
You'll notice I'm not wearing rubber gloves whilst handling the chillis. That is because I'm not a wuss. Although my wife thinks/knows it's cus I'm crazy.
Anyways, remove the hats from the chilli keeping as much fruit as possible:

And then rough chop them:

Now add all the ingredients EXCEPT the wine, water, vinegar to a saucepan. You'll notice I grouped those at the top of the ingredient list for your convenience; you're welcome. Make sure you add the seeds too!
Mix it well and then crank the heat up. Cook for around 5 mins while stirring often. The idea is to sear stuff without burning it. It should look something like this:

The above pic is after 2 mins. After 5 mins you'll notice some of the mix getting stuck to the pan. Once it starts to stick you should also notice the chillis, onion, and garlic are well-seared. Time to add the wine and the water!
So, add the wine and the water, stir well making sure you scrape the pot so everything is incorporated into the liquid. Simmer the pot till the liquid is reduced by at least 3/4 and then add the vinegar. Turn the heat off and let it cool.
Add the whole mix to a blender and blend for a few mins so that every little bit of chilli, onion, and garlic are pureed. Put the mix back in the pot and simmer to reduce the liquid by 1/4.
Your saucepan should now look like this:
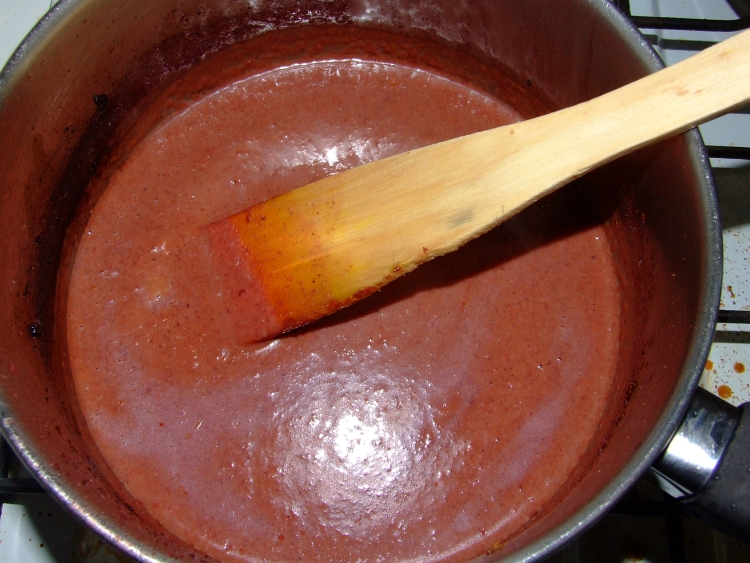
TADA! Done! Now just pour it into a jar you've disinfected, cap it, and refridgerate. Use when needed. It ages quite well and gets smoother over a couple of weeks. No preservatives are needed, I seriously doubt anything has the temerity to grow in it.
Enjoy!
Oh, btw... chilli enthusiasts (snobs) are constantly debating the heat and taxonomy of various chillis so if you think that African Bird's Eye can't get as hot as a regular Habanero then I say you are mistaken. My opinion, and I'm sticking to it.
Have I mentioned I grow my own chillis? Well, I do grow them. I currently have 8 plants of an African Bird's Eye variety growing and I should have no problems keeping them through the winter (I haven't seen frost in Adelaide for 8 years now).
Normal Bird's Eye top out at around 200,000 scoville heat units (SHU) but I'm pretty sure these are in the 300,000 to 350,000 scu range. Why do I think that? Because I know how to properly grow chillis in pots so that you get maximum fruit and maximum amounts of capsaicin. And I've eaten a regular Habanero which tops out at 350,000 and these puppies are as hot as them.
Not as hot as the Red Savina Habanero and not near the famous Bhut Jolokia that tops out at over 1,000,000 SHU, but still pretty damned hot. BTW, I'll be getting some Bhut Jolokia seeds for next season... Wife thinks I'm crazy.
These chillis and this recipe is NOT for you if you think a Jalapeno is hot, my chillis are 70 times hotter.
These chillis and this recipe is NOT for you if you think Tabasco sauce is hot, my chillis are 70 times hotter than the original Tabasco sauce and 43 times hotter than their hottest sauce.
These chillis and this recipe is NOT for you if a Cayenne chilli is toxic to your taste buds, my chillis are 7 times hotter.
These chillis and this recipe is NOT for you if you a Thai chilli means instant death to your taste buds, my chillis are 3 and 1/2 times hotter.
For those of you with the guts (in every sense of the word) to read on, then please, by all means, READ ON!
Dingo Dave's Dangerously Hot Chili Sauce
I was going to wait to make this sauce till more of the chillis are completely red and half dried, but we had a big windstorm last night and two branches broke on one of the plants. Keep in mind that even in their green state these puppies are as hot as a Thai chilli.
What you need (besides a great love of chillis):
30 Habanero chillis --this is about the SHU equivalent of the variety of African Bird's Eye I grow
1/2 an onion, minced
5 cloves garlic, crushed and minced
1 tsp of each of the following powders: Cardamom, Ginger, Sumac, Coriander, Cumin
1 tbsp tamarind paste
1 tbsp wasabi paste (the really hot green paste you get with sushi)
1 tsp sea salt
2 tbsp olive oil
1 to 2 cups red wine (I used a shiraz-cabernet)
1 cup water (the wet type, not the dehydrated type)
1/2 cup apple cider vinegar
What you do:
Firstly, you need to snip the chilli fruit off your plants, or go to a shop and buy 30 Habaneros. If the wind broke some of your branches then it should go from this:
to this:
Please notice I left the "hats" on the chillis. Why? Because under the hat on chillis (eggplant too) is where the most tenderest, succulent part of the fruit is. That's also the area with lots of capsaicin in chilli fruit.
You'll notice I'm not wearing rubber gloves whilst handling the chillis. That is because I'm not a wuss. Although my wife thinks/knows it's cus I'm crazy.
Anyways, remove the hats from the chilli keeping as much fruit as possible:
And then rough chop them:
Now add all the ingredients EXCEPT the wine, water, vinegar to a saucepan. You'll notice I grouped those at the top of the ingredient list for your convenience; you're welcome. Make sure you add the seeds too!
Mix it well and then crank the heat up. Cook for around 5 mins while stirring often. The idea is to sear stuff without burning it. It should look something like this:
The above pic is after 2 mins. After 5 mins you'll notice some of the mix getting stuck to the pan. Once it starts to stick you should also notice the chillis, onion, and garlic are well-seared. Time to add the wine and the water!
So, add the wine and the water, stir well making sure you scrape the pot so everything is incorporated into the liquid. Simmer the pot till the liquid is reduced by at least 3/4 and then add the vinegar. Turn the heat off and let it cool.
Add the whole mix to a blender and blend for a few mins so that every little bit of chilli, onion, and garlic are pureed. Put the mix back in the pot and simmer to reduce the liquid by 1/4.
Your saucepan should now look like this:
TADA! Done! Now just pour it into a jar you've disinfected, cap it, and refridgerate. Use when needed. It ages quite well and gets smoother over a couple of weeks. No preservatives are needed, I seriously doubt anything has the temerity to grow in it.
Enjoy!
Oh, btw... chilli enthusiasts (snobs) are constantly debating the heat and taxonomy of various chillis so if you think that African Bird's Eye can't get as hot as a regular Habanero then I say you are mistaken. My opinion, and I'm sticking to it.
Monday, May 25, 2009
Prawn and Bacon Curry
I mean really, just what DOESN'T go well with bacon? You can do loads of different dishes with bacon. Ahhhhh, the humble pig; Mother Nature's gift to the culinary world.
Don't worry about me abandoning the cheesy goodness, I'll be back with a How To Make Awesomely Good Feta Cheese soon --complete with pictures. But I've been told by the clan that I'd better write this one down cus they are going to want it again.
See, when I make curries I usually make them with whatever I can find in the pantry. They always come out great, but every once in a while one stands out. Two nights ago was a "once in a while" curry.
Note about the prawns (shrimp): I used already peeled and cooked prawns cus that's all I had at the time. Feel free to use fresh ones, no worries. Just make sure you keep the shells, tails, and heads as they make a very flavourful seafood stock when boiled and strained.
Feel free to use lemon grass or kaffir lime leaves if you'd like, they should go in at the same time you add the garlic. Speaking of the garlic, I used jarred, prepared, minced garlic as I was out of fresh garlic heads.
Alright, I've blathered enough! Let's get cookin'!
Prawn and Bacon Curry
What you need:
Prep wok-ing:
5 or 6 large rashers of bacon, diced (for you US'ns that'd be about half a pound of bacon strips chopped up)
For the initial wok-ing:
bacon fat (see above)
1 small onion, minced
1 tbsp minced garlic
1 tbsp tamarind paste
2 tbsp Tom Yum paste
1 small red capsicum (bell pepper), minced
1 small can (225 grams around 8 oz) whole water chestnuts
For the prawn part:
350 grams (3/4 of a pound) of shelled, deveined, de-tailed, small prawns (think cocktail shrimp size)
1/4 cup cornflour (called cornstarch in the US)
2 tsp curry powder --I used Clive of India, but any good one will do
1 tsp ginger powder
1 tsp cumin powder
1 tsp turmeric powder
1 tsp cinnamon powder
2 tbsp olive oil
For the cookin' part:
1 can (400 mls or 13 oz) coconut milk or coconut cream (whichever is in your pantry)
1/2 cup cream
semi-cooked bacon pieces from prep wok-ing
For the serving part:
Bed of cooked, white, long-grained rice (I used jasmine)
1 cup of greek yoghurt
Yeah I know, seems like a long list. You'll be happy that I broke it up into sections though, makes the instructions very easy to follow.
What you do:
Start with the bacon in the prep wok-ing section. Toss the cut up bacon into a large wok and cook on low heat till the bacon is about halfway cooked --you don't want it to be crispy. Take the semi-cooked bacon pieces out of the wok, but leave the bacon fat in the wok.
Next add the minced onion to the wok and cook in the bacon fat for a minute or 2 on medium-low heat. Then add the next four ingredients in the "initial wok-ing" section. Give it a good stir. Once it starts to really sizzle (and smell OH SO GOOD!), add the water chestnuts plus the water from the can they were in. Give it a good stir.
While the can water is cooking down (it'll only take a minute) you get to do the prawn part! Put the prawns in a large bowl and then add everything from the "prawn part" section. Toss to coat everything evenly.
By the time you take the bowl with the coated prawns over to the sizzling wok the water should have cooked down. Add the olive oil and then add the prawns to the wok (which is smelling really good by now). Stir and toss and then turn the heat up for a minute.
Add the coconut cream, the cream, and the semi-cooked bacon pieces. Give it a good stir to combine, turn the heat to low and simmer for 5 or 10 mins. Stir it every now and then.
Serve it over a bed of the cooked long grain white rice, and each plate gets a dollop of greek yoghurt on the top of the curry.
Why? Well, this could be a bit hot for some folks and the yoghurt takes care of the heat but you still get the flavours.
Some people will think this isn't hot enough! If you're one of those folks who likes your curries really hot, then double the amount of Tom Yum paste and add a few chopped up thai chilli peppers at the time you add the garlic. That'll be guaranteed to clear the sinuses!
Friday, March 6, 2009
Wasabi Mayonnaise
Mayonnaise... Ahhhhh what great and wonderful stuff it is... mmmmmmmm, drool...
Did you know that originally mayo was made with garlic? Yup! I do like mine that way since I use a LOT of garlic (Vlad will not get me, HA!) when cooking anyways. Now, it's just hearsay, but the story goes that mayo was made in France with garlic. But when one particular Cardinal came to power he decreed NO garlic in mayo. He hated garlic. Something tells me he wasn't *really* French.
Anyways, that's just what I heard yonks ago and have absolutely no idea if it's correct or not.
There's also two conflicting versions of the origins of mayo, and I really don't feel like (or have time to) check wiki and sift through the references. Why don't I have time right now? Cus I'll be cooking a batch of pappadams in less than 5 minutes so I'd better get a move on.
Now I know that you could just open up a jar of mayo and add a squeeze of wasabi paste (mmmmmmmmm... wasabi...) and call it good. But if you did that then you'd be getting all the preservatives and chemical crap from the jar of mayo. And that's what we're trying to avoid.
BTW, this calls for egg yolks. Make sure you save the egg whites for meringue. Oh, the chooks down here aren't fed growth hormones either.
Wasabi Mayo
What you need:
2 egg yolks
2 tbsp lemon juice
2 tsp wasabi paste (or more!)
1/2 cup olive oil
What you do:
Chuck everything but the olive oil in a small food processor. Process on low for a min or two. Then slowly add the olive oil while the processor is running.
Hey, now just how darned easy was that? Of course, you can add any sort of other herbs or spices you want, but the wasabi paste pretty much makes the taste and I've found other additions to be a waste as they don't really come through flavour-wise.
Enjoy!
I'm off to fry a batch of pappadams to have with tonight's Mango Chicken Curry. Ta.
Sunday, February 8, 2009
Chili Cherry Chutney
There are literally an infinite numbers of chutney recipes. You can pretty much do anything with a chutney you'd like.
Now, some chutney enthusiasts insist on a few certain ingredients and a specific way of making said chutney.
This. Recipe. Is. NOT. For. Those. Folks.
This is one you can make easily and only has a few things in it. I came up with it after we came back from Belair with 2.5 kilos of fresh, wild, tart, just barely ripe cherries. I was planning on making cherry syrup and cherry jam only. However, I kept back a couple of ladles of the syrup to experiment with... This was then born:
Dingo Dave's Excellent Chilli Cherry Chutney.
I've reconfigured the amounts --are YOU really gonna have access to five and a half pounds of cherries? Thought not. This should be sufficient make a chutney that'll fill a small salsa sized jar, about two cups.
Here's what you need:
200 grams fresh, tart cherries
1 cup of raw sugar
2 to 4 cups water
1 or 2 fresh Thai chilli peppers (them little, red, skinny ones that are about 2 inches long and are really really really hot)
small handful of finely minced onion
1 clove of crushed garlic (or 1 tsp of prepared garlic)
Here's what you do:
Give the cherries a good rinse and remove the stems. Give each cherry a quick slice partway through --don't pit them, just give each one a little slice so that as they cook all the cherry goodness is released.
Put the cherries and the sugar in a stainless steel saucepan and then add enough water to cover the cherries plus about an extra inch of water for cooking down.
Cover the saucepan and put it on low heat. Give it a stir every 5 minutes of so. If the water has cooked down the the cherries haven't turned to pulp, then just add a bit more water. This'll take 20 to 40 mins depending on your stove-top. You should end up with around 2 cups of really good tasting cherry syrup.
Now you get to strain it! This is a lot easier than you think. Pour the liquid, pulp, and pits into a fine metal seive --Ummmmm,make sure it's over a bowl cus the syrup in what you want! Now instead of trying to use a spatula or spoon, just put your fingertips into the pulp and pits and start stirring it around in the seive with your fingertips juuuuuust grazing the seive. Waa-La! 20 seconds later all the syrup is extracted from the pulp and pits.
This cherry syrup also makes a great ice cream topping, but we're gonna add some goodies to it!
Slice each chili pepper in half lengthwise and remove the seeds (but don't toss them out). Finely mince the chilli pepper flesh and then add them and the whole seeds to the cherry syrup. Add the minced onion and the garlic. Give it a good stir and let it sit while you sterilise your jar and lid.
I usually just use boiling water to sterilise my storage jars. It's, ummmm, not difficult.
Once the jar (and lid) have been out of the boiling water long enough for you to handle the glass with your hands (but still pretty warm), it's then a good time to pour the chutney in. Make sure you seal the jar tightly!
In about 30 minutes the sealed jar should be cool enough to put in the fridge --NOTE: if you are doing this in the aussie summer heat you'll put it in the fridge but if you are anywhere else just put in it your pantry.
Put it waaaaaaaay in the back and forget about it for a month.
After a month, this will taste soooooo good! You can dip crackers in it, potato chips, pappadams, corn chips or whatever. Pour it onto your morning toast! Guaranteed to wake you up.
Once you've opened it, then make sure you refrigerate it (if you don't polish the whole thing off in one sitting.
It also makes a great marinade for roasts, chickens, lamb, fish, whatever. Just remember to keep it covered in the cus the sugar will caramelise and you don't want it to burn.
THIS IS NOT A JOKE POST! THIS IS GREAT STUFF! Trust me, eh?
Tuesday, December 9, 2008
Spicy Roasted Almonds
Yes, it's that time of the year when everyone roasts nuts. Anyone remember the old joke about Chet's nuts? This post has nothing to do with Chet's nuts.
These almonds are spicy. If you don't like spicy, then just halve (or quarter) some of the seasonings.
Now, I've done this for a small amount of almonds (the cockatoos ate the rest before I got to the trees) so just double or ten-tuple everything if you've got a lot of almonds.
What you need:
1/2 cup of shelled almonds (with the skin on) --that's 50 grams or about 2 ounces.
3 tsp olive oil
1/2 tsp ground black pepper
1/2 tsp sea salt
1 tbsp chilli flakes
1 or 2 tbsp crushed garlic
What you do:
Add everything except the garlic to a steel saucepan or wok. Heat on low heat for 5 or 6 minutes (the almonds will have just started to plump up). Stir often and keep them nuts moving.
After 5 or six minutes, add the crushed garlic. Stir together. You can turn the heat off one or two minutes after adding the garlic. Keep it moving cus you don't want anything to burn.
Turn the whole mess onto a plate and let it cool.
Last thing... ummmmm, eat them! With a beer! While watching sports!
BTW, these are some of the most tasty treats to me.
Wednesday, October 1, 2008
Sweet And Spicy Cabbage
Whoa, hold on a minute. Just cus I can hear the groans from way down in Oz doesn't mean it's not good! In fact, it's very good. Well, at least to me it is.
As many of you are aware, I tend to experiment a bit. Sometimes in the kitchen even! Most of the kitchen experiments are pretty successful, once in a while something bombs totally, and once in a while something is awesome (like the special meat balls last night).
This one is one of the awesome ones. Provided, of course, that you like cabbage and spicy food. Otherwise, I don't think you'll enjoy this.
But if you're brave and like spicy food and cabbage, then read on.
This whole thing started when I noticed that I had some leftover cabbage the other day (just steamed a bunch, it was very mad) and I didn't want it to go to waste. Hmmmm, I'll just thin slice it (shred) and marinate it in *something* to have on the side tonight with the fish stir-fry.
6 hours go by while the shredded cabbage marinates...
.
.
.
.
.
.
.
.
.
Well, that sure didn't "take" the flavors well. Let me add some more sugar and then simmer the mess.
simmer
simmer
simmer
Ah, ready to have as a side dish!
Not ultra yummy, but tasty.
*The next morning*
What's this? Some leftover cabbage! Well, the spices will help clear the sinuses.
*Eat*
WOW!
*Eat some more*
WOW!!!! That's great! Now I just need to remember how I made it...
Which brings us to:
Dingo Dave's Sweet and Spicy Cabbage
Please note that this is a very ad hoc recipe...
What you need:
1/8 (or so) of a cabbage head, shredded
1/4 cup very thin sliced red onion
1/2 cup fermented white vinegar (never use distilled, I took organic chem and I know where the distilled garbage comes from)
1 cup white wine vinegar
3 or 4 cups haitch-too-o (water)
2 tsp grated ginger
2 cloves crushed garlic (or 2 tbsp of the jarred stuff)
1 to 4 tsp chil(l)i flakes (just how hot do you like it?)
1 cup raw sugar
What you do:
This is so easy. Even you blokes or blokettes that can't cook can do this!
Put everything EXCEPT THE CABBAGE AND THE ONION in a saucepan. Whisk the heck out of it so the sugar is dissolved. Crank on the burner and simmer for 15 mins (stir it once in a while, eh) and then let take it off the heat. Toss in the cabbage and onion, cover, and let it sit for a few hours.
A few hours later, turn the heat back on. Boil it till there's almost no liquid left. Strain off the liquid. Let the cabbage and onion cool, then cover and toss that puppy in the fridge till the next day (or even two).
If you like spicy and if you like cabbage, then this is awesomely good!
As many of you are aware, I tend to experiment a bit. Sometimes in the kitchen even! Most of the kitchen experiments are pretty successful, once in a while something bombs totally, and once in a while something is awesome (like the special meat balls last night).
This one is one of the awesome ones. Provided, of course, that you like cabbage and spicy food. Otherwise, I don't think you'll enjoy this.
But if you're brave and like spicy food and cabbage, then read on.
This whole thing started when I noticed that I had some leftover cabbage the other day (just steamed a bunch, it was very mad) and I didn't want it to go to waste. Hmmmm, I'll just thin slice it (shred) and marinate it in *something* to have on the side tonight with the fish stir-fry.
6 hours go by while the shredded cabbage marinates...
.
.
.
.
.
.
.
.
.
Well, that sure didn't "take" the flavors well. Let me add some more sugar and then simmer the mess.
simmer
simmer
simmer
Ah, ready to have as a side dish!
Not ultra yummy, but tasty.
*The next morning*
*picture dave staggering down the stairs in his robe*
*to feed the birds*
*and the cat*
*dave is hungry*
What's this? Some leftover cabbage! Well, the spices will help clear the sinuses.
*Eat*
WOW!
*Eat some more*
WOW!!!! That's great! Now I just need to remember how I made it...
Which brings us to:
Dingo Dave's Sweet and Spicy Cabbage
Please note that this is a very ad hoc recipe...
What you need:
1/8 (or so) of a cabbage head, shredded
1/4 cup very thin sliced red onion
1/2 cup fermented white vinegar (never use distilled, I took organic chem and I know where the distilled garbage comes from)
1 cup white wine vinegar
3 or 4 cups haitch-too-o (water)
2 tsp grated ginger
2 cloves crushed garlic (or 2 tbsp of the jarred stuff)
1 to 4 tsp chil(l)i flakes (just how hot do you like it?)
1 cup raw sugar
What you do:
This is so easy. Even you blokes or blokettes that can't cook can do this!
Put everything EXCEPT THE CABBAGE AND THE ONION in a saucepan. Whisk the heck out of it so the sugar is dissolved. Crank on the burner and simmer for 15 mins (stir it once in a while, eh) and then let take it off the heat. Toss in the cabbage and onion, cover, and let it sit for a few hours.
A few hours later, turn the heat back on. Boil it till there's almost no liquid left. Strain off the liquid. Let the cabbage and onion cool, then cover and toss that puppy in the fridge till the next day (or even two).
If you like spicy and if you like cabbage, then this is awesomely good!
Saturday, August 16, 2008
Chicken Coconut Curry
This is one of those dishes you make when you have some leftover chicken from the chook roast you did the night before. You really don't need much chicken meat, just make sure you've got plenty of chicken stock from the roasting pan.
This can easily be made into a flamethrower dish if you are so inclined. As much as I like spicy and hot foods, I *do* like to actually taste the subtle flavouring nuances of the meal.
*********************************************************************************
Holy CRAP! I can't believe I just typed "subtle flavouring nuances" without even thinking about it! Gack! Somebody pass the pitcher of cheap american beer, a chili dog, a platter of nachos, the buffalo wings, and turn the channel to pro wrestling, QUICK!
*********************************************************************************
Sorry about that... back to your regularly scheduled culinary blog...
Chicken Coconut Curry
What you need:
1 to 2 cups leftover, cooked, diced, chicken meat
1 can coconut cream (400 ml or 12 oz)
a small dollup sour cream (if it's too spicy for you)
1/2 cup cream (in case it's still too spicy for you)
2 cups chicken stock from last night's roast chook
1 tbsp chicken stock powder (if you don't have last night's chicken stock)
1 cup of basmati rice (or any long-grained rice)
1 or 2 tbsp olive oil
Spices needed:
2 tbsp vindaloo paste (really really really HOT stuff, you may want to use less)
2 tbsp tamarind paste
1 tbsp prepared lemon grass
2 cloves crushed garlic
1 tsp turmeric powder
small handful of finely minced onion
1 tbsp minced ginger
What you do:
Put the rice on to cook. Whether it's in your microwave, rice cooker, or stovetop. Remember, 1 cup of rice to 2 (or 2 1/2) cups of water.
Put the coconut cream, chicken stock and diced chicken into a large saucepan. Low heat, simmer with lid on.
While the rice is cooking and the saucepan is simmering, you get to prepare the spices! The spices AND the way they are prepared is (are) the key to this dish! So if you don't do anything else I say, just make sure you prepare the spices PROPERLY! Excuse me while I get off my soapbox now.
Put the 2 tbsp of olive oil in a wok. Flame on medium to medium high (depends on your cooker). Now, you're going to be adding the spices all at once so while the oil is heating (should only take 1 min at the most) you can add all the spices (including the minced onion) to a bowl. As soon as the oil is hot enough (just BEFORE it starts to smoke) add all the spices at once. Move the searing spices around well, toss them a few times, use a wooden spoon, do what you'd like to keep it moving while hearing that wonderful sizzling sound. No, I don't have pics of this procedure cus it's over so fast! One or two minutes in the wok should do it. You'll be smelling some of the most GORGEOUS aromas you've ever smelt... hmmmm can aromas be gorgeous?
Add the seared spices to the saucepan with the chook stock, coconut cream and chook pieces. Give it a good stir. Cover and let it simmer til the rice is done.
Ta-Da! From start to finish only 18 mins!
Oh, wait... you are gonna ask where the cream and the sour cream come into play, aren't you? Just before the rice is done, give the curry a taste. If it's too spicy, then add the sour cream and stir well. If it burns your mouth, then add not only the sour cream but the cream too. If it's still too spicy, then maybe you'll believe me when I tell you that vindaloo paste is very hot!
Nah, all joking aside: 3 of the 4 house folk down here think a quick grind of black pepper in a soup pot is spicy, and they all LOVE this dish! The trick is to sear the spices first.
Serve it over the rice, have plenty of fried pappadams on the side.
Thursday, July 10, 2008
Mild Malaysian
I do have to apologise for offending anyone who's reading this from SouthEast Asia... Please keep in mind I cook for a family that (until recently) thinks a pinch of ground black pepper in 2 gallons of soup is spicy and hot!
Fortunately, I've (slowly) gotten them to see the good side of spices and their uses in food. The key I've found is not to overdo it, and have plenty of cream and sour cream around to "dampen" the spices if I've miscalculated for their sensitive taste buds.
Can you tell I like to experiment in the kitchen? Huh, CAN YOU? Yes, I do like to experiment in the kitchen. 18 out of 20 times it comes out fine, 1 out of 20 is crap, and 1 out of 20 is DAMNED GOOD TUCKA!
Just a note, this will serve 4 adults with normal appetites. So, like, vary the amounts depending on how many you're serving, eh?
This recipe is one of those "Damned Good Tucka" ones... Hmmmmm, what shall we call it? Think, think, think... Ah! Got it!
Dingo Dave's Spicy Coconut Fish Over Rice
Yeah, that's a good name for a recipe, cool! Normally I like to use fresh stuff in my cooking (no preservatives or "flavour enhancers") but there I times when I have to dip into a jar of something. Fortunately, most everything in jars and cans down here (in Oz) don'ts gots no preservatives and other crap in it.
Here we go, kiddies:
What you knead:
2 or 3 tbsp olive oil (or peanut oil if you have it)
1/4 cup of minced onion
1/2 tsp to 3 tsp chilli powder (your palate, not mine)
1 tsp prepared garlic (or one crushed garlic clove)
1/2 tsp turmeric powder (keeps cancer away)
1/2 tsp dried mint leaves
1 tsp prepared ginger (or 1/2 inch grated ginger root)
1 1/2 tsp jarred lemon grass
2 tbsp tamarind paste
1 or 2 tbsp raw sugar
small can of bamboo shoots
a pound of white fish, cut into bite sized chunks (I usually use hake or hoki)
one can of coconut cream (400 mls down here, I think that's 12 oz in the US)
sour cream for garnish (optional, this is in case you have someone who doesn't like spices)
fresh coriander leaves (cilantro for you US'ns) for garnish
cooked long grain rice --hey, you gotta serve it over something!
What you due:
Put the oil in a wok and turn the gas to medium-low. At this point you'll want to start your rice cooking. For the rice I use Basmati or Jasmine, but any long grain will do. Start it cooking as you would normally (18 mins in microwave, eh).
To the hot oil add the next 8 ingredients. You'll notice I separated them so you can easily count to eight. Give the spices a quick stir and after 45 secs to a min add the water from the can of bamboo shoots. Stir it quickly and you'll find you have yourself an AWESOME smelling reddish sauce. Then add the sugar and give it one more quick stir.
The fish pieces (chunks or whatever you'd call them) go in now. Toss them around in the wok to thoroughly coat them in the sauce. Turn the heat down to low.
Pour in the coconut cream and the bamboo shoots. Give it a good stir and then let it simmer gently for 10 mins.
Well, ten min later it's done! And your rice should be done to (did you remember to put the rice in the rice cooker 18 minutes ago?).
Serve it up over a bed of rice, yummy! If you've added extra chilli and someone in the household doesn't like spicy food, then just put a dollop of sour cream over the top of theirs, no worries. Garnish with sprigs of fresh coriander and there ya go.
This is really, really, really tasty and I've been told by the clan (from the Scottish border country) that I can make it any time I'd like to. Keep in mind that these are people that used to break out in a sweat just by looking at a mild chilli pepper.
BONUS: Got some prawns? Add them in the same time you'd add the fish. Got some water chestnuts? Add them in the same time as the bamboo shoots; same goes with any veggies you want to put in, no worries.
Wednesday, March 26, 2008
Saucy!
Every once in a while I go off on a complete tangent to what I was thinking of. Actually, it happens pretty darned often. So much so that the clan household is used to it by now. Maybe perhaps y'all are? If not, too bad!
Did you know I make my own sauces? Well, now you do.
OT: Isn't the german language great? Depending on which form of 'you' is used they can be taking about a singular you, or a collective you. Bummer that english don't have that... guess that's why I use y'all a lot, eh?
See??!!?? I warned "you".
Back to sauces...
I just discovered a great way to make wasabi mayonnaise!
A couple of decades ago (off on one of my tangents) I was talking to a friend (drinking buddy) about making spicy tartar sauce from scratch. She said it's easier than that; just chuck in however much chili powder you want to regular tartar sauce and mix it up. Please note, many of my drinking buds were female :)
So before any of "you" say to just take some mayo and stir in some wasabi paste, let me just say that I've thought of and tried that. The following is much better and only takes a min or two.
Wasabi Mayo
What you need:
2 egg yolks (3 if you've got tiny chooks)
2 tbsp lemon juice
2 tsp wasabi paste (or more if you'd like)
1/2 cup olive oil (I use extra virgin, fresh, cold-pressed cus I'm snooty)
What you do:
If your second food processor is really small, then use that. Don't try it in a regular sized one, there just ain't enough to get to set right. If you don't have a small food processor, then just use one of them handheld electric mixer thingy-ma-bobs. Heck, it's easier to clean too.
Anyways... put the first 3 ingredients (that's a fancy chef word meaning stuff you add to make something taste good) in your small food processor and process for 30 seconds or so till it's kinda creamy. Then pour in the olive oil in a thin stream while the blade is running. GAH! Why does everyone use that fraze "while the blade is running" when talking about adding liquids (or some solids) to a food processor???? Don't ya think we know by now? How can a blade "run" anyway? Doesn't it spin? Whoops, there I am on my soapbox again...
Anyways, pour in the olive oil into the food processor bowl while the motor on the food processor is running so that the blades are spinning. Process for about a minute till it's smooth and creamy.
This goes very well spread on bread. It's great for sandwiches. If you have a stuffy nose, then just add more wasabi, but I don't recommend snorting it!
This is good, really.
Sunday, January 27, 2008
I survived!!!
Yes, I have gazed into the maw of the monster known as "Holiday Feast" and have come out unscathed. Won't mention anything about those extra pounds that came along with me...
I've also just noticed that Rachel wants to know about Miti.
Miti is a fairly simple coconut cream sauce that originated in Fiji. Since it uses chilli, onions, and lemons I'm assuming that it is not a "traditional" recipe, but one that evolved after the Europeans "discovered" the South Pacific and brought some non-native foods with them. Either way, it's darned tasty.
Before you make Miti, you have to make Lolo. There are many different ways to make Lolo, I'll describe some of them in reverse order of ease. Oh, Lolo is the Fijian word for coconut cream. Oh, when you cook with coconut cream, don't bring it to a rolling boil: lots of protein in it so it curdles and separates easily.
Lolo method 1, very traditional.
What you need:
One coconut
1/2 cup water
What you do:
Grate the flesh of the coconut, but don't forget to de-husk it first! Add the water, then strain it through a muslin cloth or cheesecloth. Wring/squeeze it out well so you get all the cream out.
Lolo method #2, not traditional
What you need:
1 cup of dessicated coconut (most stores carry this)
1/2 cup boiling water
What you do:
Pour the boiling water into the bowl with the dessicated coconut. Let it sit for a few hours, then squeeze and wring it through muslin or cheesecloth.
Lolo method #3, cheating
What you need:
cash
What you do:
Go to a grocery store and use the above cash to buy a can of coconut cream.
Note, method #3 should only be used if you're in a bit of a rush. Method #2 is the easiest, just make sure you start the dried coconut soaking in plenty of time.
On to the Miti!
What you need:
1/2 cup Lolo (see above)
juice from a lemon (you can't use my lemon tree, BTW)
1/4 tsp sea salt
1 small thai chilli, finely minced
1 small onion, minced
What you do:
Chuck it all into a bowl, whisk it together and call it done! Obviously, the longer it sits on the counter, the stronger the flavour will be.
Bonus stuff!!!!
Thick Miti dip
What you need:
One cup Miti
2 tsp cornflour (cornstarch)
1/4 tsp sea salt
2 tsp minced spring onion greens (or garlic greens)
What you do:
Mix the cornflour with 1/4 cup of the Miti and the salt. Mix well. Stir in the rest of the Miti and bring it to a simmer so that it thickens, but don't let it boil or it'll separate.
Let it cool, then mix in the onion or garlic greens. Chill it for a bit, then use it as you would any kind of dip for chips, crackers, veggies, or whatnot.
Saturday, December 22, 2007
THE Holiday Feast Down Unda
I'm a little late getting this years holiday feast typed in. In fact, we've already started on it --3 days ago! Some of you may notice it's a wee bit similar to last years feast; that's cus we've got many favorite recipes. Also, I've some new ones, and some that are just too darned expensive.
This is in NO particular order, but it'll feed four adults for two weeks. Oh, we're having a pool party and barbeque on the 28th, so the 4 or 5 kilos of snags are for the sausage sizzle.
Unless otherwise noted, everything is homemade by yours truly, or adapted (by yours truly) from recipe book --of which I have LOTS.
If'n any of you'd like a recipe for any of the following, just let me know via a comment, no worries.
Highland oat cakes
Shortbread
Peanut butter cheesecake with hot fudge sauce
Polynesian pork spare ribs
Pineapple pie
Cinnamon raisin bread
Polynesian ham
Pineapple sherbet
Chocolate mint ice cream with choc chips
Banana jam
Pineapple-Coconut pie
Miti (it's a dip)
Charlotte rouse
Banana leaf wrapped pork roast
Roast chook (at least 2 of em)
Candied yams
3 apricot cobblers (had one of em last night)
3 kinds of stuffing
4 types of gravy
3 types of salsa
Guacamole
5 kilos of sausages (for the bbq pool party)
2 kilos onions (for the above sausages)
Herbed spuds on the grill
My special homemade Dolmades
Waldorf salad
Tzatziki dip
One of my special sushi platters
Maple syrup candied pork roast
Corn chips and potato chips fresh made
Green beans and red capsicums with bacon and peanut sauce
Champagne with strawberries
Buttered roasted pumpkin pieces
2 cases beer
2 casks red wine
1 cask white wine
spicy marinated onions
Tequila, triple sec, and lime juice (mum-in-law has requested my special margaritas)
1 bottle brandy
1 bottle Father O'Learys Irish Cream
1.5 liters bourbon and coke
1 bottle dry cider
1 bottle sweet cider
Hot fudge sauce
Fudge brownies
Mince pies (lots)
Banana tarts
1 homemade bottle of chilli pepper and honey mead (I'll be the only one having that)
I think that should pretty much cover it. Remember, if you want a specific recipe then just ask.
Wednesday, December 19, 2007
Chilli Marinated Onions
I figured that pretty much everyone is posting their Holiday recipes that I should do something, well.... different.
It's not that I don't like all the "traditional" holiday foods, it's just that I usually take the road less travelled.
Ok, here we go:
Dave's Own Chilli Marinated Onions
What you need:
1 large onion (white or brown)
1 tbsp dried chilli flakes (or more)
1 cup extra-virgin olive oil
1 cup cider vinegar
1 tsp sea salt
1 tsp fresh ground black pepper
2 tsp dried tarragon
What you due:
Thin slice the onion as thin as you can. If you use a food processer it only takes 10 secs. Mix everything else in a bowl and whisk the heck out of it for 15 to 20 secs. Toss in the onion slices and stir so that all the onion is covered.
Let it sit for 2 to 3 hours.
Then, remove the onion from the marinade and fry it in a wok for a minute or two. You want the onion to just START to turn translucent, but still be crunchy. Remove from heat, let cool.
Put the semi-fried onion back in the marinade for a few more hours.
Use as needed! I find it's good with kalamata olives, as an addition to a salad, or just eating by itself (kinda like kimchi in that respect).
Use more or less chilli flakes depending on your heat tolerance.
Oh, almost forgot: Don't eat lots of this if you plan on snuggling with your wife or hubby that night... Just sayin'.
Subscribe to:
Posts (Atom)