The other day I actually got to make a dinner JUST FOR ME! Ahhhhhhhh, bliss. Of course I had to make other stuff for the rest of the clan. Why? Well, firstly, I thought B.I.L. would be heading out to teach before dinner so I hadn't planned anything for him --turned out that not only would he be around for dinner but that I would also have to give him a ride to the U. And M.I.L. is having teeth probs so it was going to be something soft yet tasty for her. Wifey-Poo had some tummy probs so she was wanting something very mild and light.
Needless to say, I ended up making four completely different main courses. But the one I had was THE BEST! Mine was the chilli, of course.
Normally if I'm going to make chilli then I'll get the beans soaking the night before. I did not have that luxury this time so it meant extra cooking time for the beans, but that's ok since I can do loads around the house and grounds while the beans simmer, no worries.
So, here is what I did for my Squid Chilli!
To a large pot, I added the following:
150 gm dried berlotti beans
8 dried curry leaves
1/2 an onion, diced
4 cloves of garlic, crushed
sprinkle of sea salt
lots of water
I put it on to boil and boiled till almost no liquid left, added a few more cups of water and boiled it down again till the beans were soft.
Into a hot, oiled wok I added the following:
1 squid tube --cleaned, sliced into rings, and blanched*
1/2 an onion, diced
2 cloves of garlic, crushed
3 tbsp chilli paste (use the kind that's at least 90% thai chillis)
2 tsp ground cumin
2 tsp ground coriander
1/2 tsp ground cardamom
1 tsp ground ginger
1 tbsp dried basil
sprinkle of sea salt
*if you blanch the squid rings after cleaning and slicing then you can use them in any sauces and any cooking length without them going "tough" or "chewy".
I seared all that in the wok for 5 to 6 minutes, stirring/tossing regularly. I deglazed the wok with 2 glasses of shiraz and cooked it down till there was only a bit of liquid left.
The contents of the wok were then added to the pot with the cooked beans (and all that other stuff). One can of peeled roma tomatoes was added along with 2 tsp of chilli powder.
Simmered down till it was thick but not sticking and then served up! I did grate some fresh onion and cheddar cheese over the top of my bowl and I used some of my wholemeal flatbread as scoopers.
This was darned good! No reason why this can't be done for pretty much any type of meat you want to use in the chilli. Ground roo (kangaroo) instead of the squid would be particularly nice I think, as would moose.
Saturday, March 27, 2010
Tuesday, March 16, 2010
Sloooooooow Gravy
Now I can whip up a quick gravy for mashed spuds or whatnot in about 30 seconds. It's so simple I'm not even going to go into the making thereof.
This gravy IS NOT like that.
This gravy is the main course for my extra special biscuits n gravy dinner that everyone down here loves. There are 2 keys to making this dinner... An awesomely good biscuit recipe (which I have) and the makings (and 8 hours) to make the gravy.
Yes, this gravy takes 8 hours. Most of that is "resting" time and some simmering time so it's not like you are going to slave over the stovetop all 8 hours. I usually do about 5 mins on my way through for each step.
You don't get an ingredient list since this changes depending on just what sort of meats and pan juices I have lying around. In fact, I think I'll just tell you what I did.
Here's what I did:
Half a can of mushrooms plus one glass of port wine went into the food processor and it was processed. That was put into a large saucepan along with 1/2 a minced onion, 2 cloves of crushed garlic and a sprinkle of sea salt. I simmered it till no liquid was left. Saucepan was de-glazed with 2 glasses of chardonnay and then simmered till almost no liquid was left. 3 glasses of shiraz were then added and it was simmered till the liquid was reduced by half.
It was then left to sit for 3 hours. I do believe I had a swim in the pool and then a nap during those 3 hours.
3 thick slices of a small, cooked, beef topside roast were diced along with the other half of the onion. It was all added to a wok along with 2 more crushed garlic cloves, sprinkle of sea salt and ground black pepper. That was dry seared in the hot wok for a minute or two, then deglazed with 1 glass of shiraz and 1 glass of chardonnay, and then simmered till the liquid was reduced by half.
That then sat for an hour.
Everything was combined into the large saucepan and roasting pan juices from a corned silverside and a beef topside roast were added --about two cups total. Plus 2 cups of water.
Whisked and heated, then checked for seasonings --nothing more was needed! Brought up to a boil and thickened with cornstarch/cornflour (in Aus it's called cornflour, in the US it's called cornstarch --same thing and it comes from WHEAT, not CORN) and then massive amounts of it were ladled over fresh, hot, flaky biscuits.
Very tasty, clean bowls all around!
Monday, March 1, 2010
Char-Grilled Eggplant
Eggplant is one of the most under-rated veggies (it's actually a berry) around. Very nutritious if you eat the skin too.
Aaaaaaannnnnnnnddddddd if you do one simple trick there won't be any perceived bitterness nor will the eggplant soak up loads of oil --this means if you are making eggplant parmesan then you are forgiven for frying the breaded slices of eggplant instead of baking them.
But we aren't making eggplant parmesan today, we are just going to simply grill the slices. First though, we'll "treat" them so they aren't bitter (even if they aren't fresh) and so they don't absorb the olive oil and go mushy.
What you need:
1 eggplant
1 or 2 tsp sea salt
olive oil
What you do:
Slice the eggplant into slices 1 to 2 cm thick. I try to slice them around 1.5 cm which is 3/5 of an inch. Make sure you get the last slice or two under the "hat" of the eggplant as that's the most succulent part. Lightly salt all the slices and let them set for 30 minutes. You'll notice the slices start to sweat a yellowish liquid, that's ok cus they are supposed to.
After 30 minutes, go crank your gas barby on high (if you are using charcoal, then you had better've started the coals 30 minutes ago!). Next, rinse the eggplant slices and pat them dry.
Drizzle olive oil over the slices and gently toss them in a bowl to lightly coat the slices with olive oil.
Grill them slices! 2 or 3 minutes a side is enough. You'll only turn them once so check after 2 minutes that you've got a nice grill pattern on the bottom of a slice before turning them.
After both sides are char-grilled, serve them up as a side dish to pretty much anything. You'll find the skin has a pleasant, nutty flavour and is very tender. The flesh won't be "heavy" or "greasy" since the eggplant didn't absorb the oil!
You can use various spices when you are oiling the slices. I'll be using a combo of turmeric, cumin, and coriander along with the oil next time.
Enjoy!
Sunday, February 21, 2010
Dingo Dave's Dangerously Hot Chili Sauce
Yes folks, I like chillis. I also spell chilli with two l's as that's how we spell it down here in Oz.
Have I mentioned I grow my own chillis? Well, I do grow them. I currently have 8 plants of an African Bird's Eye variety growing and I should have no problems keeping them through the winter (I haven't seen frost in Adelaide for 8 years now).
Normal Bird's Eye top out at around 200,000 scoville heat units (SHU) but I'm pretty sure these are in the 300,000 to 350,000 scu range. Why do I think that? Because I know how to properly grow chillis in pots so that you get maximum fruit and maximum amounts of capsaicin. And I've eaten a regular Habanero which tops out at 350,000 and these puppies are as hot as them.
Not as hot as the Red Savina Habanero and not near the famous Bhut Jolokia that tops out at over 1,000,000 SHU, but still pretty damned hot. BTW, I'll be getting some Bhut Jolokia seeds for next season... Wife thinks I'm crazy.
These chillis and this recipe is NOT for you if you think a Jalapeno is hot, my chillis are 70 times hotter.
These chillis and this recipe is NOT for you if you think Tabasco sauce is hot, my chillis are 70 times hotter than the original Tabasco sauce and 43 times hotter than their hottest sauce.
These chillis and this recipe is NOT for you if a Cayenne chilli is toxic to your taste buds, my chillis are 7 times hotter.
These chillis and this recipe is NOT for you if you a Thai chilli means instant death to your taste buds, my chillis are 3 and 1/2 times hotter.
For those of you with the guts (in every sense of the word) to read on, then please, by all means, READ ON!
Dingo Dave's Dangerously Hot Chili Sauce
I was going to wait to make this sauce till more of the chillis are completely red and half dried, but we had a big windstorm last night and two branches broke on one of the plants. Keep in mind that even in their green state these puppies are as hot as a Thai chilli.
What you need (besides a great love of chillis):
30 Habanero chillis --this is about the SHU equivalent of the variety of African Bird's Eye I grow
1/2 an onion, minced
5 cloves garlic, crushed and minced
1 tsp of each of the following powders: Cardamom, Ginger, Sumac, Coriander, Cumin
1 tbsp tamarind paste
1 tbsp wasabi paste (the really hot green paste you get with sushi)
1 tsp sea salt
2 tbsp olive oil
1 to 2 cups red wine (I used a shiraz-cabernet)
1 cup water (the wet type, not the dehydrated type)
1/2 cup apple cider vinegar
What you do:
Firstly, you need to snip the chilli fruit off your plants, or go to a shop and buy 30 Habaneros. If the wind broke some of your branches then it should go from this:
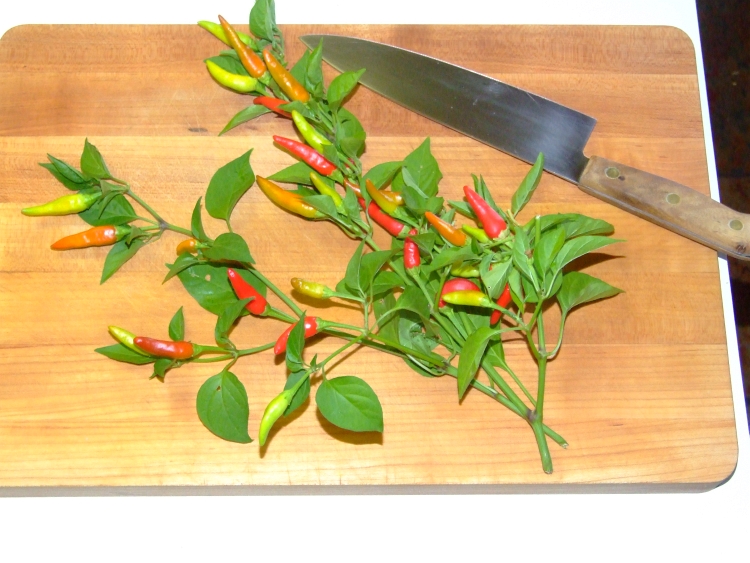
to this:

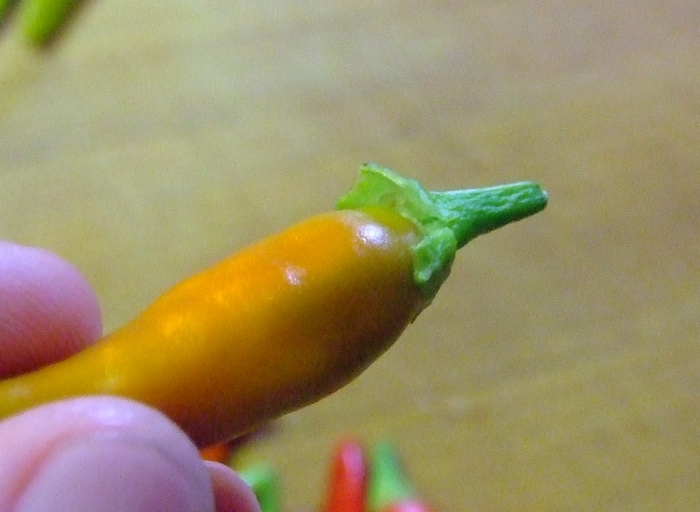
Please notice I left the "hats" on the chillis. Why? Because under the hat on chillis (eggplant too) is where the most tenderest, succulent part of the fruit is. That's also the area with lots of capsaicin in chilli fruit.
You'll notice I'm not wearing rubber gloves whilst handling the chillis. That is because I'm not a wuss. Although my wife thinks/knows it's cus I'm crazy.
Anyways, remove the hats from the chilli keeping as much fruit as possible:

And then rough chop them:

Now add all the ingredients EXCEPT the wine, water, vinegar to a saucepan. You'll notice I grouped those at the top of the ingredient list for your convenience; you're welcome. Make sure you add the seeds too!
Mix it well and then crank the heat up. Cook for around 5 mins while stirring often. The idea is to sear stuff without burning it. It should look something like this:

The above pic is after 2 mins. After 5 mins you'll notice some of the mix getting stuck to the pan. Once it starts to stick you should also notice the chillis, onion, and garlic are well-seared. Time to add the wine and the water!
So, add the wine and the water, stir well making sure you scrape the pot so everything is incorporated into the liquid. Simmer the pot till the liquid is reduced by at least 3/4 and then add the vinegar. Turn the heat off and let it cool.
Add the whole mix to a blender and blend for a few mins so that every little bit of chilli, onion, and garlic are pureed. Put the mix back in the pot and simmer to reduce the liquid by 1/4.
Your saucepan should now look like this:
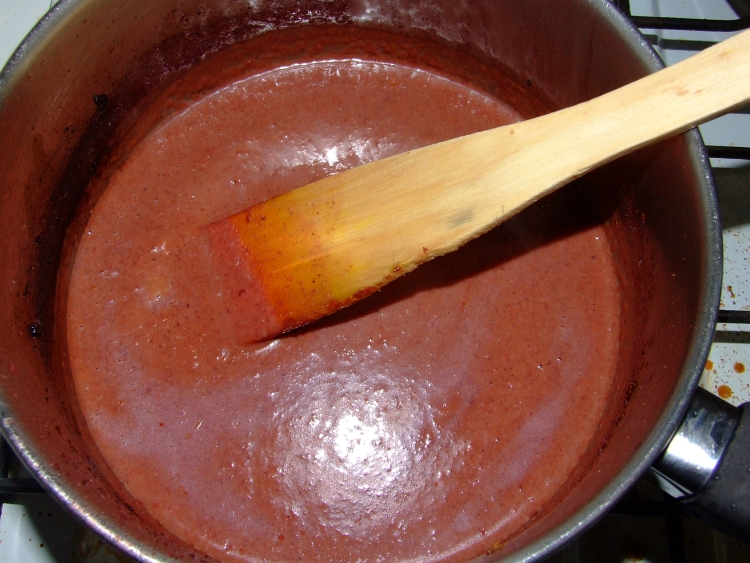
TADA! Done! Now just pour it into a jar you've disinfected, cap it, and refridgerate. Use when needed. It ages quite well and gets smoother over a couple of weeks. No preservatives are needed, I seriously doubt anything has the temerity to grow in it.
Enjoy!
Oh, btw... chilli enthusiasts (snobs) are constantly debating the heat and taxonomy of various chillis so if you think that African Bird's Eye can't get as hot as a regular Habanero then I say you are mistaken. My opinion, and I'm sticking to it.
Have I mentioned I grow my own chillis? Well, I do grow them. I currently have 8 plants of an African Bird's Eye variety growing and I should have no problems keeping them through the winter (I haven't seen frost in Adelaide for 8 years now).
Normal Bird's Eye top out at around 200,000 scoville heat units (SHU) but I'm pretty sure these are in the 300,000 to 350,000 scu range. Why do I think that? Because I know how to properly grow chillis in pots so that you get maximum fruit and maximum amounts of capsaicin. And I've eaten a regular Habanero which tops out at 350,000 and these puppies are as hot as them.
Not as hot as the Red Savina Habanero and not near the famous Bhut Jolokia that tops out at over 1,000,000 SHU, but still pretty damned hot. BTW, I'll be getting some Bhut Jolokia seeds for next season... Wife thinks I'm crazy.
These chillis and this recipe is NOT for you if you think a Jalapeno is hot, my chillis are 70 times hotter.
These chillis and this recipe is NOT for you if you think Tabasco sauce is hot, my chillis are 70 times hotter than the original Tabasco sauce and 43 times hotter than their hottest sauce.
These chillis and this recipe is NOT for you if a Cayenne chilli is toxic to your taste buds, my chillis are 7 times hotter.
These chillis and this recipe is NOT for you if you a Thai chilli means instant death to your taste buds, my chillis are 3 and 1/2 times hotter.
For those of you with the guts (in every sense of the word) to read on, then please, by all means, READ ON!
Dingo Dave's Dangerously Hot Chili Sauce
I was going to wait to make this sauce till more of the chillis are completely red and half dried, but we had a big windstorm last night and two branches broke on one of the plants. Keep in mind that even in their green state these puppies are as hot as a Thai chilli.
What you need (besides a great love of chillis):
30 Habanero chillis --this is about the SHU equivalent of the variety of African Bird's Eye I grow
1/2 an onion, minced
5 cloves garlic, crushed and minced
1 tsp of each of the following powders: Cardamom, Ginger, Sumac, Coriander, Cumin
1 tbsp tamarind paste
1 tbsp wasabi paste (the really hot green paste you get with sushi)
1 tsp sea salt
2 tbsp olive oil
1 to 2 cups red wine (I used a shiraz-cabernet)
1 cup water (the wet type, not the dehydrated type)
1/2 cup apple cider vinegar
What you do:
Firstly, you need to snip the chilli fruit off your plants, or go to a shop and buy 30 Habaneros. If the wind broke some of your branches then it should go from this:
to this:
Please notice I left the "hats" on the chillis. Why? Because under the hat on chillis (eggplant too) is where the most tenderest, succulent part of the fruit is. That's also the area with lots of capsaicin in chilli fruit.
You'll notice I'm not wearing rubber gloves whilst handling the chillis. That is because I'm not a wuss. Although my wife thinks/knows it's cus I'm crazy.
Anyways, remove the hats from the chilli keeping as much fruit as possible:
And then rough chop them:
Now add all the ingredients EXCEPT the wine, water, vinegar to a saucepan. You'll notice I grouped those at the top of the ingredient list for your convenience; you're welcome. Make sure you add the seeds too!
Mix it well and then crank the heat up. Cook for around 5 mins while stirring often. The idea is to sear stuff without burning it. It should look something like this:
The above pic is after 2 mins. After 5 mins you'll notice some of the mix getting stuck to the pan. Once it starts to stick you should also notice the chillis, onion, and garlic are well-seared. Time to add the wine and the water!
So, add the wine and the water, stir well making sure you scrape the pot so everything is incorporated into the liquid. Simmer the pot till the liquid is reduced by at least 3/4 and then add the vinegar. Turn the heat off and let it cool.
Add the whole mix to a blender and blend for a few mins so that every little bit of chilli, onion, and garlic are pureed. Put the mix back in the pot and simmer to reduce the liquid by 1/4.
Your saucepan should now look like this:
TADA! Done! Now just pour it into a jar you've disinfected, cap it, and refridgerate. Use when needed. It ages quite well and gets smoother over a couple of weeks. No preservatives are needed, I seriously doubt anything has the temerity to grow in it.
Enjoy!
Oh, btw... chilli enthusiasts (snobs) are constantly debating the heat and taxonomy of various chillis so if you think that African Bird's Eye can't get as hot as a regular Habanero then I say you are mistaken. My opinion, and I'm sticking to it.
Tuesday, February 16, 2010
Cheese Making Tip
If you don't make cheese, you should start. It's much easier than you may have been led to believe, trust me.
Ok, cheesemaking tip: You can save yourself a lot of pasteurizing time by using milk powder. I use full cream milk powder and add a 1/4 to a 1/2 teaspoon of lipase powder to the milk (gives it a nice, fresher milk taste). I also double the amount of milk powder than usual. Why? Because that way you get *ahem* MORE curds, which is always nice.
I'll be back with recipes soon, just wanted to get this tip up while I was thinking about it.
Wednesday, February 10, 2010
This Food Blog Is NOT Abandoned!!!!
And I mean it, seriously!
It's just that I've been rather busy lately. Not only with keeping up around the house and grounds outside, but doing a lot of kitchen work.
Not only have been making cheeses but I've been experimenting with some new processes. I'll, uh, have to wait a few more weeks to find out how it well it works. But you WILL be the first to know!
Tofu making is a weekly --sometimes twice-weekly-- event now. Quick, cheap, and easy.
Bread and beer making too, of course. I've also been experimenting with chia seeds in various breads and curries. So far so good and I'll let you know all about that soon.
Jarring homegrown sundried tomatoes in olive oil happens daily --at least until the tomato plants call it a season. Harvested 1134 tomatoes so far this summer.
Jams from brambleberries and wild rose-hips is going well.
I've also been doing quite a bit of research. Health and nutrition mainly. I want to keep this blog as a "recipe only" type thingy so I've decided to launch a health blog. I'll keep you posted, no worries.
Aaaaaaaaannnnnnddddddd, here's todays recipe! This is more of a tip though.
Have you ever cooked a beef roast and had it come out dry or tough? Or perhaps you didn't have enough pan juices to make gravy? Bland tasting maybe?
I can help, really.
Place your beef roast in your roasting pan with the fat side UP. This way not only will the fat drip down through the roast to keep in tender, but you can also take the lid off the roasting pan for the last 20 or 30 mins to crispy-ize the fat if so desired.
Next, pour a half bottle of a strong red wine over the roast. Shiraz, merlot, cab-sauv, any of those will work nicely. Then grind a lot of black pepper over the top of the roast and rub the pepper in with your fingers. Lightly sprinkle with sea salt, put the lid on it, and then put it in the LOWEST oven temp you can get away with for 2 to 4 hours. The time depends upon the size and how well done you like your roast.
When you take it out of the oven for serving, pour all the pan juices into a saucepan for gravy making. The only thing you'll have to do for the gravy is boil the juices in the saucepan and add cornflour (called cornstarch in the US) --dissolved in cold water, of course-- while whisking. How much you add completely depends on how thick YOU like your gravy.
Gravy making should only take 2 minutes, max.
Thin (or thick, your choice) slice pieces off that roast and serve it up with the gravy! Loads of mashed spuds (potatoes), grilled corn on the cobb, and steamed veggies make great accompaniments to this. Serve with a glass of red wine and a glass of ale.
Sunday, January 3, 2010
How To Make A Charlotte Russe
It's not that there's anything particularly difficult about making a charlotte russe, nor is it very expensive. It has more to do with the time --there's a lot of fridge time while parts of it "set", and the actual construction of it.
It's worth the time though. Drool...
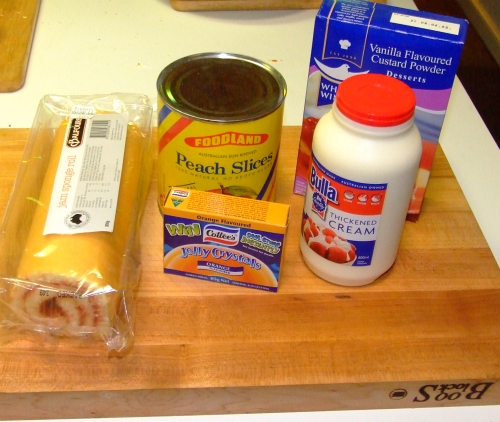
All you need is a bit of jello mix, some whipping cream, custard powder mix, and a swiss roll (commonly called a jam sponge roll).
This is all you need:
The first thing you do is mix your jello according to the package instructions. And then let it cool. DO NOT LET IT COOL SO LONG THAT IT SETS!
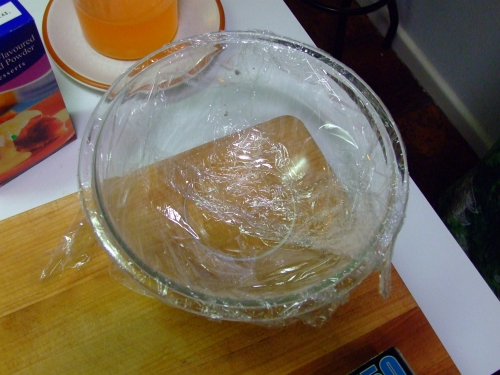
Then line a really large glass bowl with cling wrap. It doesn't have to be pretty or neat:
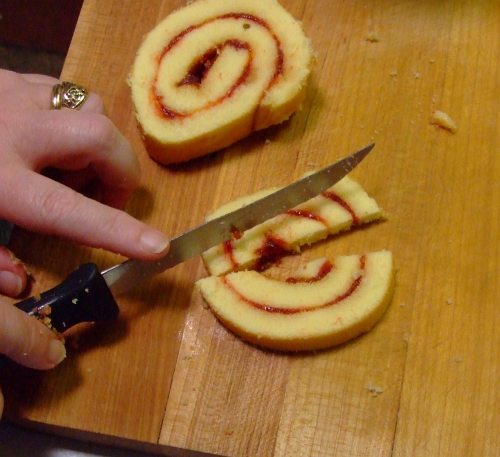
Slice the swiss roll into 1 cm thick pieces:

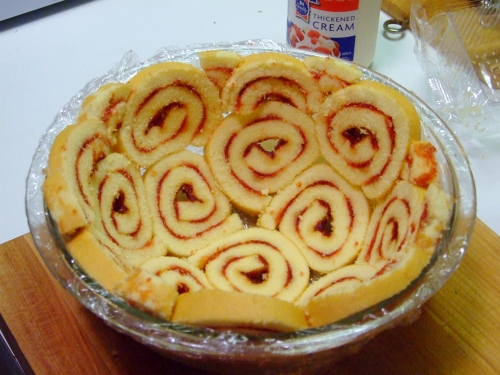
and then line the bowl with the pieces.

Cut up the last two pieces to fill in the gaps:
Now you ladle your cooled but not set jello over the roll:
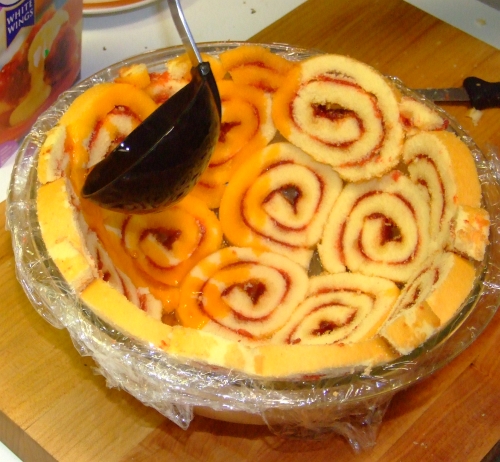
Make sure the sponge rolls are completely soaked in jello!
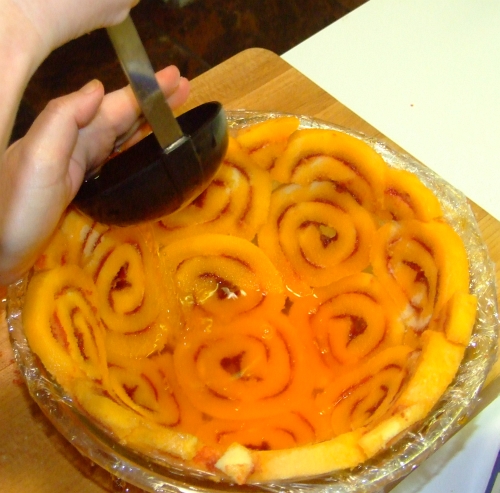
Now put it in the fridge overnight (or all day) to really set the jello.
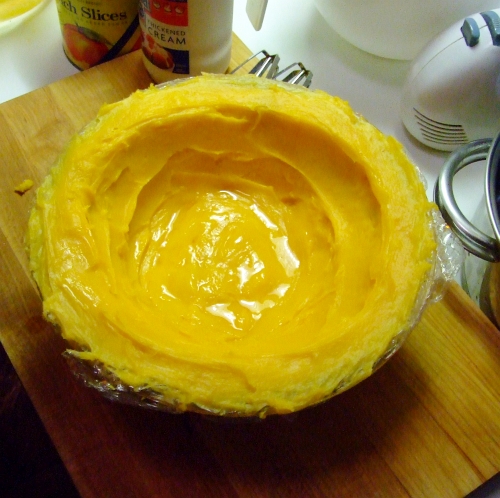
Let's make the custard --it too goes in the fridge all day.
Add three times as much custard powder as the directions call for. Yes, it will be lumpy even after heating and stirring thoroughly. Remove from the heat and let it cool for 15 mins or so. It will look like you ruined the custard, don't worry.
Put the lumpy, ugly custard into a mixing bowl, pour in scant 1/2 cup of whipping cream and then beat the heck out of it with your electric mixer. See, all nice and purdy and really tasty now!
Put that bowl in the fridge overnight too.
The next morning...
The custard should be thick enough to paste to the inside of the jello-set spongecake:

Don't be afraid to use lots of custard!
Now put it back in the fridge for a few hours.
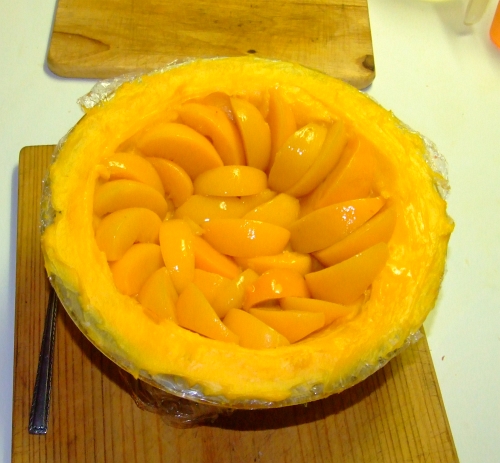
At around lunchtime open your can of peach slices and drain them really really really well.
Arrange them nicely in the custard thusly:
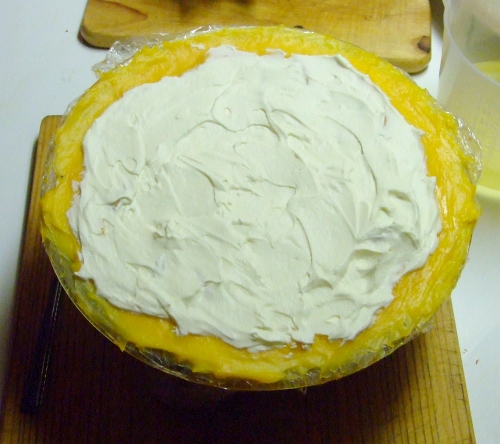
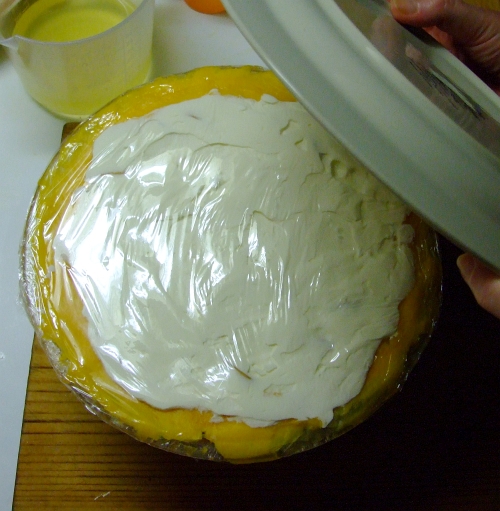
It's now time to whip the whipping cream! Once it's whipped so it's really thick then pile the whipped cream on!
Place a piece of cling wrap over the top, and set a large plate on top:
Turn it over so the plate is now on the bottom:
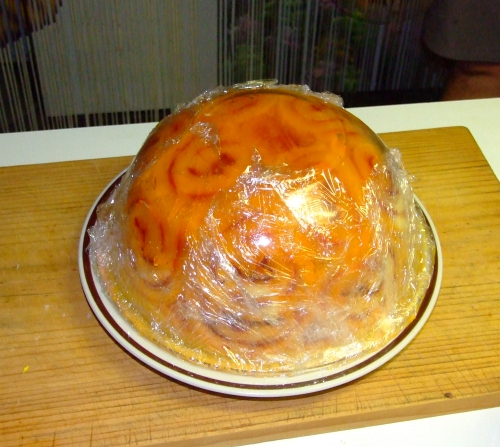
Put it in the fridge till dessert time. It's own weight will pack it down nicely after a few hours.
When you are ready to serve it, take it out of the fridge. Take the bowl off:
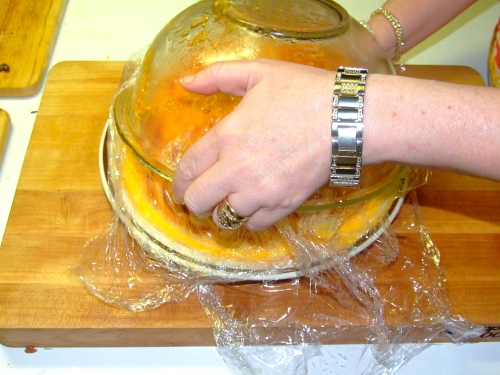
Remove the cling wrap too.

Get ready to slice and serve!

It holds together quite well:
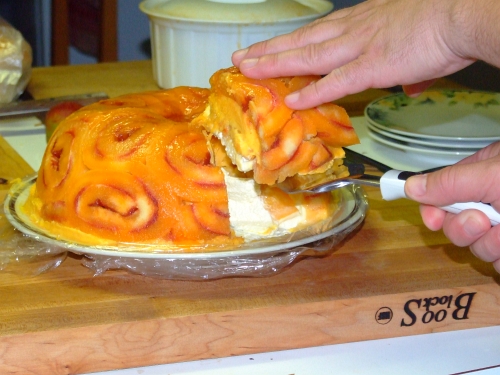
Mmmmmmmmmmmm...
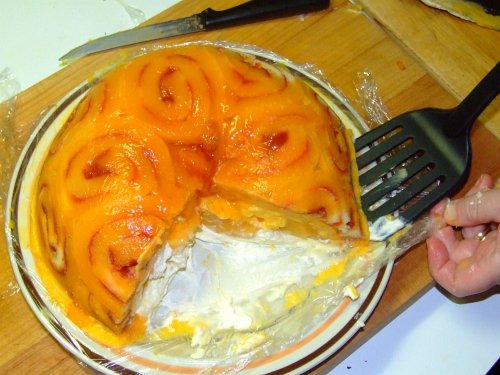
This piece is MINE! You can't have it so go make your own!
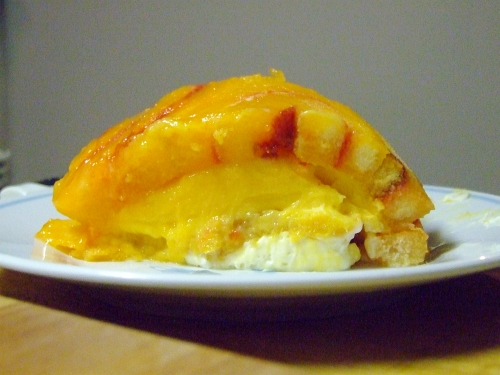
And don't forget to run an extra 20 miles the next day...
It's worth the time though. Drool...
All you need is a bit of jello mix, some whipping cream, custard powder mix, and a swiss roll (commonly called a jam sponge roll).
This is all you need:
The first thing you do is mix your jello according to the package instructions. And then let it cool. DO NOT LET IT COOL SO LONG THAT IT SETS!
Then line a really large glass bowl with cling wrap. It doesn't have to be pretty or neat:
Slice the swiss roll into 1 cm thick pieces:
and then line the bowl with the pieces.
Cut up the last two pieces to fill in the gaps:
Now you ladle your cooled but not set jello over the roll:
Make sure the sponge rolls are completely soaked in jello!
Now put it in the fridge overnight (or all day) to really set the jello.
Let's make the custard --it too goes in the fridge all day.
Add three times as much custard powder as the directions call for. Yes, it will be lumpy even after heating and stirring thoroughly. Remove from the heat and let it cool for 15 mins or so. It will look like you ruined the custard, don't worry.
Put the lumpy, ugly custard into a mixing bowl, pour in scant 1/2 cup of whipping cream and then beat the heck out of it with your electric mixer. See, all nice and purdy and really tasty now!
Put that bowl in the fridge overnight too.
The next morning...
The custard should be thick enough to paste to the inside of the jello-set spongecake:
Don't be afraid to use lots of custard!
Now put it back in the fridge for a few hours.
At around lunchtime open your can of peach slices and drain them really really really well.
Arrange them nicely in the custard thusly:
It's now time to whip the whipping cream! Once it's whipped so it's really thick then pile the whipped cream on!
Place a piece of cling wrap over the top, and set a large plate on top:
Turn it over so the plate is now on the bottom:
Put it in the fridge till dessert time. It's own weight will pack it down nicely after a few hours.
When you are ready to serve it, take it out of the fridge. Take the bowl off:
Remove the cling wrap too.
Get ready to slice and serve!
It holds together quite well:
Mmmmmmmmmmmm...
This piece is MINE! You can't have it so go make your own!
And don't forget to run an extra 20 miles the next day...
Subscribe to:
Posts (Atom)