Sunday, April 29, 2012

ANZAC Biscuits

DSCF0023

Dang, I wanted to write up the recipe for the onion/garlic gratin I made last night, but I realised I'd better get this ANZAC bikkie recipe up before it gets even FARTHER past ANZAC Day.

Me? Procrastinate? Nevah!

A quick notice to my American readers; biscuits do NOT mean what you think they mean. Down here in Oz (and in the UK) bikkies (slang for biscuits) are what Americans know as "cookies". And what Americans know as "biscuits" are what Aussies (and POMS) know as "scones".

Yes, the first time I told the family down here I was making Biscuits n Gravy for dinner I received some rather peculiar looks.

So if you are in the US, think of these as ANZAC cookies!

And for you longtime Aussies, these are NOT the hard, break-your-teeth, thin bikkies that are still in an "edible" state after almost 100 years. These are soft, chewy, delectable bikkies that won't last 100 minutes as they will all be devoured as soon as they are cooled!

I found this recipe in a mailer from me local member of Parliament regarding the ANZAC celebrations. It was originally credited to a certain Mr Bob Lawson who was at the landing in Gallipoli all those yonks ago.

I'm guessing that Bob was a cook with the ANZACs and wanted to come up with a slightly more palatable version of the ANZAC wafers they were being served. A bikkie that could perhaps be used for something besides scrapping mud off the bottom of you boot perhaps.

The recipe didn't specify what type of sugar to use so I, of course as always, used raw sugar. That's probably more in keeping with the times back then than today's highly refined gunk referred to as "sugar".

Even if you don't like coconut or oats in your bikkies (cookies) make sure you include them as these are the most absolutely BESTEST tasting cookies or bikkies EVAH!

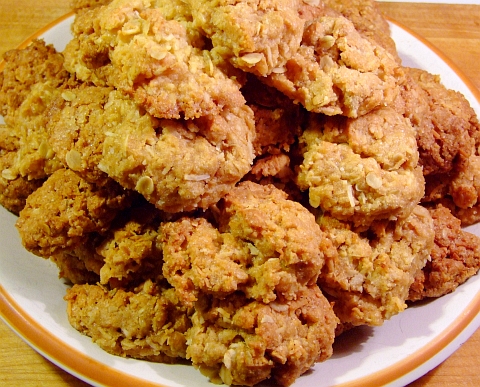
ANZAC bikkies (cookies)

What you need to make 25 to 30 bikkies:
1 cup flour
1 cup raw sugar
1 cup rolled oats
1 cup shredded, dessicated (fancy word for "dried") coconut

1/2 stick of slightly softened butter --no, DO NOT use margarine!
1 tbsp golden syrup (treacle) You can use molasses, but DO NOT use corn syrup!

2 tbsp boiling water (H2O)
1 tsp bi-carb (baking soda)

What you do:
Grease up a coupla baking sheets. I use butter. Preheat your oven to 180C which is about 356F.

Stir the dry stuff together in a mixing bowl. That's the first four (4) ingredients on the list.

In a separate bowl, mix the butter and golden syrup together. A large spoon should do the trick nicely.

Combine the boiling water with the bi-carb then immediately add to the butter/syrup mix. Stir quickly to combine.

Pour the contents of the butter etc mix into the bowl that has the dry ingredients. Mix with a strong, solid wooden spoon. Feel free to drizzle in a bit of hot water if it's too dry.

Grab a ping-pong sized ball of dough and plop it on a buttered baking tray. Continue till all the dough is on the trays. Make sure you leave plenty of room for spreading as these will soften and spread.

Bake for 10 to 12 minutes. When they start to brown around the edges they'll be done. Remove the trays from the oven and let the bikkies cool for about 10 minutes before you put them on a cooling rack. Trust me on that!

These bikkies are powerhouses of calories and energy! Seriously, if you aren't going on a 200 km bike ride immediately then I wouldn't suggest eating more than 2 or 3 at a time. Of course the fact that they taste sooo darned delicious may make that difficult!


DSCF0023
Full disclaimer: I had 13 of these for dessert the day I first made them. Ummmm, I didn't need to eat the next day, that's for sure!

Saturday, January 14, 2012

Easy Flour Tortillas WITHOUT Lard or Shortening!

DSCF8071

And these are SOOOOOO easy to make. They're ultra-easy if you have a tortilla press, but still very easy if you only have a rolling pin.

Very tasty, nice and flexible, and if you are vegetabletarian or even vegan these will be perfect for you!

The key is, of course, to use olive oil. Lots an lotsa olive oil! These tortillas are so healthy you won't feel at all bad having 5 or 6 homemade burritos in one sitting!

One caveat to add though: These are not Tex-Mex flour tortillas. It seems Texans for some reason like their tortillas slightly "foofy". That means they add a leavening agent, usually a bit of baking powder, to their tortillas. I personally don't like that for tortillas, as I prefer more of a traditional Mexican tortilla but without the lard and without the modern addition of shortening.

So, here's whatcha need and here's whatcha do:

What you need:
2 cups plain, unbleached flour (or 1 wholemeal and 1 plain)
1/4 to 1/2 tsp sea salt
2/3 cup (Yes, TWO-THIRDS!) extra virgin olive oil
just under 2/3 cup (call it halfway betwixt 1/2 to 2/3 cup) water (H2O)

What you do:
This is pretty simple. Mix everything together in a bowl, knead it for a few minutes till it's a dough. Cover with plastic wrap and let it rest for 30 minutes.

Divide your dough into 6 pieces. The easiest way to do this is to roll/shape the dough into a tube, slice it in half, then cut each half into thirds. Although I'm sure you could have figured that out on your own, right?

If you have a 12 inch tortilla press, then you just, ummmmm, ahhhhhh, make your tortillas!

If you only have a 6.5 inch tortilla press (like me) then you still press out the tortillas and then finish them to 12 inches with a rolling pin.

If you have neither, then just roll em out to 12 inches in diameter.

When you stack up the uncooked tortillas make sure you put wax paper or a tea towel betwixt each tortilla.

For "cooking" the tortillas the best cooking implement to use is a large, well-seasoned, cast-iron fry pan. A thick-bottomed stainless steel one will work just fine too.

Once your fry pan is heated up on your stovetop then you just "cook" the tortillas for 20 to 40 seconds a side, only flipping once. Pile up all six, then spread them out on a board to cool for a few minutes.
DSCF8071

Once they are cool enough to handle easily but still warm you want to put them into a plastic bag for 15 minutes.
DSCF8070

Take the tortillas out of the bag to finish cooling completely and you'll find they nice and flexible and won't tear no matter how much good filling you stuff into them and wrap up!
DSCF8066

Load em up with whatever you want! Beans, veggies, shredded seasoned meat, souvlaki fixings, etc. I'm sure you can figure out what to do with them.

Don't worry about how long they'll keep in the fridge, they'll all be eaten in one day -possibly two if you are on your own.

Saturday, January 7, 2012

Maggie's Creamy Vegetarian Pepper Pot Soup

DSCF7784

I have fun trading recipes, cooking tips n tricks, ingredients substitution, etc on twitter. One of my most wonderfullest twitter mates is named Maggie. She's a vegetabletarian but she also puts my meatiness recipes on her daily paper.

The other day (month!) we were chatting about soups and she said she'd send me her pepper pot soup recipe.

Of course I had to make it!

And of course I had to change it around a bit! Why? Cuz I didn't have all the ingredients at hand so I subbed a couple of items. I also changed the amounts a bit as I was only making it for myself.

She later told me that she herself had modified the original recipe from the person she received it from! Hey, all's fair in the kitchen mates!

Here is her original ingredient list plus directions:

PEPPER POT SOUP

2 Cups Water
2 Cups Veggie Stock
2 Good Sized Potatoes, Shredded
2 Medium Carrots, Shredded
2 Celery Stalks, Chopped fine
2 Medium Onions, Chopped fine
1 Green Pepper, Chopped fine
½ Cup All-Purpose Four
2 tsp Salt
½ tsp Pepper, fresh hand milled
1 Cup Water
6 Cups Milk

Mix first 7 ingredients together in a large saucepan. Bring to boil. Cover and simmer for 20 minutes. Mix flour, salt, pepper, and 1 Cup Water together in a small container until no lumps remain. Stir into the simmering soup to thicken it slightly. Add milk. Heat through. Check for seasoning.

Makes 12 ½ Cups

Not being one to take directions too well, I decided to make a few changes based upon why I had on hand. And remember, I was only wanting to end up with 6 to 8 cups. Here's what I came up with:

Maggie's Modified Vegetarian Pepper Pot Soup


1 Cup Water
2 Cups Veggie Stock
1 Good Sized Potato, Shredded
1 Medium Carrot, Shredded
1 Bok Choy, rough chopped, leaves included
1 Medium Onion, Chopped fine
1 Red Bell Pepper, Chopped fine
1 Handfull of fresh Rocket (the peppery kind)
A few fresh basil leaves, rough chopped.
A few fresh coriander leaves (cilantro to North Americans)
½ Cup All-Purpose Four
2 tsp Salt
½ tsp Pepper, fresh hand milled
1 Cup Water
2 Cups Milk

DSCF7774

DSCF7777

I mixed first 10 ingredients together in a large saucepan and brought it to a boil.

It was then covered and simmered for 30 minutes.
DSCF7780

Then the flour, salt, pepper, and 1 Cup Water were whisked together and that slurry was stirred into the simmering soup as a thickener and a spicy-er.

DSCF7782

The milk was added and the soup was brought back up to temperature.

DSCF7783

I checked to see if it needed any more seasonings (like salt) and I added a pinch of sea salt.

And it of course looks great in a bowl!
DSCF7784

I of course just had to make one little, itsy, bitsy, teeny, tiny final adjustment...


Fresh grated Parmesan!
DSCF7785

The soup was very very tasty, I thoroughly enjoyed it. And you can all thank Maggie up in Canada for sending me the recipe!

Monday, December 12, 2011

Deep Fried Zucchini Fingers

DSCF7787


These are so easy to make and oh so tasty! Don't worry if you don't normally like zucchini, you'll LOVE these!

AND you don't have to worry about salting n "sweating" the zucchini fingers. Why? Since they are deep fried any bitterness that may be in the zucchini (if it's not fresh) is gone during the cooking, woo-hoo!

These are breaded, not battered. The battered ones come out a bit on the soggy side I've found. However if you do have soggy battered deep fried treats, you can chuck 'em in a hot oven for a few minutes to crispy them up, no worries mates.

Alrighty then, let's get to the breaded zucc's.

What you need:

one zucchini
bread crumbs (around a cup should do)
1 tsp cumin powder (cuz I LOVE cumin)
1 tbsp (or so) of freshly grated Parmesan (cuz I LOVE Parmesan)
sprinkle of sea salt
one beaten egg

The oil you want to use for deep frying is something that'll take a good hot temp of around 400 to 425F. The two best for deep frying, in my opinion, are peanut oil and rice bran oil. Both are very healthy, have a very high smoke point, and aren't GMO.

What you do:

Add the bread crumbs, cumin powder, Parmesan, and a pinch of sea salt to a bowl
DSCF7788
and mix it all together!

Next, prepare your zucchini. Just cut each end off and rinse it, no need to peel it. Cut it in half, then halve each half lengthwise. Slice each halved half into finger sized pieces.

You should now have a bowl of seasoned bread crumbs, a bowl with a beaten egg (do I really need to tell you how to beat an egg? Thought naught) in it, and a small plate of zucchini fingers.
DSCF7790


Hopefully you remembered to light a fire under your oil before you started all this so you should have a wok with an inch of hot oil in it.

Put one fourth of the zucchini fingers into the egg, move around to thoroughly coat, put them in the bread crumbs and make sure they are well coated in the seasoned crumbs.

Carefully plop the breaded zucchini fingers into the oil without splashing any oil on you. Cuz, well, like, you know, that kinda like HURTS!

After around 45 seconds or so, give em a stir and turn. I suggest using tongs instead of your fingers BTW.

Once they are nicely browned, take them out of the oil and drain on paper towels. Continue deep frying in batches till they are all cooked.

A little sprinkle of sea salt and they'll be perfect! No dips are needed for these, trust me.

And don't they look delicious?
DSCF7794

Friday, December 2, 2011

Perfect Hard Boiled Eggs with pics and humor!

hb12


Hard boiled eggs. Yes, I wrote "hard boiled" instead of "hard cooked". Why? Cuz I can, that's why. And I'd never heard the term "hard cooked" until just recently.

Apparently there's a recent(?) move afoot to call them hard cooked instead of hard boiled. The method involves putting the eggs into cold water, bring the temp up to just boiling, cover, then turn heat off and let sit for a certain length of time.

Harumph, says I!

As long as the yolks are solid and there's no green tinge around the outside of the yolk then they're fine without doing some new-fangled cooking technique. So there.

BTW, that thar greenish tinge is not harmful and doesn't stink and doesn't taste like crud... it just looks like it!

But what is it? It's just iron sulfide formed when the iron in the yolk reacts with the hydrogen sulfide in the white. Oh, the hydrogen sulfide is what makes rotten eggs stink. It does the same thing to crude oil too!

Anyways, it's quite easy to make perfect hard boiled eggs that peel easily, never crack whilst cooking and have no iron sulfide formed around the yolk.

How is this done? Quite easily as it turns out. And since eggs are the original Meal Ready to Eat, you want to know how to cook them in their shells properly.

Here's how:

Dave's Perfectly Cooked Hard Boiled Eggs

What you need:
3 medium eggs
some water
salt
vinegar
some sort of slotted spoon/ladle type thingy
ice cubes

What you do:

Take the eggs out of the fridge for an hour before you'll be BOILING them. The shells are much less likely to crack if they aren't cold to start out.

hb01
Above is the eggs coming up to room temp. Eggsciting, eh?


Once the eggs have warmed up, get the water boiling (I'd suggest using a saucepan to contain the water), give it a sprinkle of sea salt and a splash of vinegar.

Why salt? It makes the eggs much easier to peel, that's why.
Why vinegar? If the eggs do crack, the vinegar will seal them up so none of your egg whites leak out.

Once the salted, vinegary water is boiling (here's a handy reference pic in case you don't know what boiling water looks like)
hb02
you want to very carefully load your room temp eggs into your slotted/holey spoon/ladle
hb03
and slowly walk across the kitchen to your boiling water without dropping any eggs!
hb04


Lower the eggs over the boiling water, but DO NOT IMMERSE!

hb05

Hold the eggs over the boiling water till condensation forms (20 to 30 seconds)

hb06

and then carefully lower the eggs into the boiling water

hb07
then cover the saucepan and set your oven timer for TWELVE (12, XII) minutes.

hb08


Whilst you are waiting for your eggs to finish cooking, you can prepare the ice water that you'll plunge them into to stop the cooking process.

hb09


Once your 12 minute oven timer beeps, turn off the heat and rinse the eggs under cold tap water for a moment, then plunge them into the ice water! Ker-sploosh!
hb10
If you omit this step, you will not halt the cooking process and the outer surface of your yolks Will. Be. Green.

After they've been in the ice water for 30 minutes then go ahead and chuck em in the fridge, use whenever you want them!

And you'll find that the shells practically fall off!
hb11


And of course the yolks will be perfect when you slice them:
hb12

Friday, October 14, 2011

Sticky Fingers Dessert! A Happy Accident!

Sometimes you do something in the kitchen without thinking about it and you end up with something miraculous. Usually this doesn't happen, but this happened to be one of those times when it did! So I'll share it with you, no worries.

Side note: I AM the Iron Chef of leftovers, as you'll soon see.

A few days ago I made my Award Winning* Beer Batter Waffles. I made enough so that there'd be some for lunch the next day.

I had forgotten that BIL would be out the next day and that MIL doesn't usually eat large lunches. I had some batter LeftOver! No dramas though, this is the point where I cook it all up in the waffle iron, chuck the finished ones in the freezer, then use em in the toaster for brekkie for the week.

This time though, I needed the large mixing bowl the batter was in to make The Dish that crowned me Iron Chef of Leftovers and I had already put the waffle iron away.

I casually reached into the cupboard and pulled out the first thing I found that would hold waffle batter. It happened to be a 9 inch diameter glass pie dish! No worries, poured in the batter, rinsed the bowl and proceeded to make The Dish.

Later on I puzzled over the fact that the waffle batter was in a pie dish. Hmmmm, I hadn't buttered the dish, no crust, and there wasn't too much --about 1.5 cm or just over 1/2 inch.

"I wonder how it'll bake like this," I thought. Next thing I knew I had chucked it into a cold oven, turned the heat to 180 C (350F) and went on to other tasks... completely forgetting to set a timer.

tick

tock

45 minutes go by and I notice a nice odor emanating from the cooker! Ah, memory is jogged!

As I took the waffle pie out of the oven I notice it had (quite predictably) foofed up whilst baking. I left it in the dish, set it on a cutting board, and continued with whatever it was I was doing.

In 10 minutes it had fallen back down to level. "Hmmmmm, maybe if I dust it with icing sugar they might actually eat it," I thought.

dust

dust

dust

cool

cool

cool

When it came time for dishing it up for dessert, it was very easy to cut, had a cheesecake-like texture, and had formed it's own bottom and top "crust"! See, here's proof:
DSCF6943


When Wifey-Poo saw it she said it'd be perfect with some maple syrup and cream on top! Ummmm, yes dear, that's exactly what I had in mind.**

So the beer batter waffle pie (which had been previously dusted with icing sugar) was cut into thin wedges and then had maple syrup and fresh cream drizzled over it.

Sticky Fingers Dessert was born!
DSCF6869


Yes, it tasted even better than it looks!

*dave is lying his *ss off, but they are darned good tucka!

**quick thinking on my part mates!


Stay tuned to this channel as next time dave learns how to boil water!

Sunday, October 2, 2011

Fried Parsnip Slices

Ah yes, the humble and venerable parsnip!

DSCF6117


This veggie has been known and eaten since antiquity. The ancient Romans considered the ones from what is now Germany but was then called Germanica to be the best. They were also a staple diet of the poor in the Middle Ages --that means prit-near everyone in Europe back then ate 'em! Parsnips were also used as a side dish to salted cod or smoked herrings as they complimented the strong fish flavours nicely.

They fell out of fancy as the ole humble spud from the New World gradually replaced them. Even to this day there are many that hate parsnips, probably from ingrained thinking over the last few hundred years.

There's one Aussie TV chef/personality who caused quite a stir (Ha! "A stir" get it?) a couple of years ago when he went on a bit of a rant against parsnips as they are starting to come into fashion down here in Oz. Says he wouldn't even feed 'em to a pig!

Believe or not Ripley, but until recently I'd never had a parsnip nor even knew what they looked like! I got a few kilos of them at a ridiculously low price a coupla months ago and asked via twitter what I should do with them.

Quite a lot of great suggestions I did receive. Curry was one of the suggestions but I didn't want to make that first as I wanted something that let the parsnip flavour speak for itself. So I went with the by far #1 suggestion of parsnip chips (fries)!

I even baked one batch and deep fried another to find out the taste difference. Not surprisingly, the deep fried ones tasted better. Well, at least to us! I made the baked ones the first day and we all thought they were tasty, even BIL who is a very fussy eater and doesn't eat many veggies. But the deep fried ones the next day were waaaaay better! The whole platter of them disappeared in under a minute.

Not that I was timing it though, too busy eating!

The key to baking or frying the parsnips is to slice them lengthwise making sure all slices have the same thickness. Otherwise thin strips will be burnt before the thick strips are done. After peeling the parnsips I contemplated how to do this.

"Duh," my brain said, "use a cheese slicer you moron!"

Wouldn't you know it worked great? Yes, my brain can be smart at times. Here's proof (of the procedure working, not my brain being smart)
DSCF6123


To bake them, toss the strips in olive oil, lightly salt them, and put them in a hot oven till they're crispy. They come out lookin', smellin' and tastin' good!
DSCF6128


For even better ones: deep fry them thar strips! Use the same temperature of oil as you would for fries, no worries. I recommend rice bran oil as it has a very high smoke point of 495 F and the fried food comes out light and crisp.

The strips fry up very quickly so keep a close eye on them else you'll end up with burnt strips of crud. So don't go tweeting while deep frying!

Here's what the first round out of the wok (my deep fryer) looked like:
DSCF6188

Just a quick sprinkle with salt and then EAT THEM!