This post originally appeared in my other blog about 2 and a half years ago. It was about vegemite and olivemite. Keep in mind at that point in time I'd never heard of olive tapenade, ahem. I've taken the parts out of the post that don't pertain to food, and I've softened the edges of some not-so-nice words.
Happy Little Vegemite!
Vegemite... I'm sure all of you up in the "other hemisphere" have heard the term: Vegemite
There was a telly commercial yonks ago down here with a couple of happy, sappy ankle-biters singing a song,"...We're happy little vegemites..." It was in black and white so down here that means in the early '80's. Not really, 50's I believe.
In case you are interested, Kraft (tm) now owns Vegemite. They were going to try to compete with it down here with their own version, but they just decided to buy the company and keep the name and recipe as Vegemite. Pretty darned shrewd marketing, eh?
So, like what the hell is Vegemite? Yes, I heard you ask that! Not only can I see in the dark, but I can peer into cyberspace too.
Vegemite is "Concentrated Yeast Extract". And it's a dark brown colour (color). And it has a VERY strong flavor (flavour). And it's "one of the world's richest sources of Vitamin B". And it has a VERY strong flavour (flavor). Did I mention that it is strong tasting?
It should be used as a spread on toast or a sandwich (usually with butter --in fact, the butter in our butter dish has brown streaks in it... FROM THE VEGEMITE YOU PERVERTS!!!!) It should not be used as a "dip" as some dipsticks in the US do when they are first presented with a jar of Vegemite. If you use it as a "dip", then you will HATE it for the rest of your life and all of your future lives too. Forewarned you are.
Remember all the stuff about Vegemite earlier? Well, this is called Olivemite. As much as I'd like to take credit for the name, I can't. A few months ago myself and The Most Wonderful Woman In The Entire World were driving through Mclaren Vale --it's a great place, over a hundred wineries right at the doorstep! Take a note, dave: blog about wineries soon.
Anyways, we stopped at an olive shop to get some specialty olives and we noticed they had a jar of something labeled Olivemite. It was bloody-well GREAT! Bought some --wee-hoo! Had a look at the ingredients later on and I thought to myself, "Dang, I can make that! And it won't cost much either."
So, here is how to make dave's Olivemite
What you need:
200 grams (just under a cup) of pitted Kalamata Olives***
1-2 heads roasted garlic
olive oil
*** Don't use regular black olives... It will taste like shit (seriously, I tried!) if you do --you've been warned
What you do:
This is simple. Chuck it all into a food processor and process it till it's done. The more olive oil you add the creamier it is.
Your taste buds will thank me for this one, guaranteed.
Here's a little something I've just added that's not in the original post: to turn the olivemite into olive tapenade, just add a bit of lemon juice, a few capers, an anchovy fillet (or a bit of anchovy paste) to the food processor, no worries. A bit of ground black pepper if you'd like.
There are as many ways to make olive tapenade as there are provinces that border the Mediterranean Sea --that's where it's from, BTW. So don't think that mine is THE way to make it cus there are literally hundreds of authentic olive tapenade recipes. Have fun and experiment! I'd be trying some tarragon first.
Tuesday, March 31, 2009
Monday, March 23, 2009
Bread Baking Tip
Firstly, let me apologise for not having a recipe up for a while. It's been... ummmmmm... busy down here lately.
There are several recipes that I've been meaning to put up, and I also want to put my homebrewing hijinks here too.
In the meantime (or at least today) here's a tip to make really soft bread. Or rolls, or whatever bread-like substance you happen to put in the oven.
Fill up a small pie dish (or something similar) with hot water. Put it on the lowest rack of your oven and preheat the oven. Once the oven is preheated, then put in your bread or rolls.
Ultra soft crust! And a very nice texture too. I've been doing this for the past few months and M-I-L, B-I-L, and Wifey-Poo won't have the bread any other way now.
Friday, March 6, 2009
Wasabi Mayonnaise
Mayonnaise... Ahhhhh what great and wonderful stuff it is... mmmmmmmm, drool...
Did you know that originally mayo was made with garlic? Yup! I do like mine that way since I use a LOT of garlic (Vlad will not get me, HA!) when cooking anyways. Now, it's just hearsay, but the story goes that mayo was made in France with garlic. But when one particular Cardinal came to power he decreed NO garlic in mayo. He hated garlic. Something tells me he wasn't *really* French.
Anyways, that's just what I heard yonks ago and have absolutely no idea if it's correct or not.
There's also two conflicting versions of the origins of mayo, and I really don't feel like (or have time to) check wiki and sift through the references. Why don't I have time right now? Cus I'll be cooking a batch of pappadams in less than 5 minutes so I'd better get a move on.
Now I know that you could just open up a jar of mayo and add a squeeze of wasabi paste (mmmmmmmmm... wasabi...) and call it good. But if you did that then you'd be getting all the preservatives and chemical crap from the jar of mayo. And that's what we're trying to avoid.
BTW, this calls for egg yolks. Make sure you save the egg whites for meringue. Oh, the chooks down here aren't fed growth hormones either.
Wasabi Mayo
What you need:
2 egg yolks
2 tbsp lemon juice
2 tsp wasabi paste (or more!)
1/2 cup olive oil
What you do:
Chuck everything but the olive oil in a small food processor. Process on low for a min or two. Then slowly add the olive oil while the processor is running.
Hey, now just how darned easy was that? Of course, you can add any sort of other herbs or spices you want, but the wasabi paste pretty much makes the taste and I've found other additions to be a waste as they don't really come through flavour-wise.
Enjoy!
I'm off to fry a batch of pappadams to have with tonight's Mango Chicken Curry. Ta.
Sunday, February 22, 2009
Stuffed Chili Peppers
And if you are in Aus, it's Chilli. With two "l"s...
Before I let you know about how I stuffed the chili's and how they were cooked, let me reply to my massive fan club (all 3 of you , thanks!) about my question of what to do with the chili peppers I got.
Suzer: Yup, chili was on the agenda. In fact that'll be tonight's dinner. I just picked up 5 pounds of lamb off-cuts for a dollar yesterday. This morning I seared the fat and it's in a big pot of boiling water. I'll get more than enough meat for the chili, plus some good skimmed fat for cookin', and then a load of lamb stock for soup. The chili should come out to around 60 cents a serve, cool. Hmmmmm, lamb chili... I'll let you know how it tastes. Oh, I was planning on roo chili (like you suggested) but couldn't pass up the lamb deal.
You should be glad you won't be here later this week as it'll be back in the 40's for a couple of days; definitely pool weather :)
RunninL8: Pizza... drool... We have it about once a week. Thanks for the dough recipe, it's almost exactly the same as mine except I don't put the herbs in the dough cus someone here (BIL) doesn't like it like that. I think it's very cool that there's still folks in the US (sorry, Alaska) that make traditional Italian pizza, very very healthy and tasty. How many blokes do you know who have 2 pizza stones and use them regularly? They're great for cooking biscuits and some breads on too :)
The pizza last night was a bit of sauce (tomato, herbs, garlic), cheese, lots of peppers, a bit of bacon, shrooms, and smoked oysters. It was gooooood... BTW have you ever had a BBQ Roo pizza?
OT for runninL8: WP is a solitary, so is MIL (she's been reading runes for over 80 years), and BIL is a wiccan who chairs the local Uni religious centre.
Arvay: When you eat spicy food in hot weather it actually cools you off. Why? Cus all them spices dilate your capillaries so you blow off heat. Most cultures in hot climates have been doing this millenia before a/c was invented. It's cheaper too :) And tastier :)
I did stuffed chilli's for two nights in a row as a side dish for 3 of us (BIL is a wussy food weenie) so we obviously were on the same wavelength. Yes, cheese was involved :)
Ricotta Stuffed Chilli Peppers!
Mmmmmmmm, tasty and tangy.
Here's what the chilli's look like:
On a scale of 1 to 10; with a bell pepper (called a capsicum down here in Oz) being zero, a jalepeno being a 4, a habenero (sp????) being 8, a thai chilli being 8.5, and the ungodly horror that grows in India (your fingers blister if you touch it and eating one seed of it will leave your mouth in agony for up to half an hour) being 10 zillion gajillion; I'd say these come in around 1 or 1.5. In other words, not very spicy at all, but just enough to taste it.
Take two of the peppers, slice them lengthwise, take out the membrane and seeds. Next, mix 1/2 to 3/4 cup of ricotta cheese with a tsp of sea salt, 1/2 tsp dried mint, 1/2 tbsp of dill weed, and 2 tsp of corn starch (called corn flour down in Oz).
Place the halved chillis on a baking tray and fill with the ricotta mix. Then generously sprinkle bread crumbs over the top of each (there'll be four!) and pat them down a bit. Sprinkle with sea salt and ground cumin powder. Drizzle with a bit of olive oil.
Then bake them suckers! Around 180 C (350 F) for 15 to 20. Then turn the heat up to 220 C (425 F) for a couple of mins to crispy up the top. You'll know they're done with the tops are crispy but not burned.
Makes a great side dish, each person gets one of the halved chillis to go along with whatever else you are making for dinner.
Wednesday, February 18, 2009
A Call for HELP!
I need some input from all 4 of my ever faithful readers. See, when I'm out grocery shopping it's pretty darned hard for me to go past a really damned good bargain.
See, here's proof:
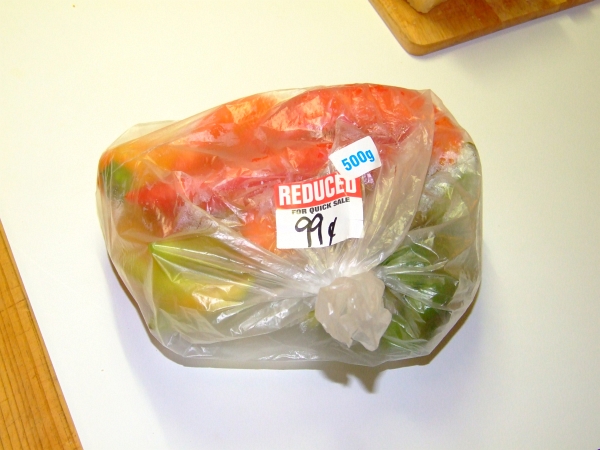
That's 99 cents aussie for 500 grams, or equal to 72 cents US per pound. But just what's in the bag? Glad you asked:
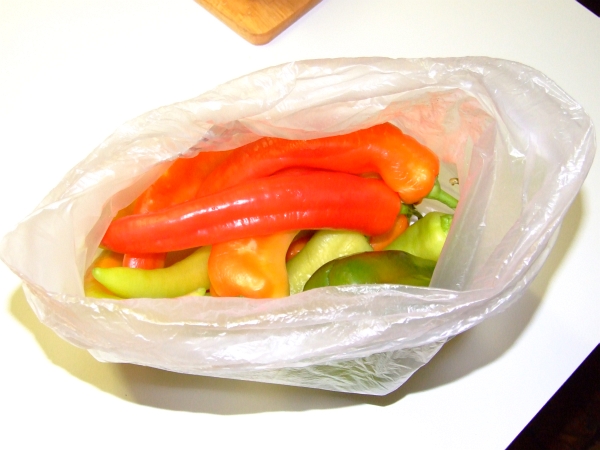
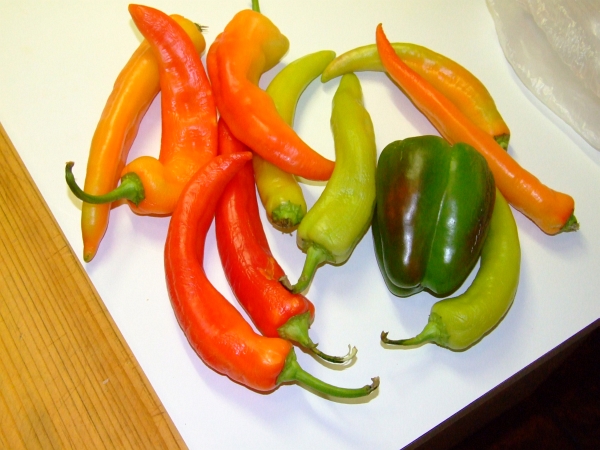
Lots and lots of chil(l)i peppers! Well, ok, there was one capsicum (bell pepper) in the bag too. See, here they are all spread out:
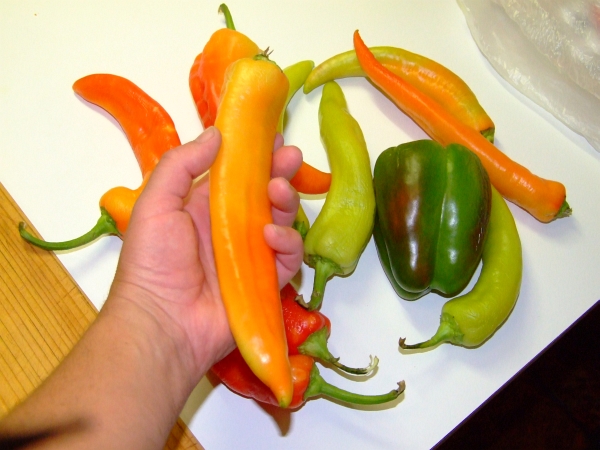
These suckers are pretty darned big:
Now, I've got many ideas as to what to do with them. In fact one of them will be used as my side dish to the Malaysian Squid & Prawn Curry I'll be making for dinner. Ummmm, the other folks in the house are treating these puppies like they are toxic! Well, that's one way to get them out of my kitchen, eh?
So, what's y'alls ideas? Any suggestions? I'll be pickling at least one, and drying the bell pepper, btw.
Chili Relenos (sp????) come to mind... does anyone have a good batter for that dish?
See, here's proof:
That's 99 cents aussie for 500 grams, or equal to 72 cents US per pound. But just what's in the bag? Glad you asked:
Lots and lots of chil(l)i peppers! Well, ok, there was one capsicum (bell pepper) in the bag too. See, here they are all spread out:
These suckers are pretty darned big:
Now, I've got many ideas as to what to do with them. In fact one of them will be used as my side dish to the Malaysian Squid & Prawn Curry I'll be making for dinner. Ummmm, the other folks in the house are treating these puppies like they are toxic! Well, that's one way to get them out of my kitchen, eh?
So, what's y'alls ideas? Any suggestions? I'll be pickling at least one, and drying the bell pepper, btw.
Chili Relenos (sp????) come to mind... does anyone have a good batter for that dish?
Sunday, February 8, 2009
Chili Cherry Chutney
There are literally an infinite numbers of chutney recipes. You can pretty much do anything with a chutney you'd like.
Now, some chutney enthusiasts insist on a few certain ingredients and a specific way of making said chutney.
This. Recipe. Is. NOT. For. Those. Folks.
This is one you can make easily and only has a few things in it. I came up with it after we came back from Belair with 2.5 kilos of fresh, wild, tart, just barely ripe cherries. I was planning on making cherry syrup and cherry jam only. However, I kept back a couple of ladles of the syrup to experiment with... This was then born:
Dingo Dave's Excellent Chilli Cherry Chutney.
I've reconfigured the amounts --are YOU really gonna have access to five and a half pounds of cherries? Thought not. This should be sufficient make a chutney that'll fill a small salsa sized jar, about two cups.
Here's what you need:
200 grams fresh, tart cherries
1 cup of raw sugar
2 to 4 cups water
1 or 2 fresh Thai chilli peppers (them little, red, skinny ones that are about 2 inches long and are really really really hot)
small handful of finely minced onion
1 clove of crushed garlic (or 1 tsp of prepared garlic)
Here's what you do:
Give the cherries a good rinse and remove the stems. Give each cherry a quick slice partway through --don't pit them, just give each one a little slice so that as they cook all the cherry goodness is released.
Put the cherries and the sugar in a stainless steel saucepan and then add enough water to cover the cherries plus about an extra inch of water for cooking down.
Cover the saucepan and put it on low heat. Give it a stir every 5 minutes of so. If the water has cooked down the the cherries haven't turned to pulp, then just add a bit more water. This'll take 20 to 40 mins depending on your stove-top. You should end up with around 2 cups of really good tasting cherry syrup.
Now you get to strain it! This is a lot easier than you think. Pour the liquid, pulp, and pits into a fine metal seive --Ummmmm,make sure it's over a bowl cus the syrup in what you want! Now instead of trying to use a spatula or spoon, just put your fingertips into the pulp and pits and start stirring it around in the seive with your fingertips juuuuuust grazing the seive. Waa-La! 20 seconds later all the syrup is extracted from the pulp and pits.
This cherry syrup also makes a great ice cream topping, but we're gonna add some goodies to it!
Slice each chili pepper in half lengthwise and remove the seeds (but don't toss them out). Finely mince the chilli pepper flesh and then add them and the whole seeds to the cherry syrup. Add the minced onion and the garlic. Give it a good stir and let it sit while you sterilise your jar and lid.
I usually just use boiling water to sterilise my storage jars. It's, ummmm, not difficult.
Once the jar (and lid) have been out of the boiling water long enough for you to handle the glass with your hands (but still pretty warm), it's then a good time to pour the chutney in. Make sure you seal the jar tightly!
In about 30 minutes the sealed jar should be cool enough to put in the fridge --NOTE: if you are doing this in the aussie summer heat you'll put it in the fridge but if you are anywhere else just put in it your pantry.
Put it waaaaaaaay in the back and forget about it for a month.
After a month, this will taste soooooo good! You can dip crackers in it, potato chips, pappadams, corn chips or whatever. Pour it onto your morning toast! Guaranteed to wake you up.
Once you've opened it, then make sure you refrigerate it (if you don't polish the whole thing off in one sitting.
It also makes a great marinade for roasts, chickens, lamb, fish, whatever. Just remember to keep it covered in the cus the sugar will caramelise and you don't want it to burn.
THIS IS NOT A JOKE POST! THIS IS GREAT STUFF! Trust me, eh?
Thursday, February 5, 2009
Chocolate Log Cabin Part 4
This is the Fourth and Final Fragmented Featurette of the saga of Dingo Dave's Chocolate Log Cabin, at the end of Year 4705.
I'm sure y'all will be looking forward to my next entry. Chilli Cherry Chutney!
But in the meantime, how's abouts we add some ice and snow to that thar cabin we wuz werkin' on last time. Remember though, if you've just stumbled into this blog and are totally lost, then read these: Cabin part 1, cabin part 2, and cabin part 3.
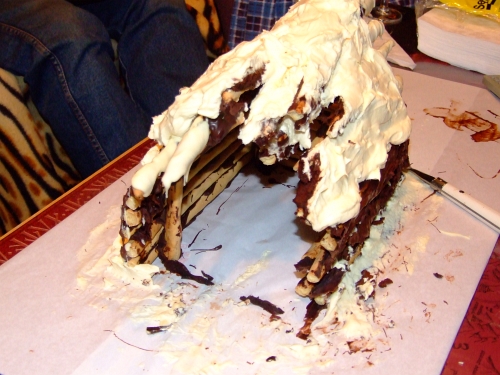
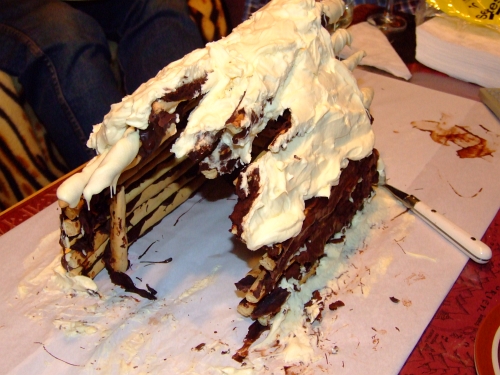
Ok: icycles!
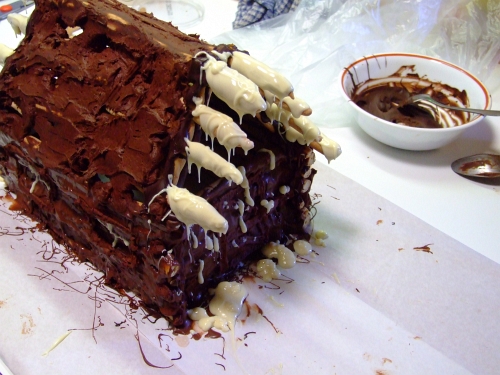
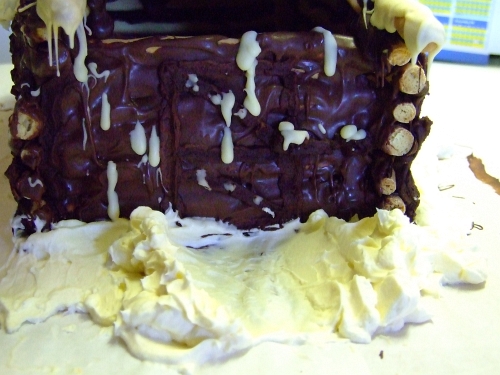
You'll need about 1/2 pound of white milk chocolate. Melt it in the nuu-queue-lerr machine (microwave) as per instruction in part 2. And then (this is the important part) let it cool till you can juuuuust stir it. Otherwise the icycles won't form when you spoon it onto the over-hanging roof rafters.
See, this is what I mean:
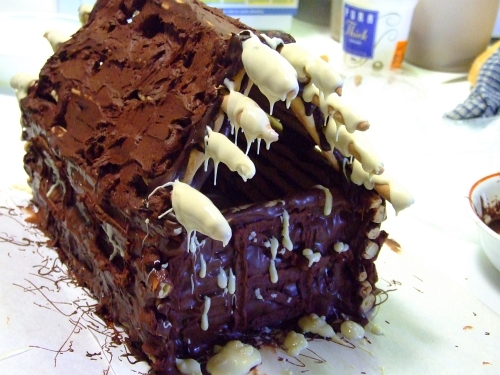
And don't worry about any "ice" on the "ground" around the cabin, it just makes the snow taste good!
And make sure you get the back rafters too

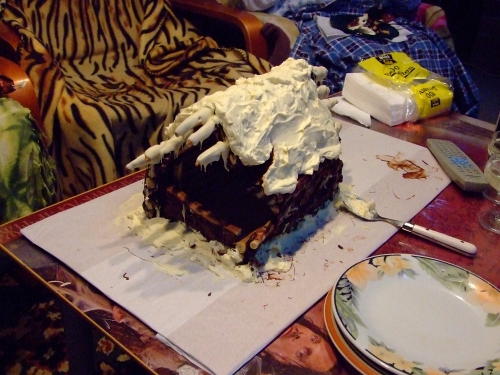
It's now time to make it snow! This involved a litre and a half of heavy whipping cream, one cup (or so) of raw sugar, and then the heck beat out of it until it was very stiff! Here's a pic of the bowl in front of the cabin:
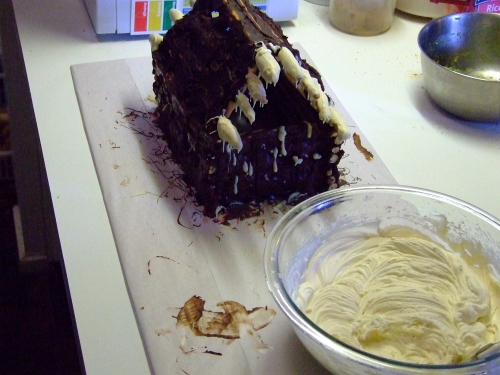
Then slather the snow over the roof using a flexible rubber spatula
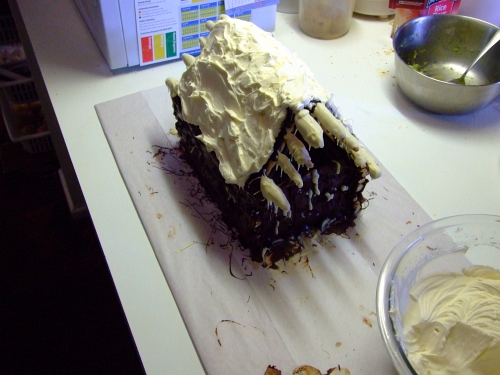
Pile the leftover "snow" around the outside of the cabin
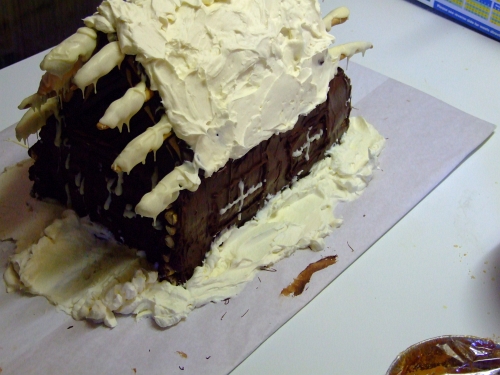
And don't forget to shovel out the front door!
Next time I'll use a lot more cream! I'll make a whole snowfield around the cabin, a woodpile, a chimney, a dog yard, and (of course) an outhouse. Stay tuned for that!
It was then time to eat this sucker! It took the four of us chocolate lovers 2 and a half days to polish it off. Mmmmmmmmmm...
Here's some pics of the carnage:
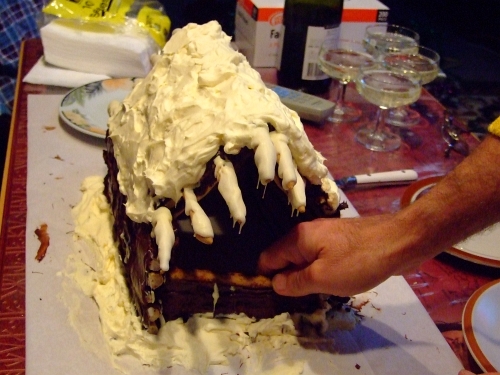
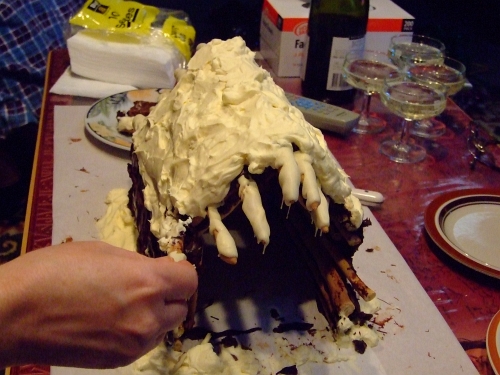
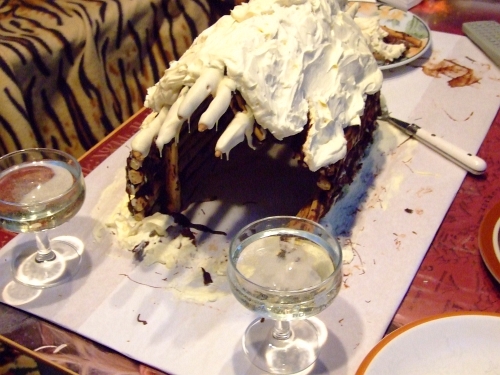

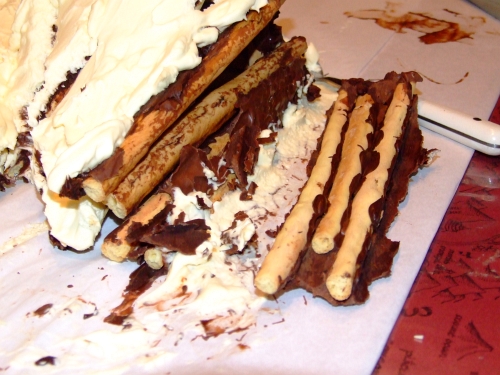
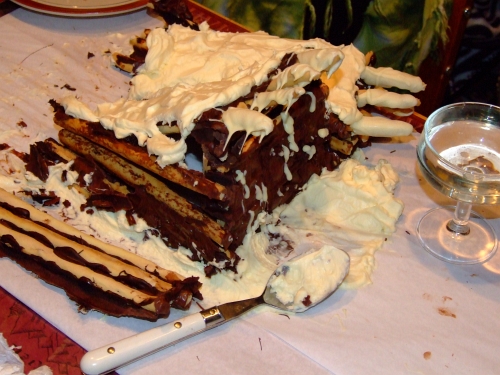
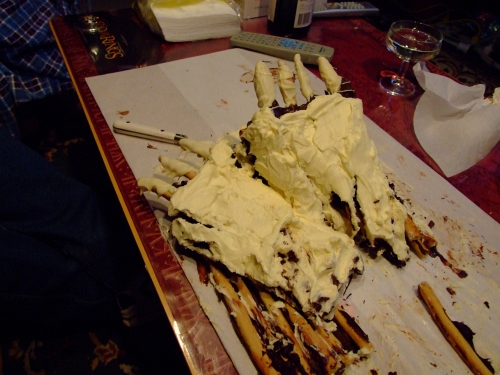
Mmmmmmmmmmm... chocolate... mmmmmmmm...
I'm sure y'all will be looking forward to my next entry. Chilli Cherry Chutney!
But in the meantime, how's abouts we add some ice and snow to that thar cabin we wuz werkin' on last time. Remember though, if you've just stumbled into this blog and are totally lost, then read these: Cabin part 1, cabin part 2, and cabin part 3.
Ok: icycles!
You'll need about 1/2 pound of white milk chocolate. Melt it in the nuu-queue-lerr machine (microwave) as per instruction in part 2. And then (this is the important part) let it cool till you can juuuuust stir it. Otherwise the icycles won't form when you spoon it onto the over-hanging roof rafters.
See, this is what I mean:
And don't worry about any "ice" on the "ground" around the cabin, it just makes the snow taste good!
And make sure you get the back rafters too
It's now time to make it snow! This involved a litre and a half of heavy whipping cream, one cup (or so) of raw sugar, and then the heck beat out of it until it was very stiff! Here's a pic of the bowl in front of the cabin:
Then slather the snow over the roof using a flexible rubber spatula
Pile the leftover "snow" around the outside of the cabin
And don't forget to shovel out the front door!
Next time I'll use a lot more cream! I'll make a whole snowfield around the cabin, a woodpile, a chimney, a dog yard, and (of course) an outhouse. Stay tuned for that!
It was then time to eat this sucker! It took the four of us chocolate lovers 2 and a half days to polish it off. Mmmmmmmmmm...
Here's some pics of the carnage:
Mmmmmmmmmmm... chocolate... mmmmmmmm...
Subscribe to:
Posts (Atom)